
The undead completed their new musty home without major incidents (only two groups of adventurers had to be driven off). In part I of this tutorial the basic layout of the Crypt was created, featuring natural stone walls and stone slabs. Part II focused on vegetation, such as vines, moss, mushrooms and roots.
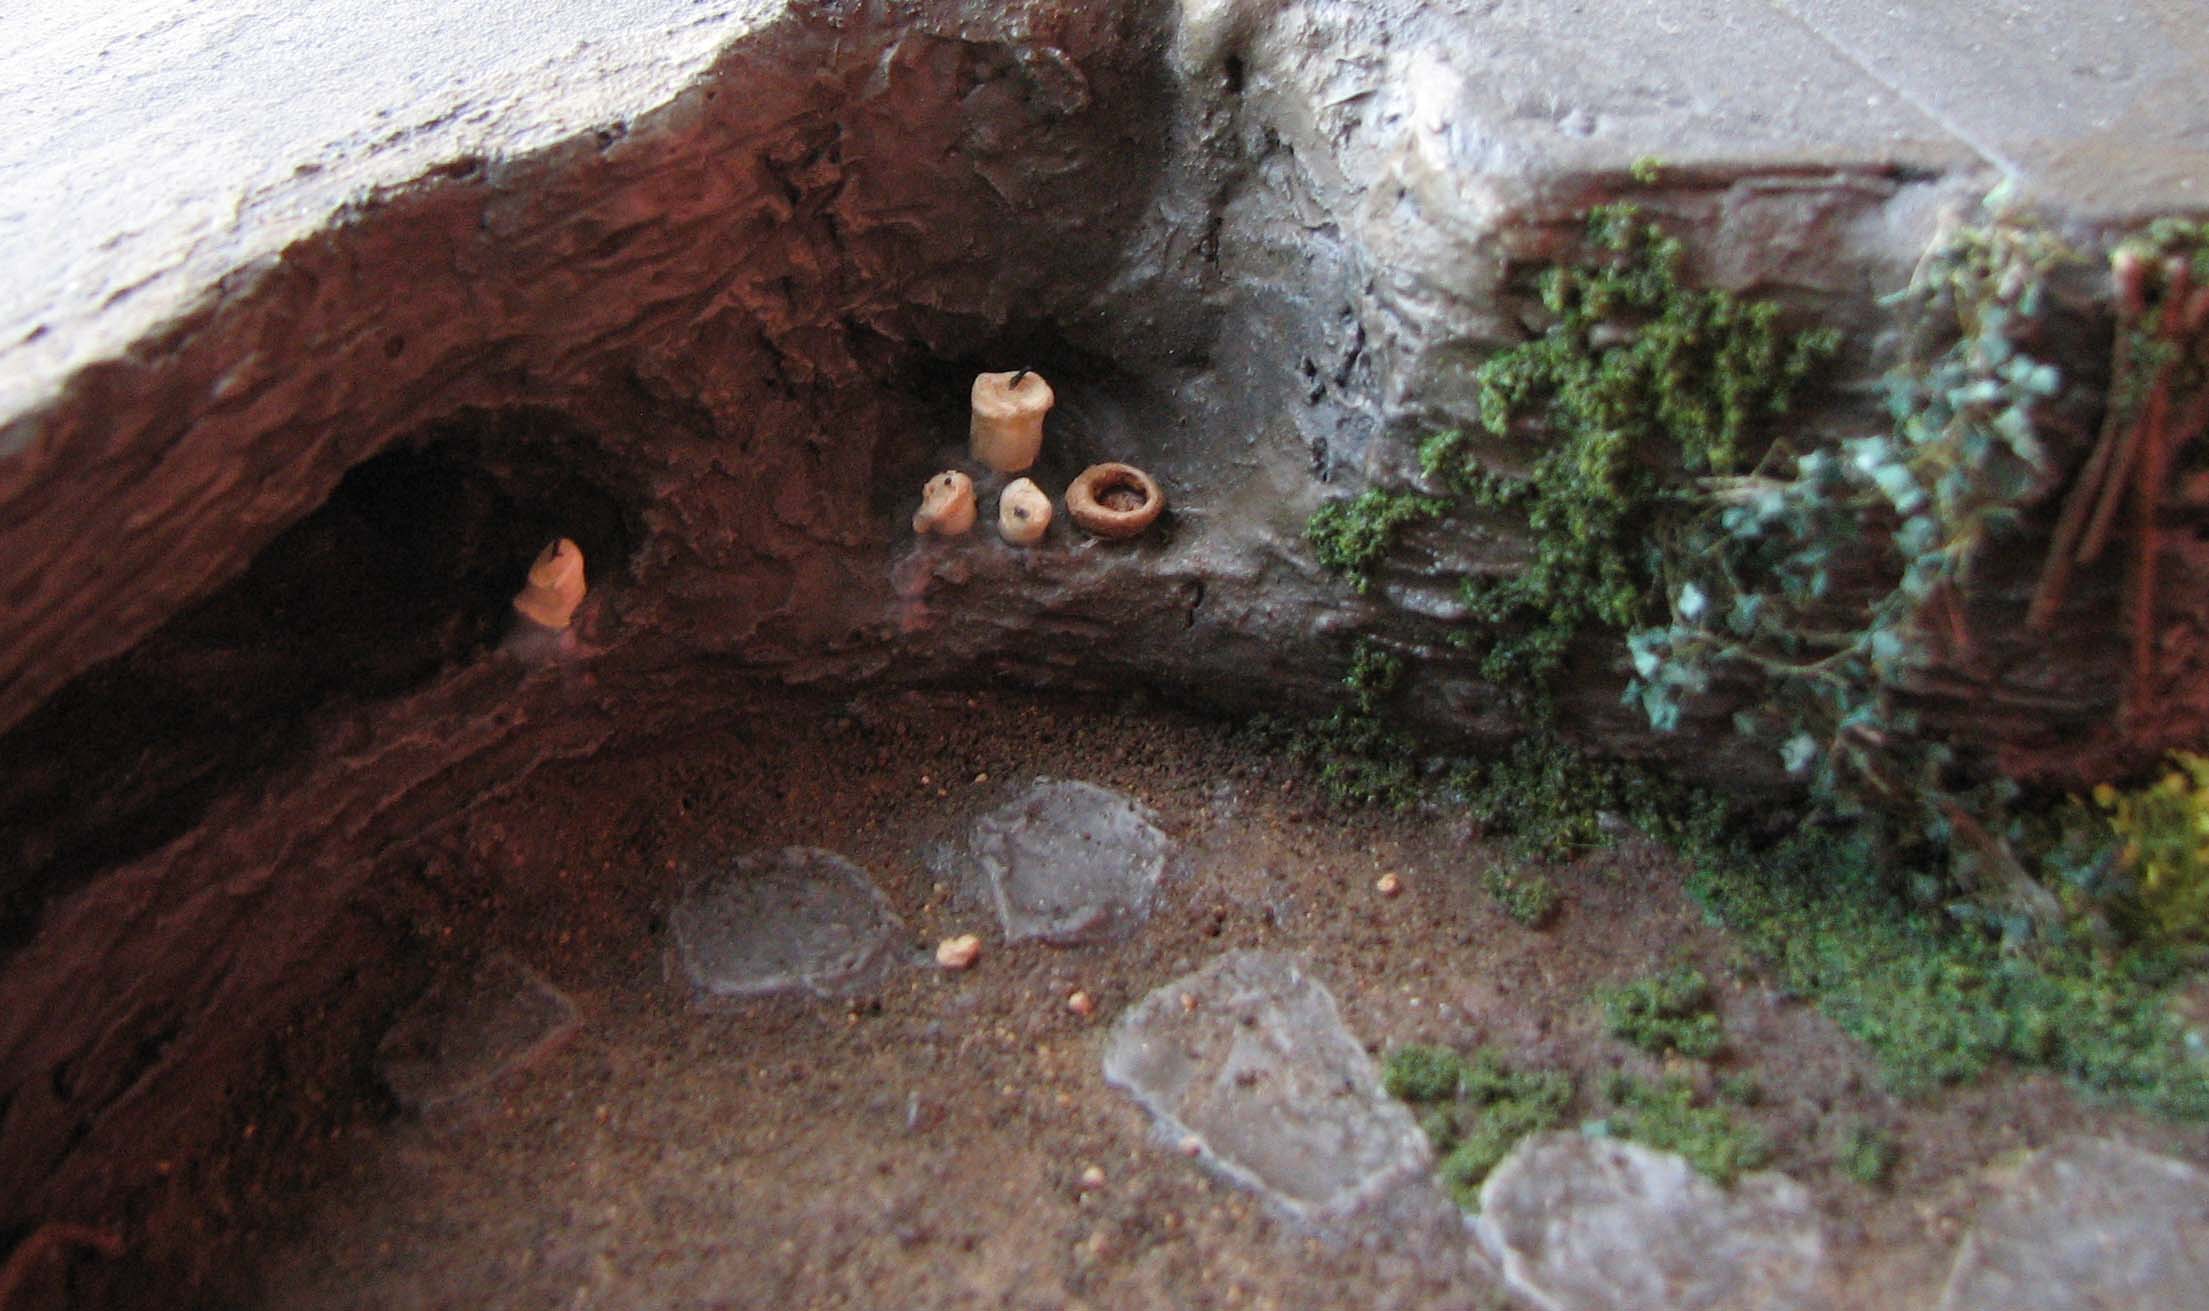
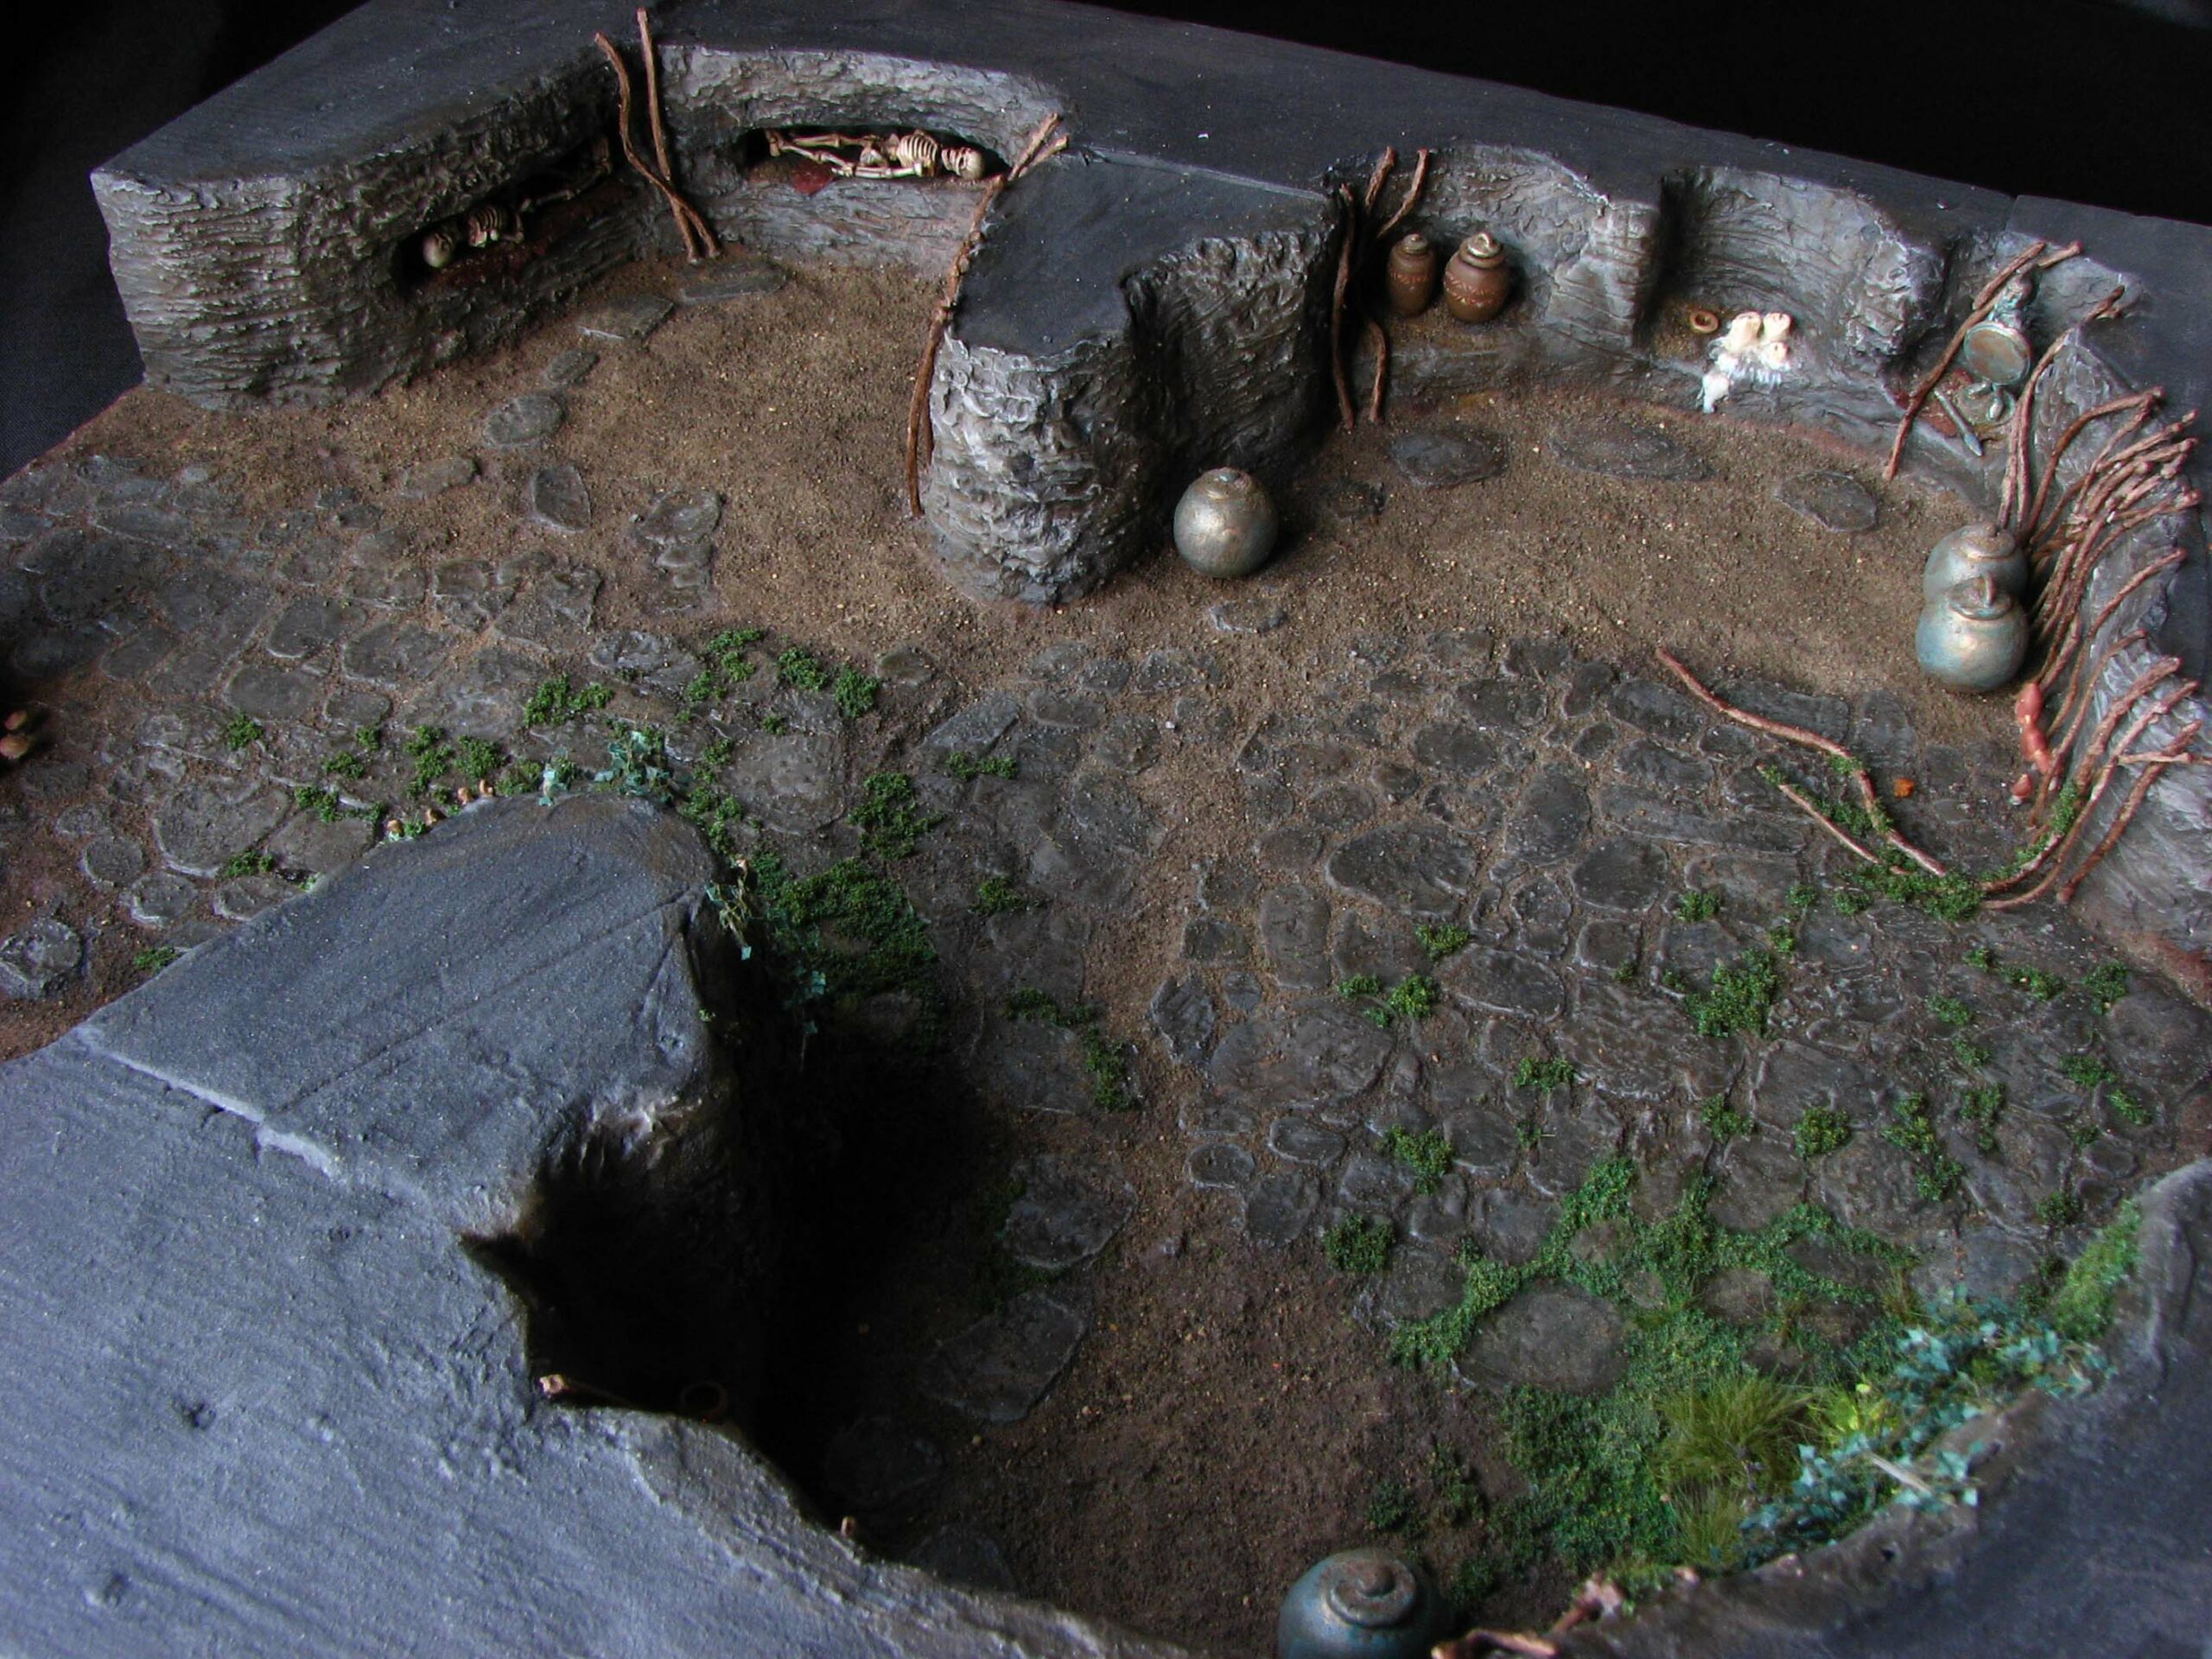
In this part we will add skeletons for the alcoves, urns, candles and sacrificial offerings.
Some thoughts on Crypt Dressings
Being a place where the dead rest, a crypt is not only a sombre place, but also a place of commemoration. The civilisation that built this place may have long perished, but the signs of paying tribute to the dead entombed here will outlast their creators for hundreds if not thousand of years.
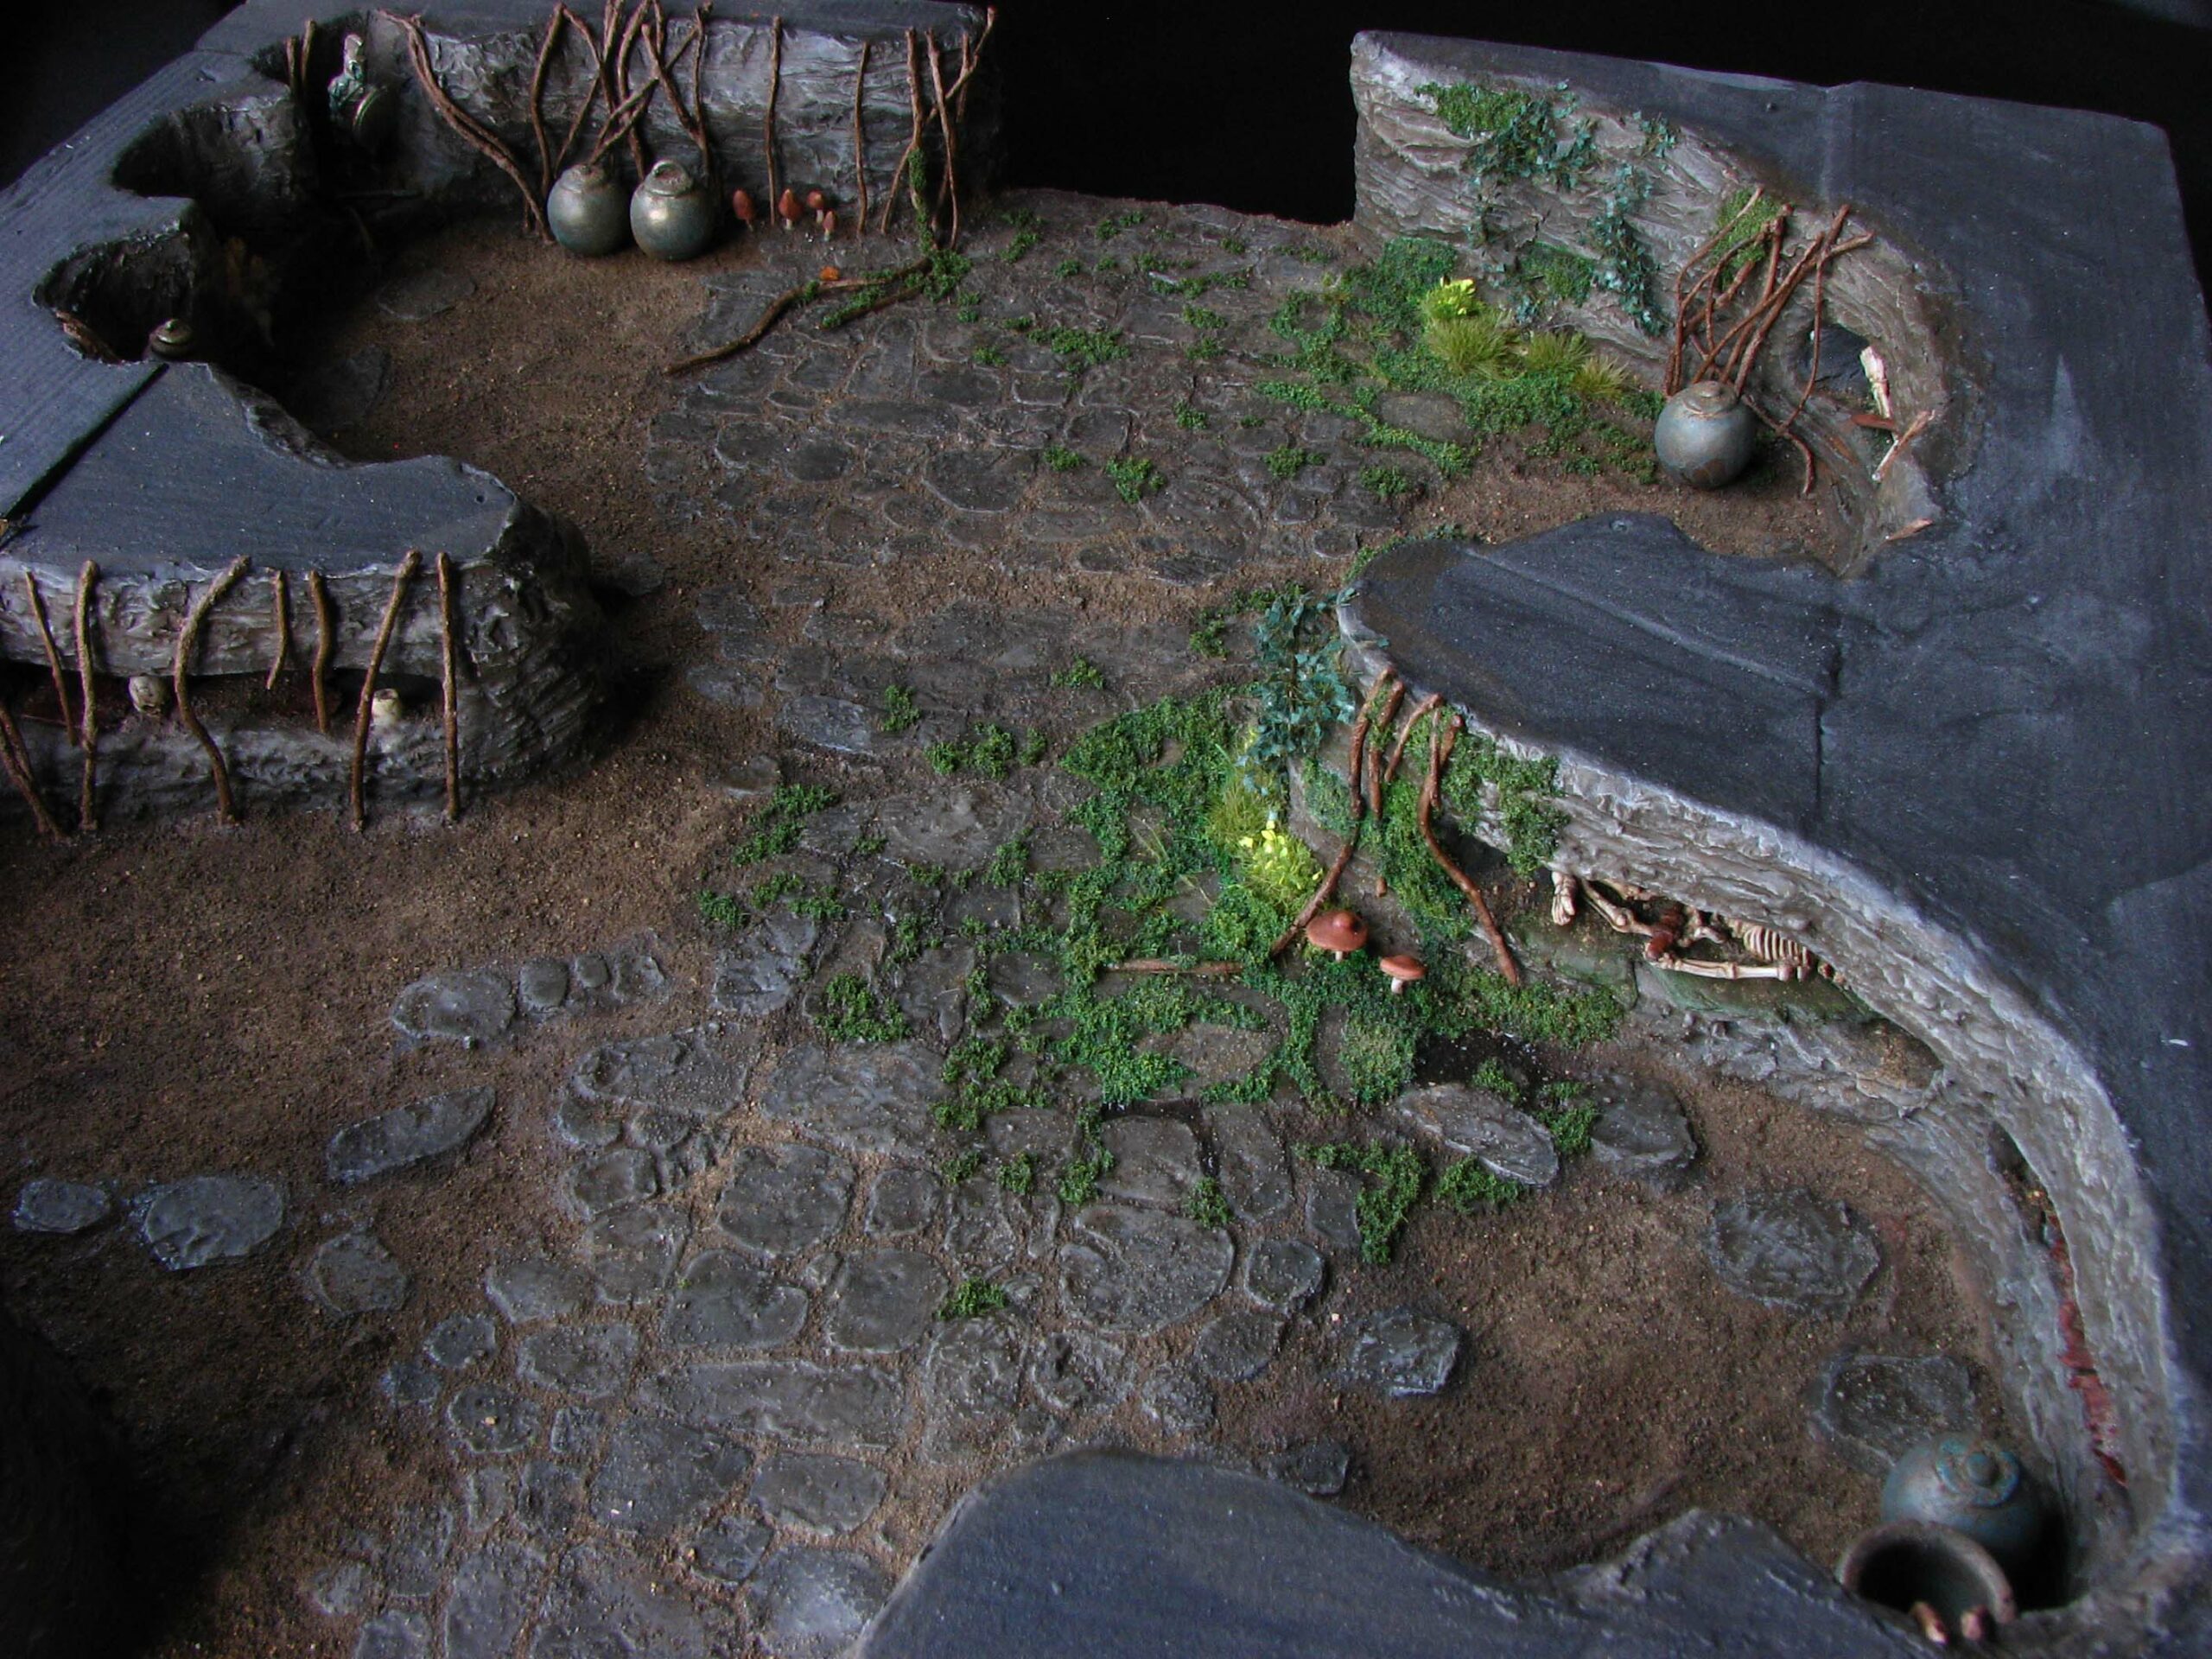
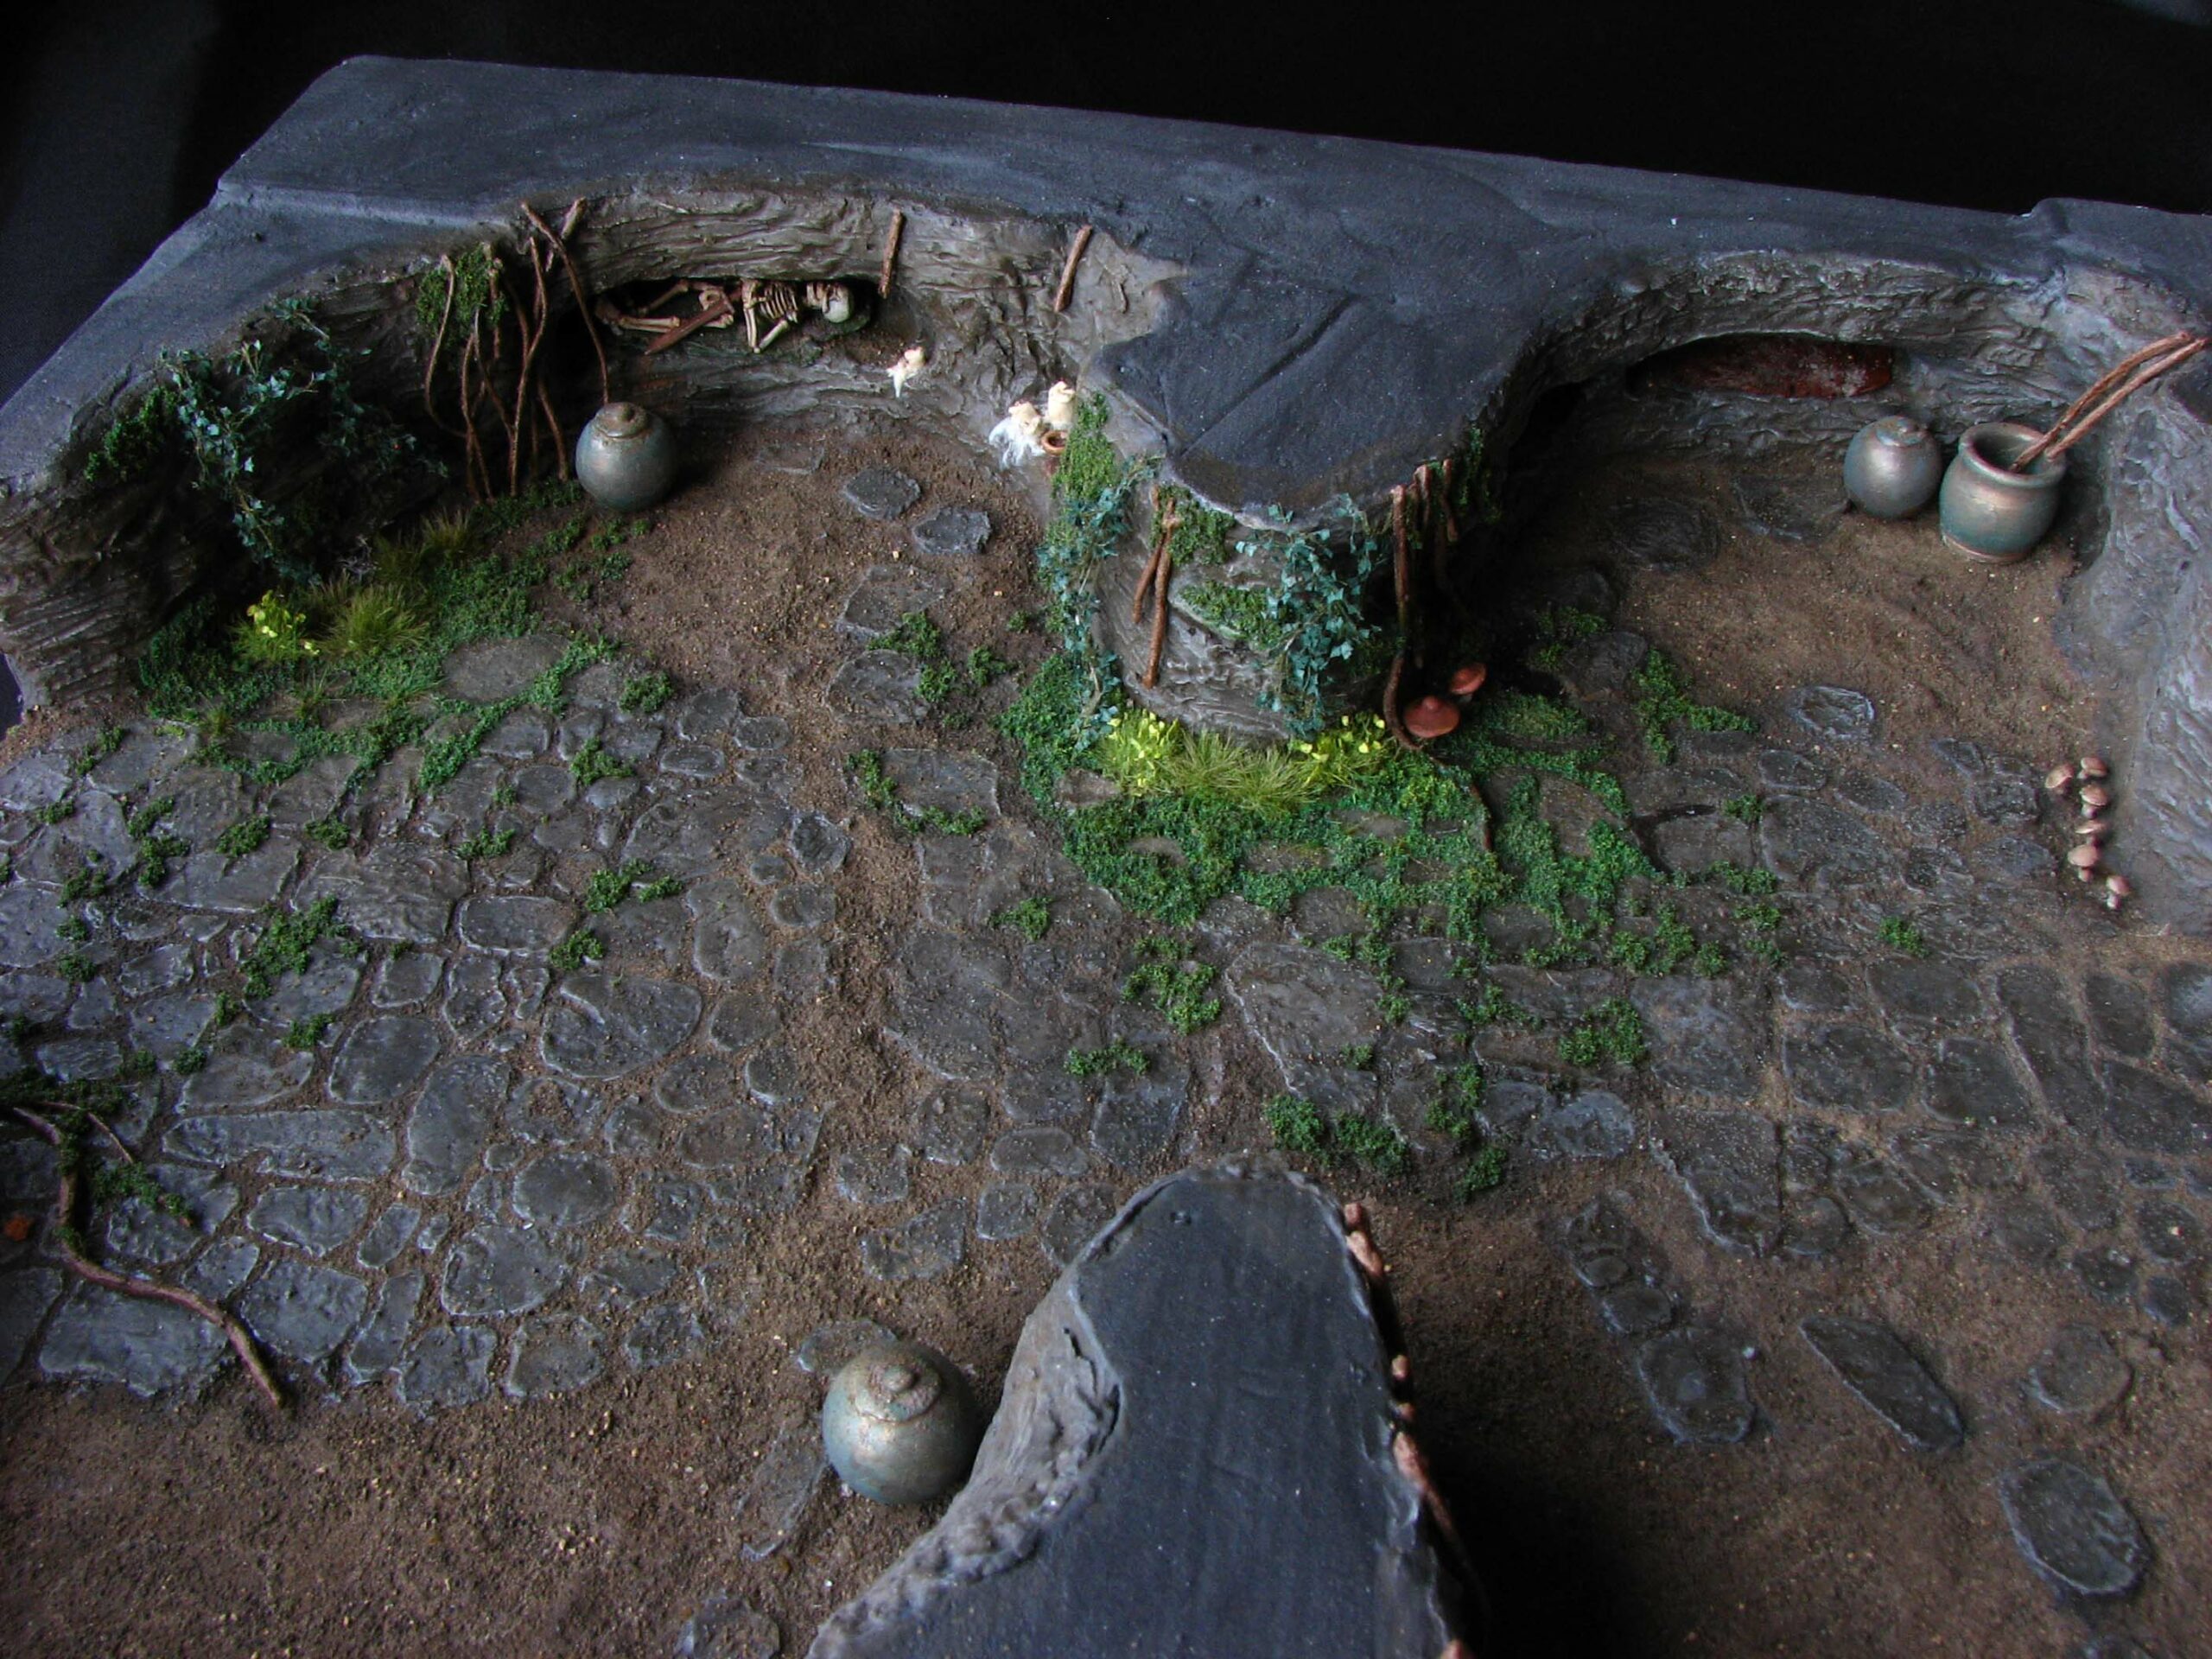
The long time since anyone, may it be priests, kin or tomb raiders, entered this place needs to be reflected in the appearance of all objects contained in the crypt. Vessels or offerings made of metal need to show signs of rust or verdigris, surfaces need to be dusty and any organic materials should show signs of decay.
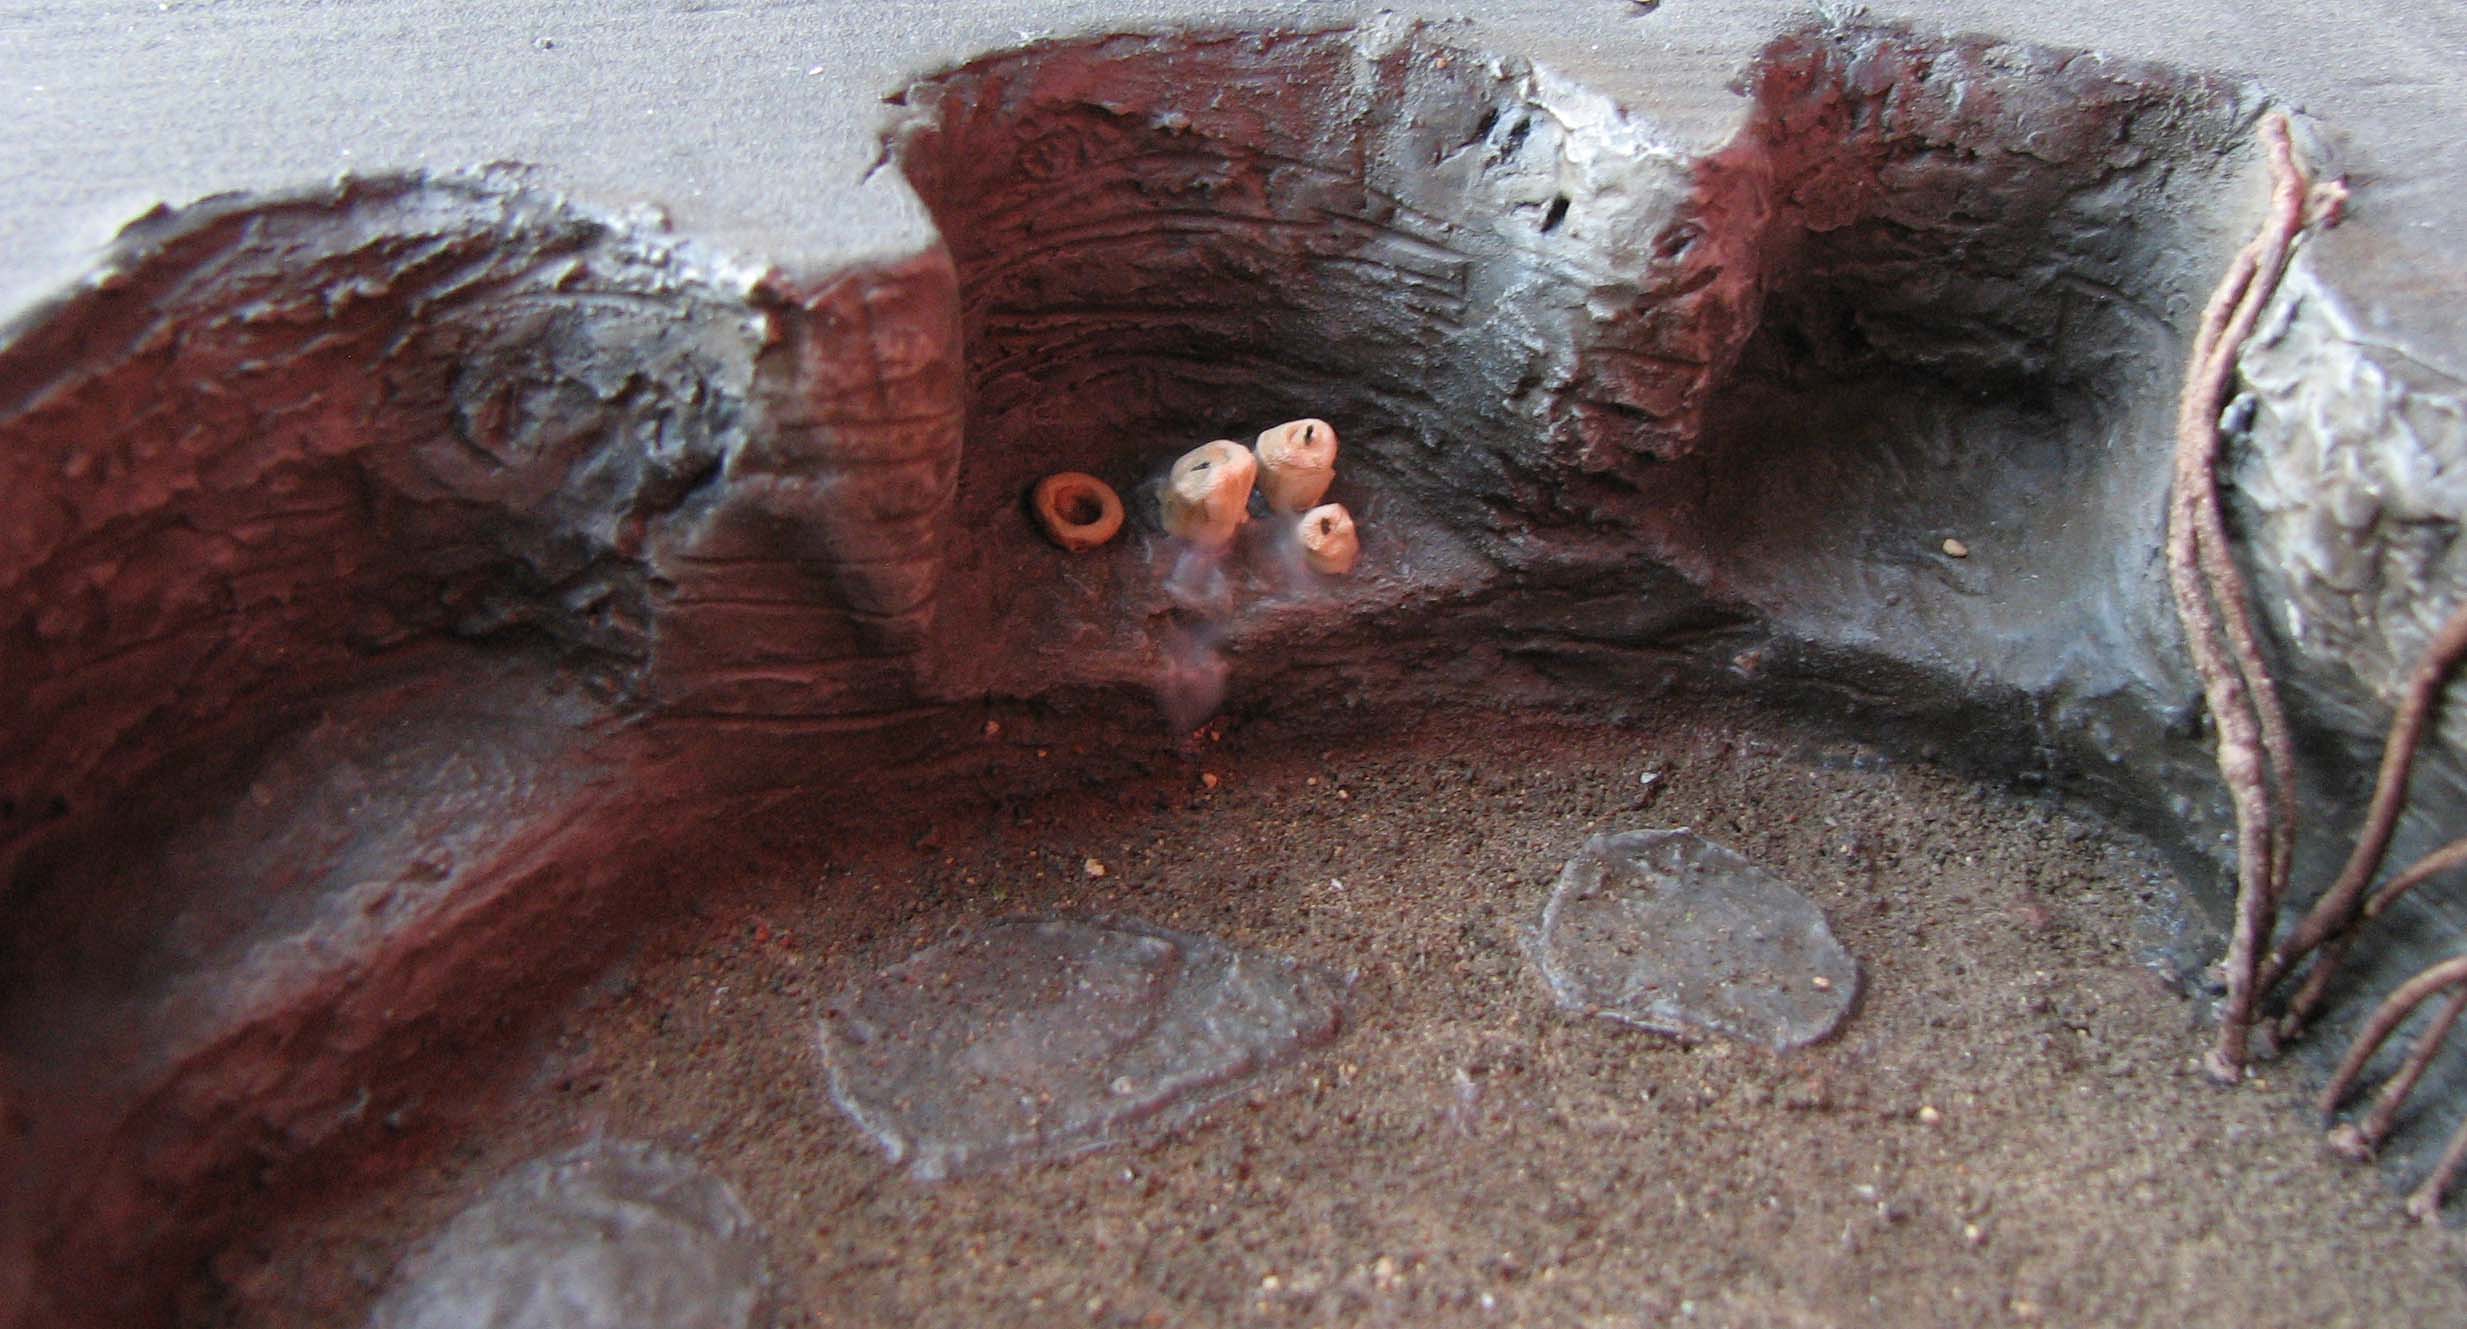
Candles were used in combination with the light shafts to enable kin and priests to pay their tribute. They burned down and were replaced with fresh ones, leading to a build-up of wax. In small, narrow bowls libations were presented, still showing remnants of wine long reduced to a brown desiccated layer. The candles, too, may have been lit to remember of the one’s gone, to keep vigil or lead the way to the afterlife.
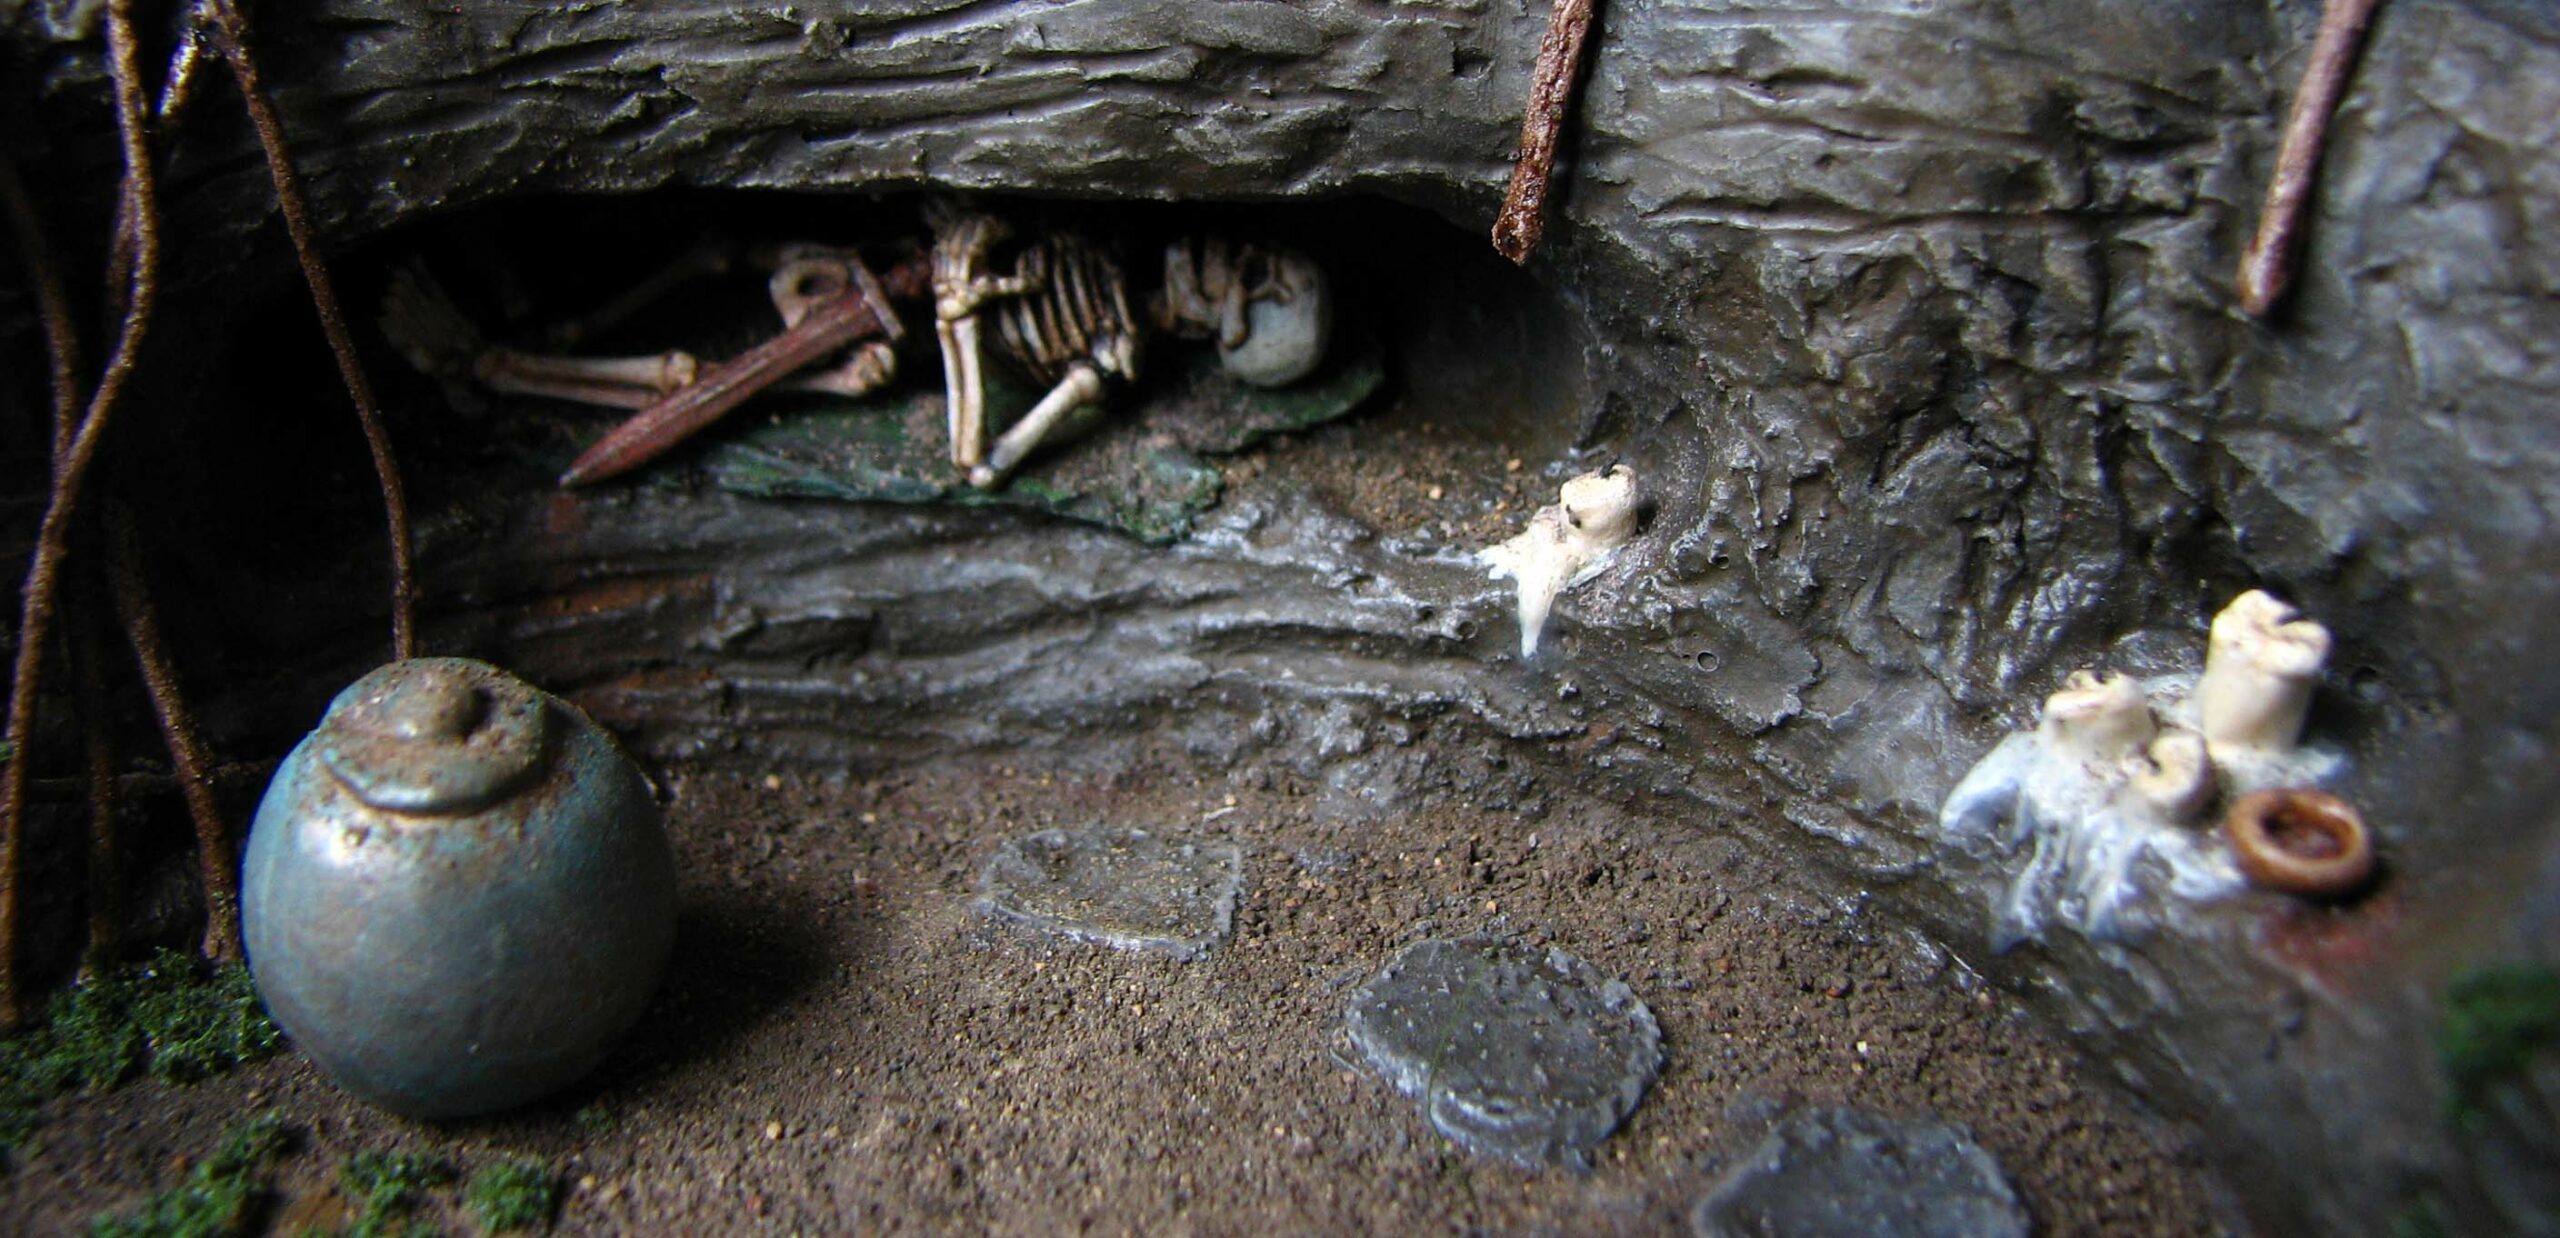
Grave goods like swords and daggers were given to the revered ancestors, their bones carefully placed on richly coloured fabrics. Well-off families commissioned statues of their ancestors, portraying them as ageless heroes. Hundreds of years later the swords are rusty, the fabric eaten by moths and decaying through the permeation of water. Statues are tumbled over, broken or covered in dust and verdigris.
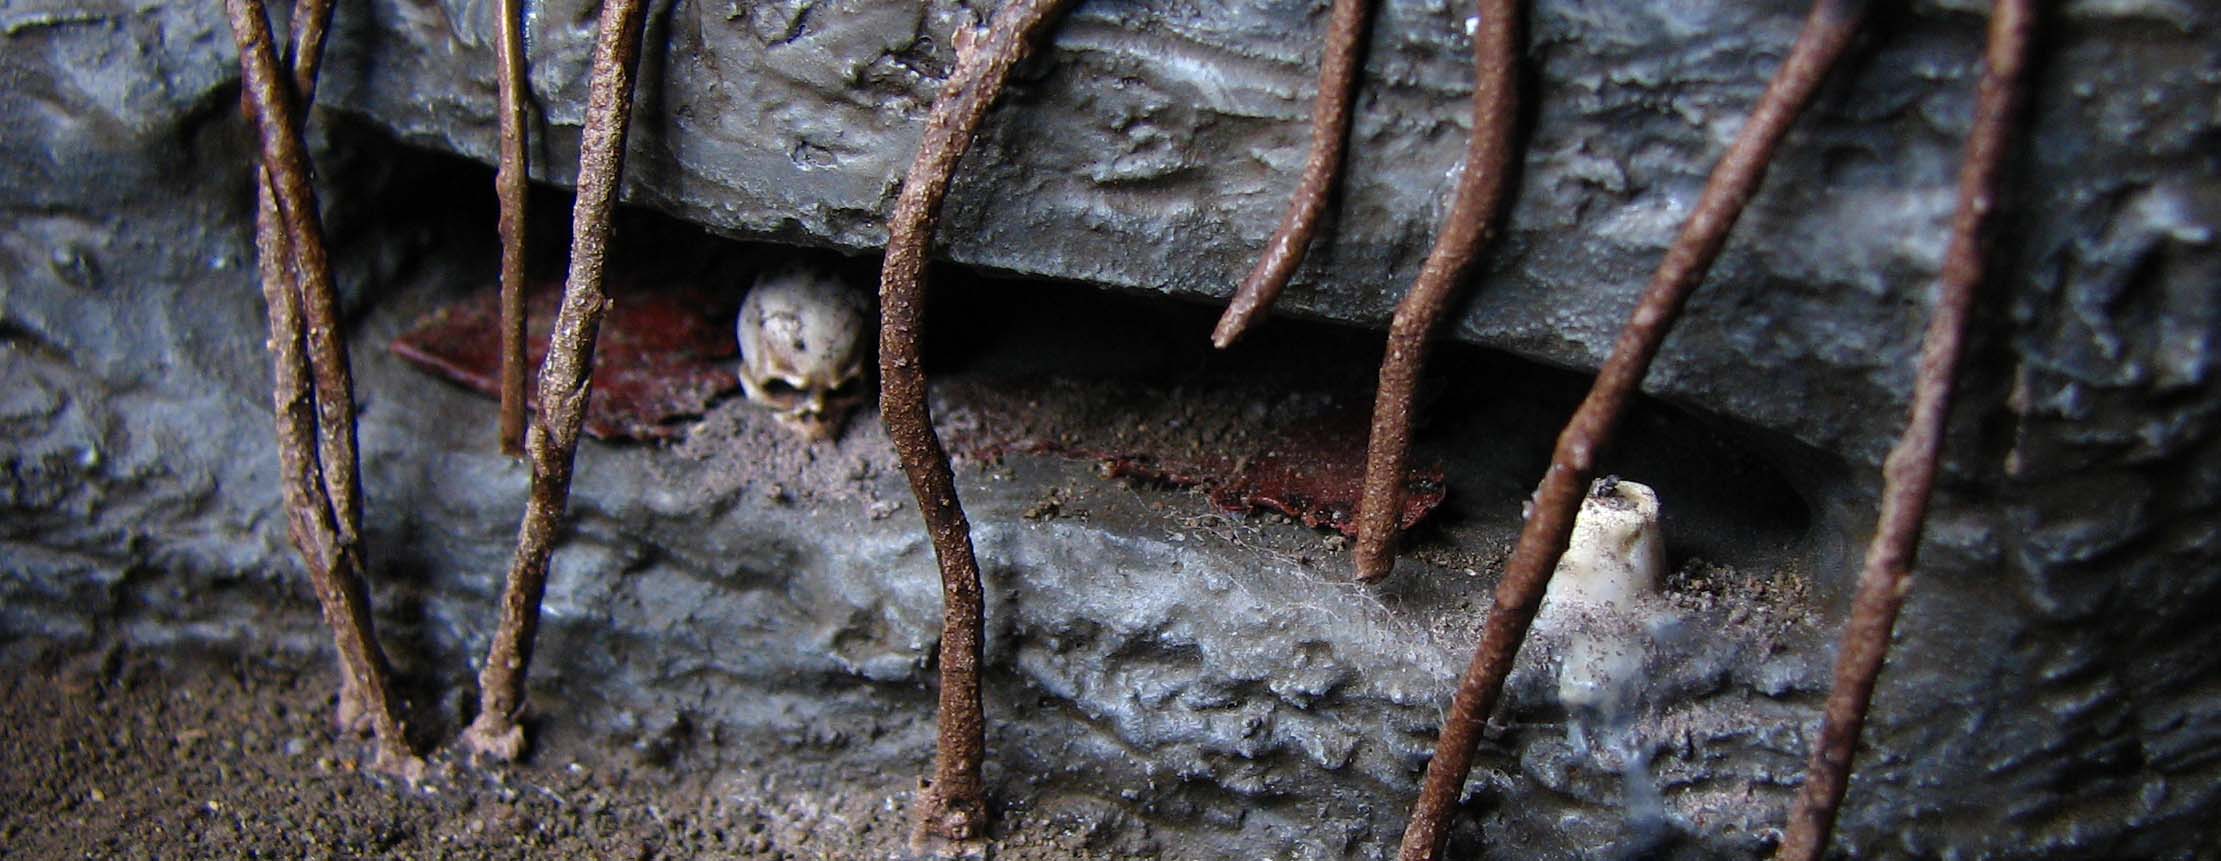
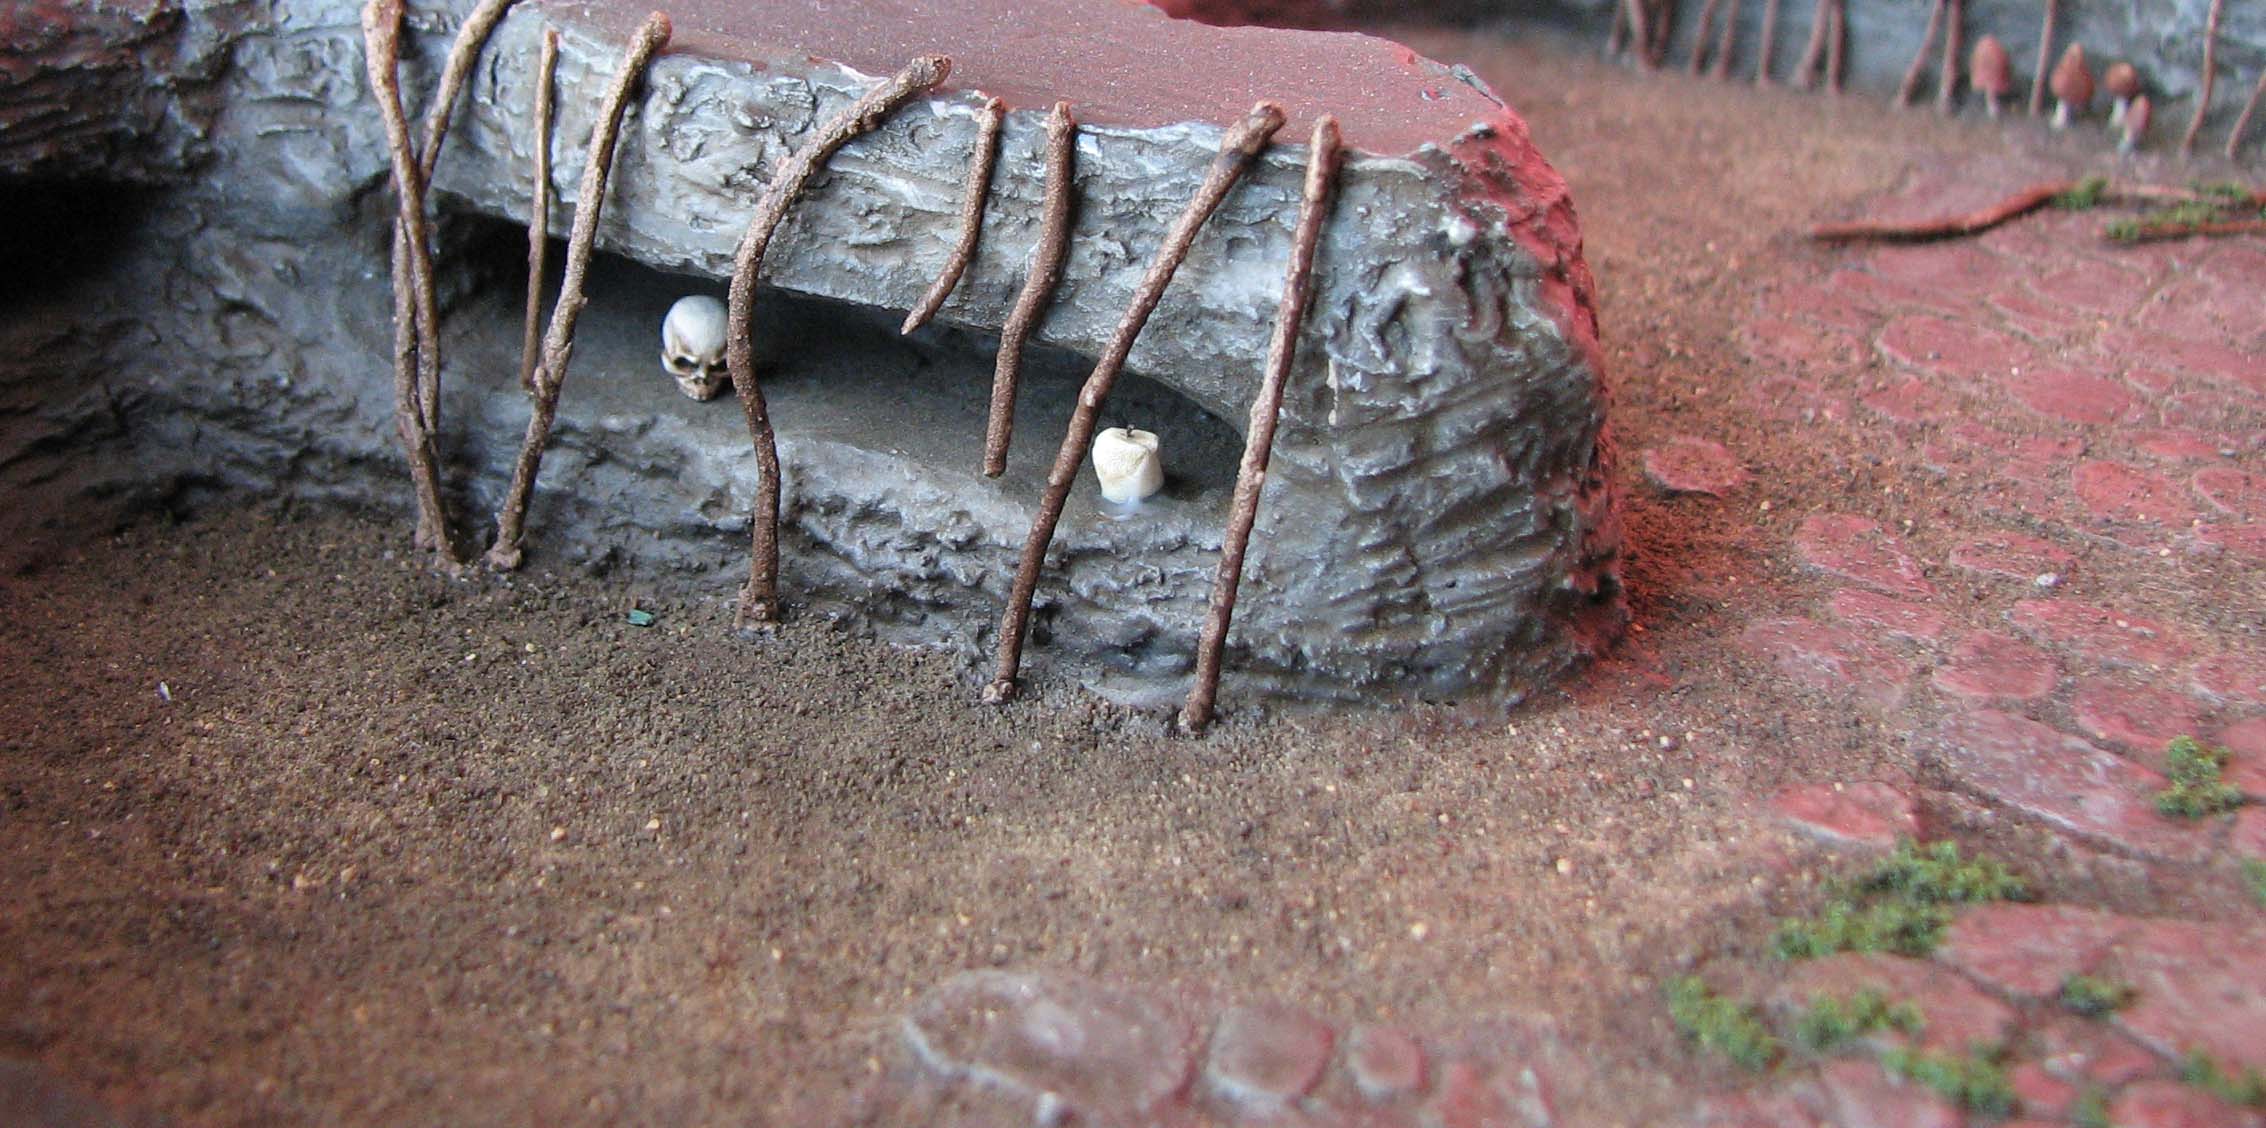
Burial rites may have changed in the course of time. It is thus not surprising that burial of bodies in the alcoves and urn burials are both present. Urns are placed in an alcove to set them apart from other vessels, which contained incense and embalming materials.
This, again, dictates some design choices:
- Anything made of metal needs to be heavily rusted or covered in verdigris.
- Skeletons should be placed together with grave goods to “tell a story” and should be heavily weathered.
- Candles, urns and offerings should be placed in a logical way. One alcove might have been used for libations, the other to display a statue etc.
Naturally, guidelines are not something that should suppress creativity, but they can provide a cross-check when deciding where to place all the details. On that note – let’s place some stuff!
What you need to honour the dead
For the candles
- Some cylindrical shape as a basis for the candles. I used some plastic sprue cuttings.
- Golden Acrylic Matte Gel to sculpt the wax.
- One strand of copper wire, cut in small pieces to depict the wicks.
- Acrylic paints. Candles come in all kinds of different colours nowadays, but in a Fantasy setting it might be good to use natural tones. I went for off-whites, especially RMS Yellowed Bone by Reaper.
- Fast setting glue to attach the candles.
- Brown and grey pigment to depict dust.
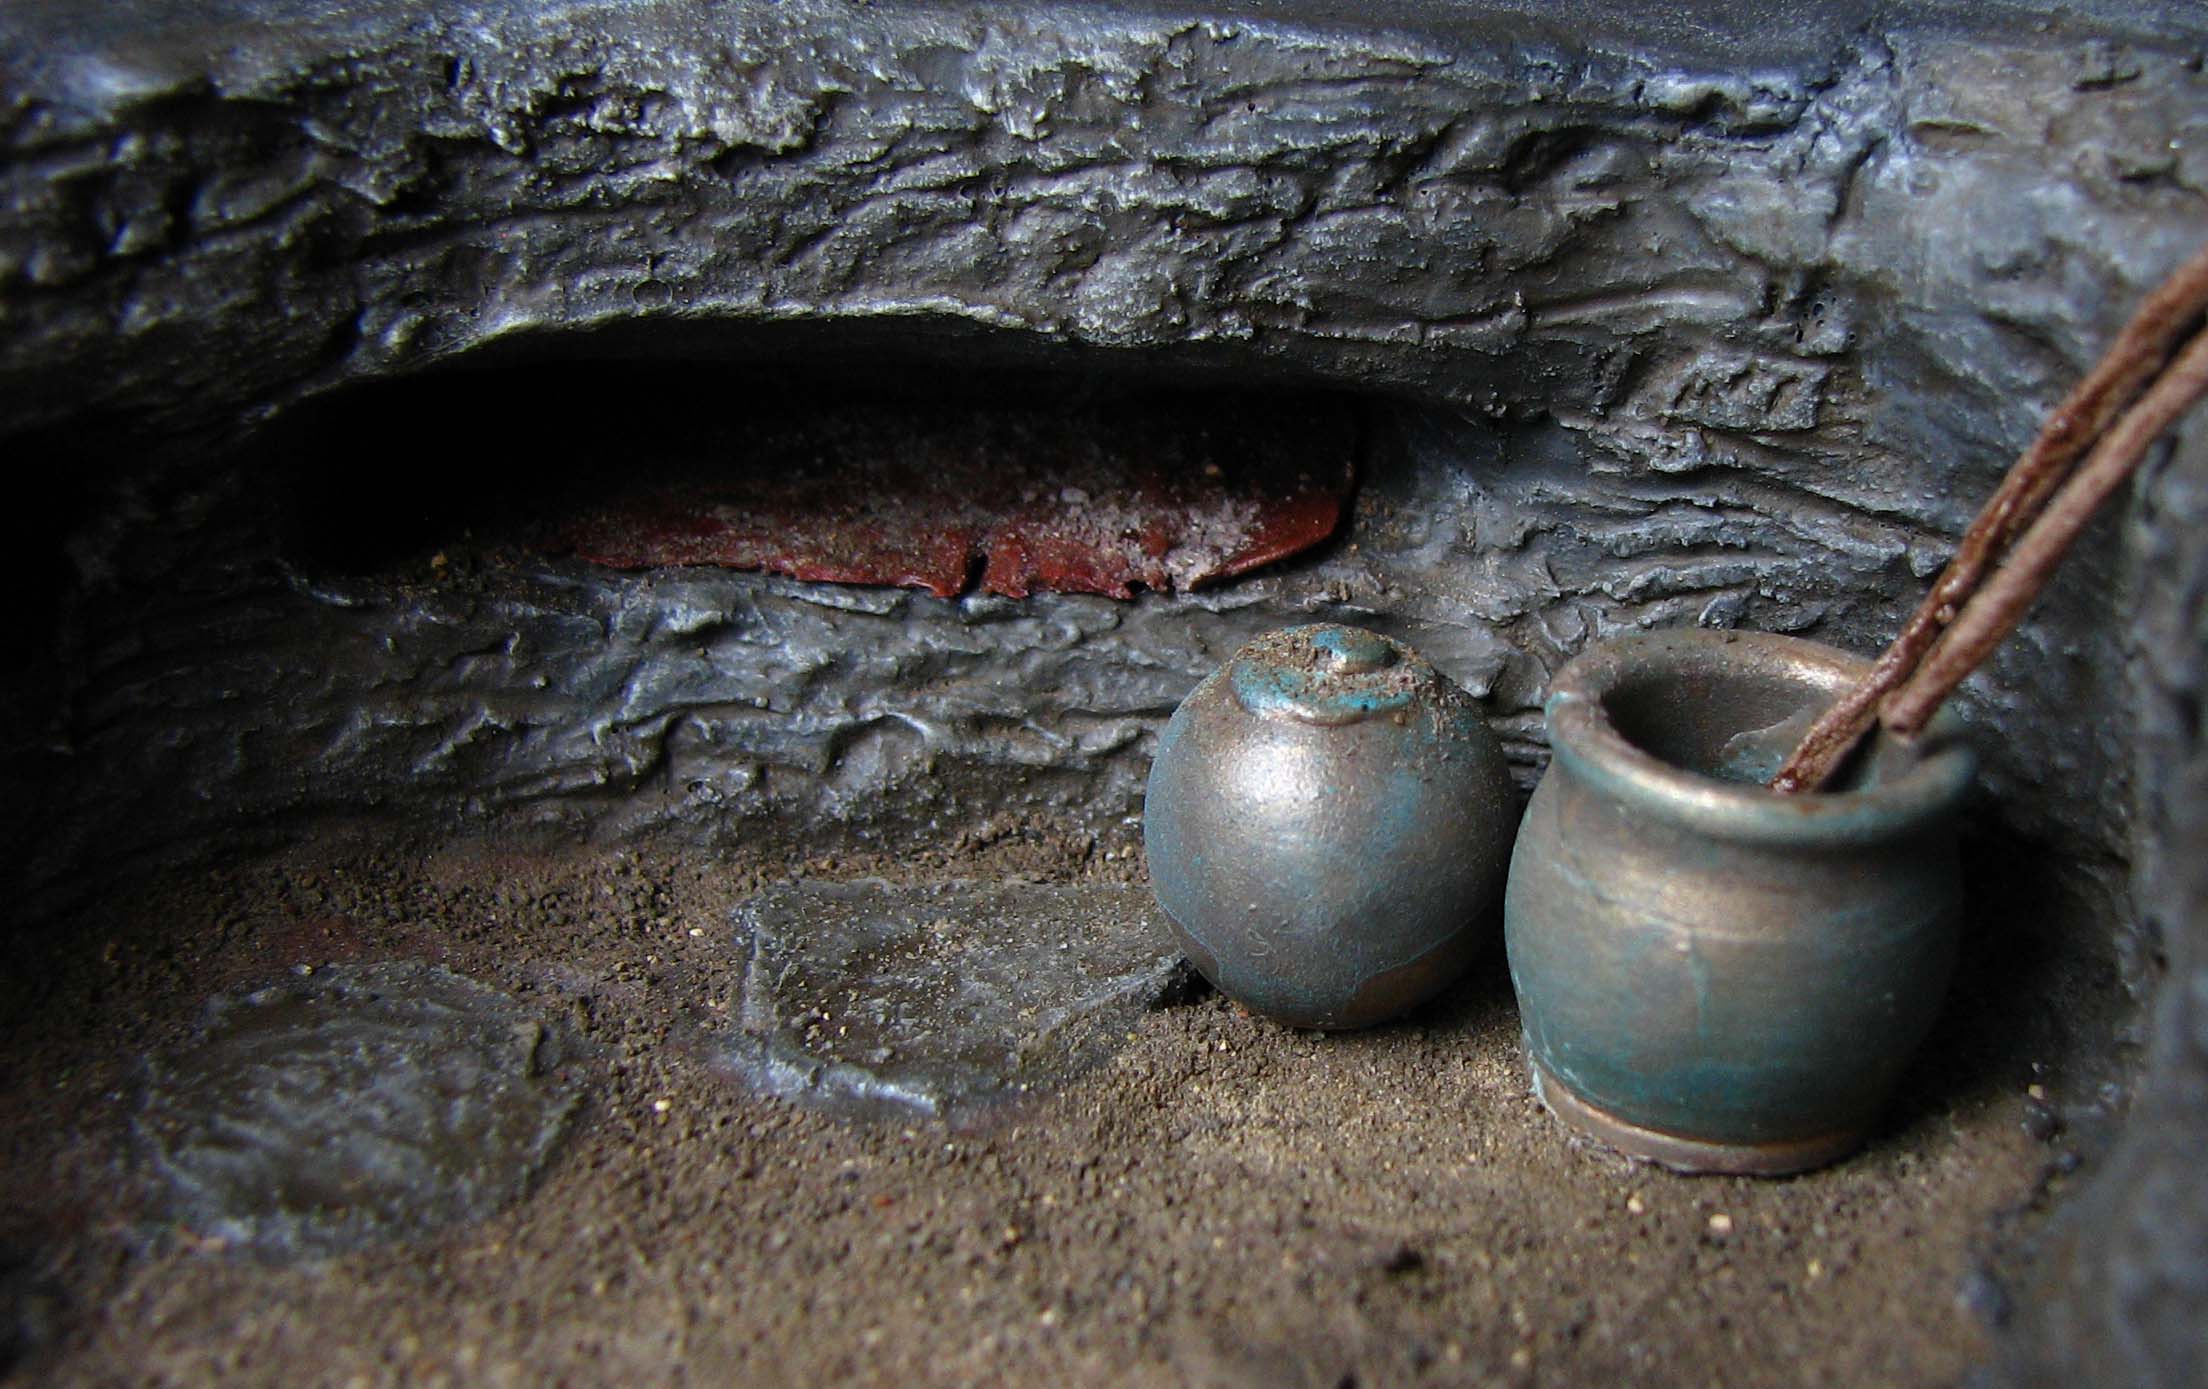
For the urns, bronze vessels and libation bowls
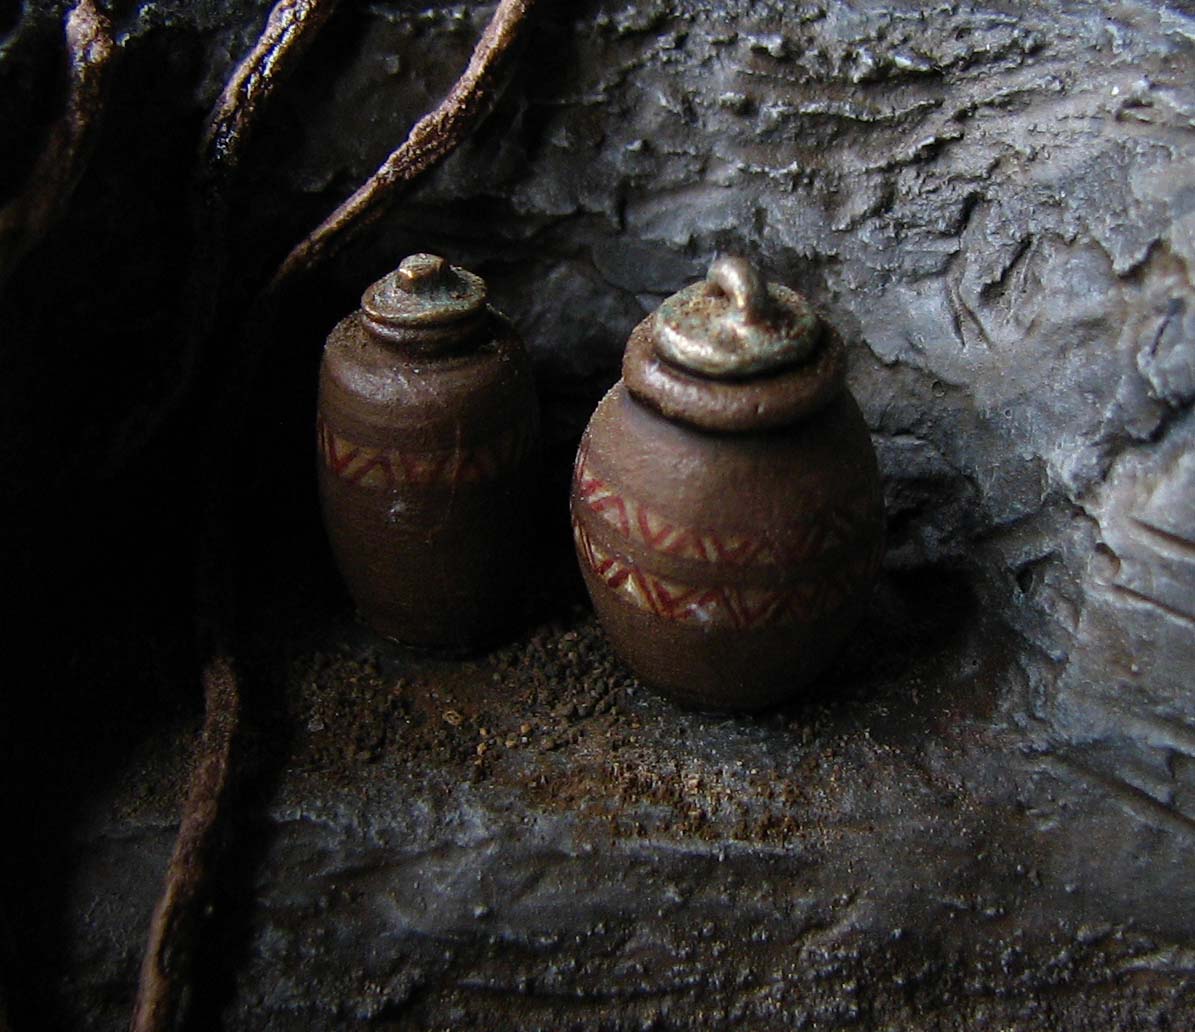
- Depending on how much money you would like to spend, you can get ceramic vessels in 28mm or 15mm scale from Baueda. The jars, amphorae and vases come in handy to depict urns, but might need a lid made of green stuff. Alternatively (I used both) you can also get some cheap spherical beads, add a lid and paint those up as vases or urns.
- Green stuff for lids and libation bowls.
- Golden Acrylic Matte Medium to cover the beads and improve adherence.
- Brown and beige acrylic paint (can be cheap stuff) and GW Agrax Earthshade. Bronze and silver paint. Vallejo Smoke. For verdigris effects a jade tone. If you want to add free hand adornments to the urns you can go for a lighter shade of the base colour or introduce some other colour, in my case dark red.
- Brown pigments to depict grime and dust, red pigment to depict the remains of a libation offering.
For the skeletons and their grave goods
- Any number of Warlord Skeletons. I went for four full skeletons and one skull.
- Some of their weapons to depict grave goods. I went for a sword and a dagger.
- Green stuff to sculpt the cloth the skeletons rest on.
- Acrylic paint. RMS Yellowed Bone, white, reds, metallics and greens.
- Different pigments (browns and reds) to depict grime, dust and rust.
Tools needed
- Brushes of various sizes to apply paint and wood glue. Old bristle brush for dry brushing.
- Sculpting tools.
- X-acto knife.
How to make sepulchral scenics
The candles
Cut as many pieces of round sprue as you need candles. Glue them down on a piece of cardboard or plastic.
Now cover the sprue pieces with Golden Acrylics Gel matt. It has a nice thick consistency and you can shape it to an uneven surface. The idea is to make the candles look like they burned down a bit. Next, insert the copper wire (the wick), while the gel is still wet. After the first coat is dry, you may need to apply a few more. Really depends how thick a candle you want.
Paint the candles with a basecoat of RMS Yellowed Bone and add subtle highlights with an off-white. RMS Pure Black works well for the wick. Remove the candles from the painting aid and glue them in place
Time to add the wax build-up. Apply the matte gel around candles or even on the floor or walls. The matte gel does not dry translucent, but has a certain cloudiness to it. Perfect to depict wax. If necessary, add some more RMS Yellowed Bone to pronounce the texture.
Finally, dust the candles with grey and brown pigment and fixate with some AK Pigment Fixer.

Urns, statue, bronze vessels and libation bowls
If you got some, clean and basecoat the Baueda vases. Put them aside and glue some beads on a piece of cardboard or plastic card. Dilute the matte gel slightly, so that it is runny enough to cover the beads without much effort. If you feel like it, sculpt some lids and add them to the vases and beads. Last, but not least, take a tiny ball of green stuff and indent it with a ball point tool. Voila, instant bowl!
Basecoat the beads, bowls and Baueda vases with brown acrylic paint. Follow up, with an even coat of bronze paint. Add some silver for the highlights and darken the areas closer to the ground with Vallejo Smoke. When all is dry, make a wash using green, blue and white. We want a nice Jade tone. I suggest a mix of 10 to 1 water/ paint. Apply over the entire vessel and let dry. Repeat if you would like the verdigris effect to be stronger.
Highlight the Baueda vases and add some ornaments if you like. I went for a very simple geometric pattern. Now, paint the lids just like the bronze vessels, adding the verdigris effect. Next, add some red pigment to the bowls to depict the remains of libelation offerings. Finally, sprinkle with different pigments to add grime and dust and fixate the pigments with AK Pigment Fixer.
Repeat the steps above for the bronze statue. I used and old 15mm miniature. The face is very rough, but suits a statue perfectly.

Skeletons and grave goods
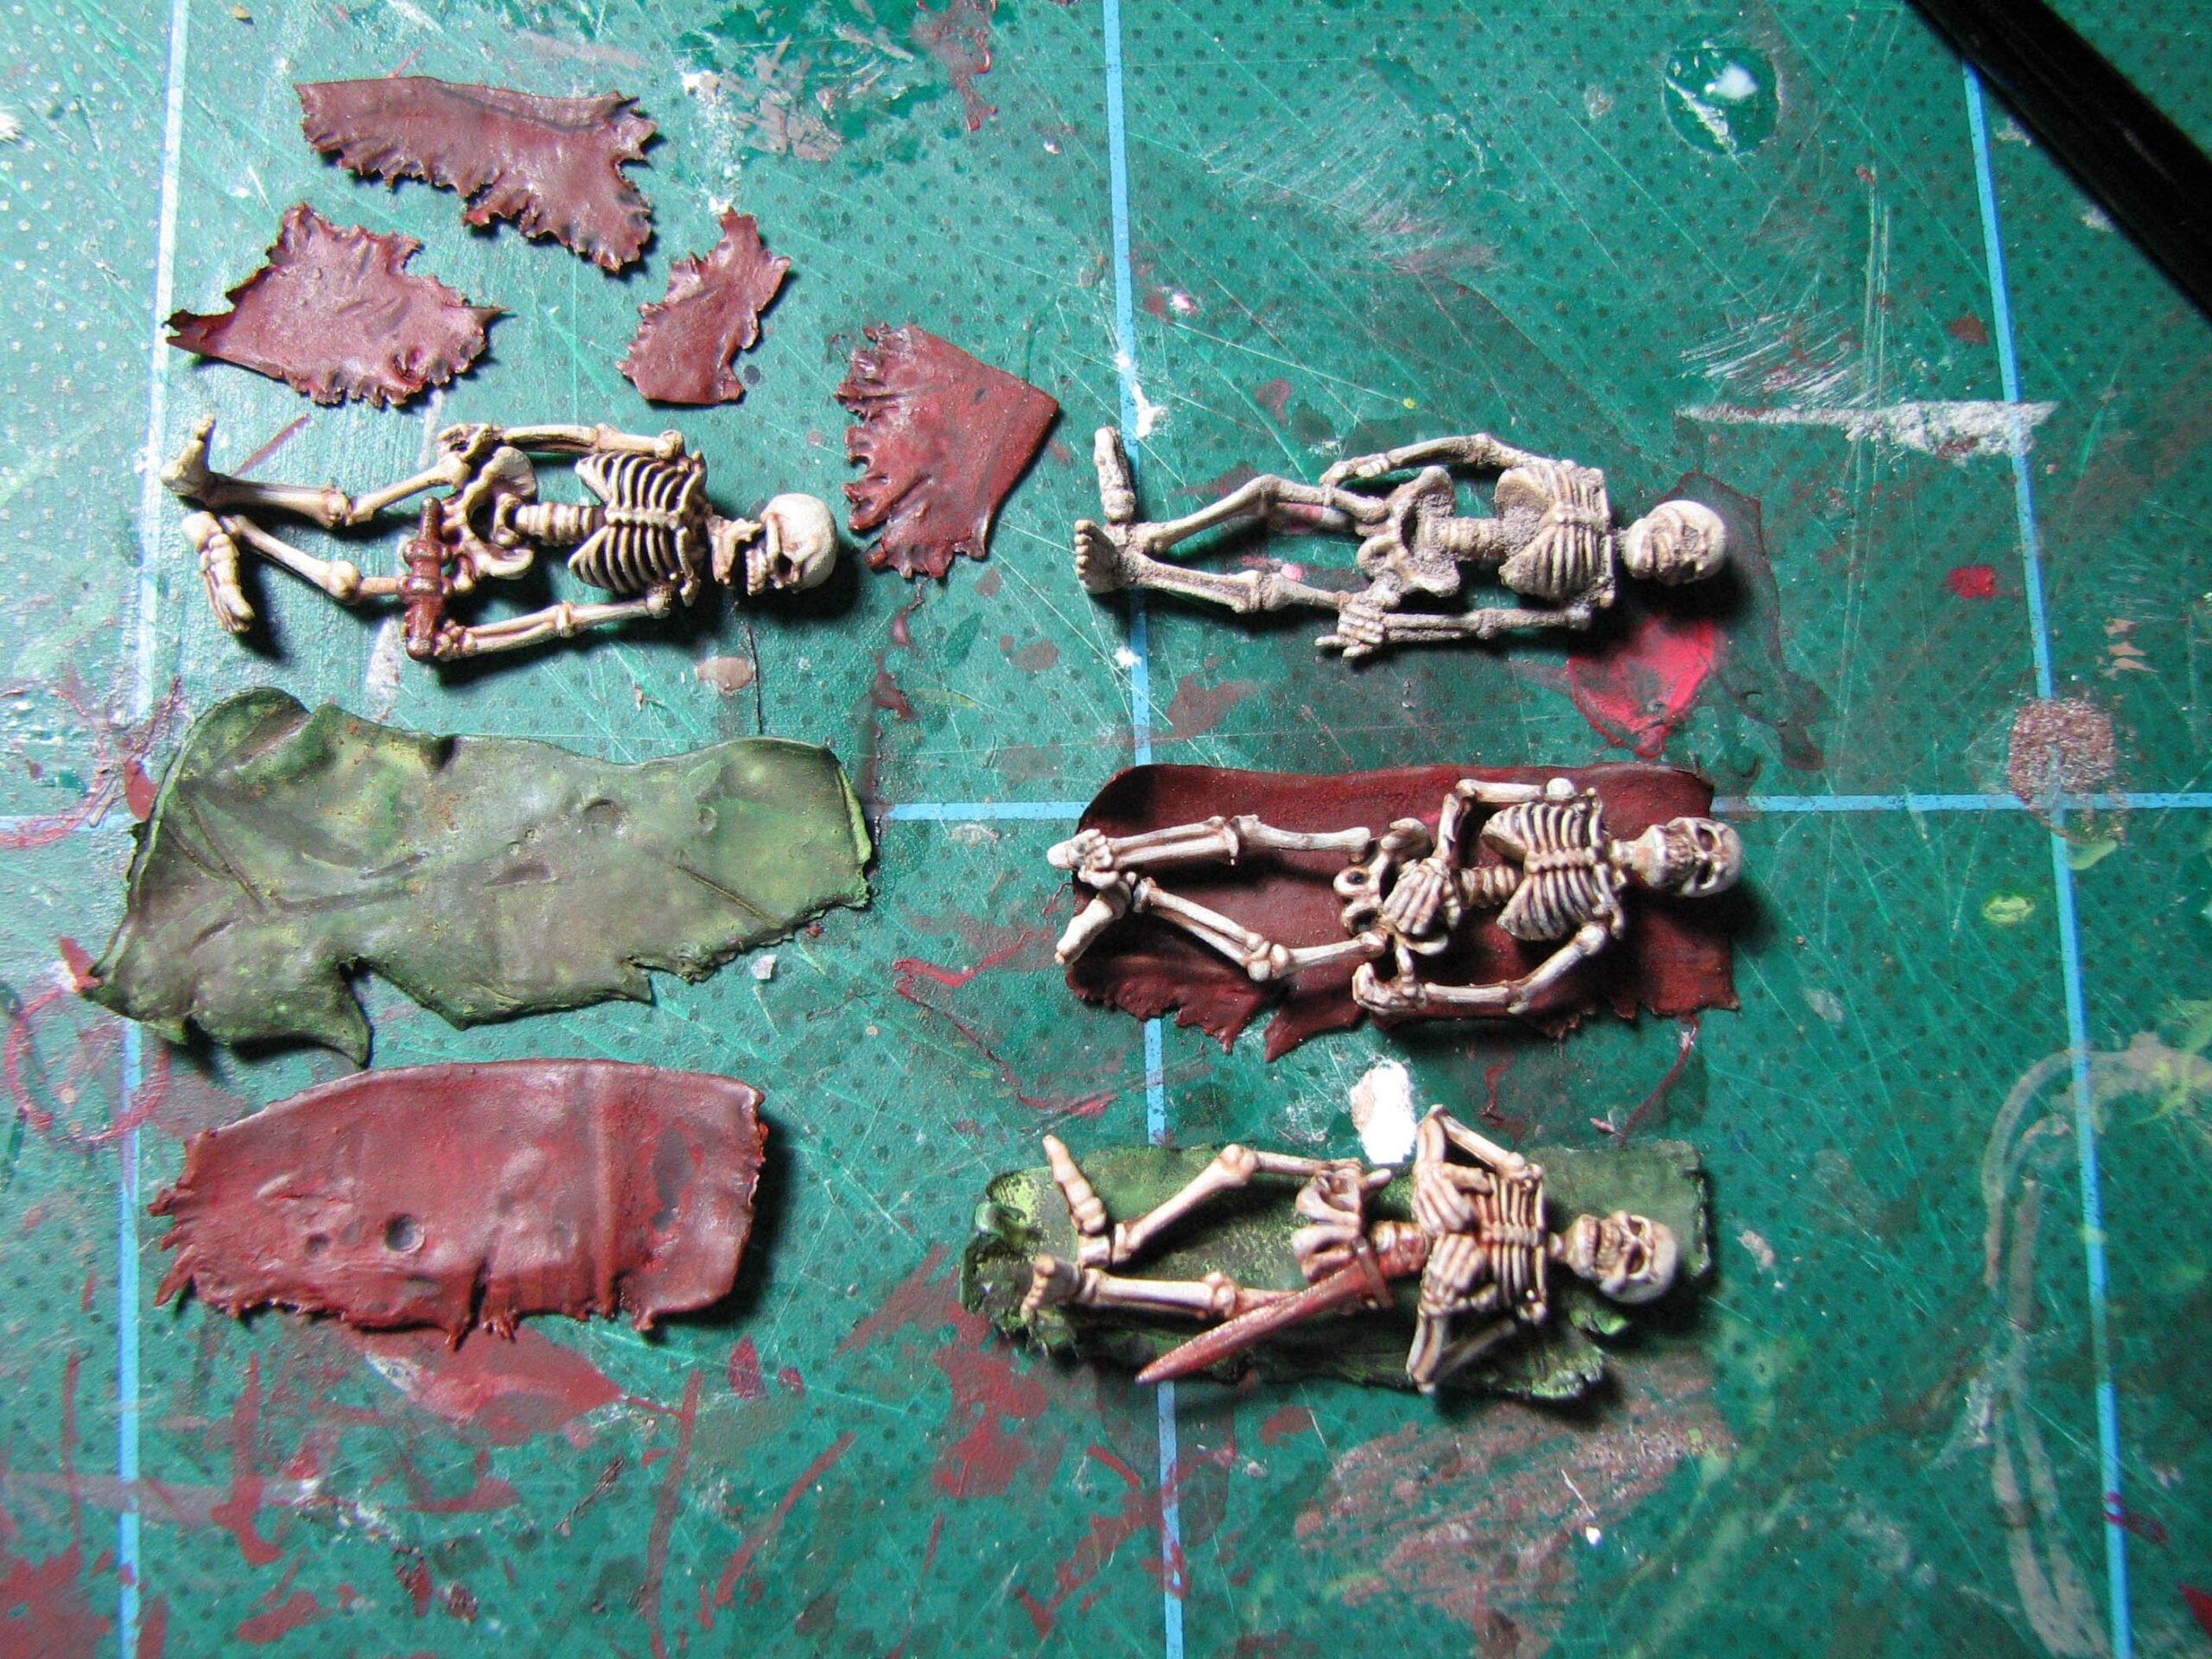
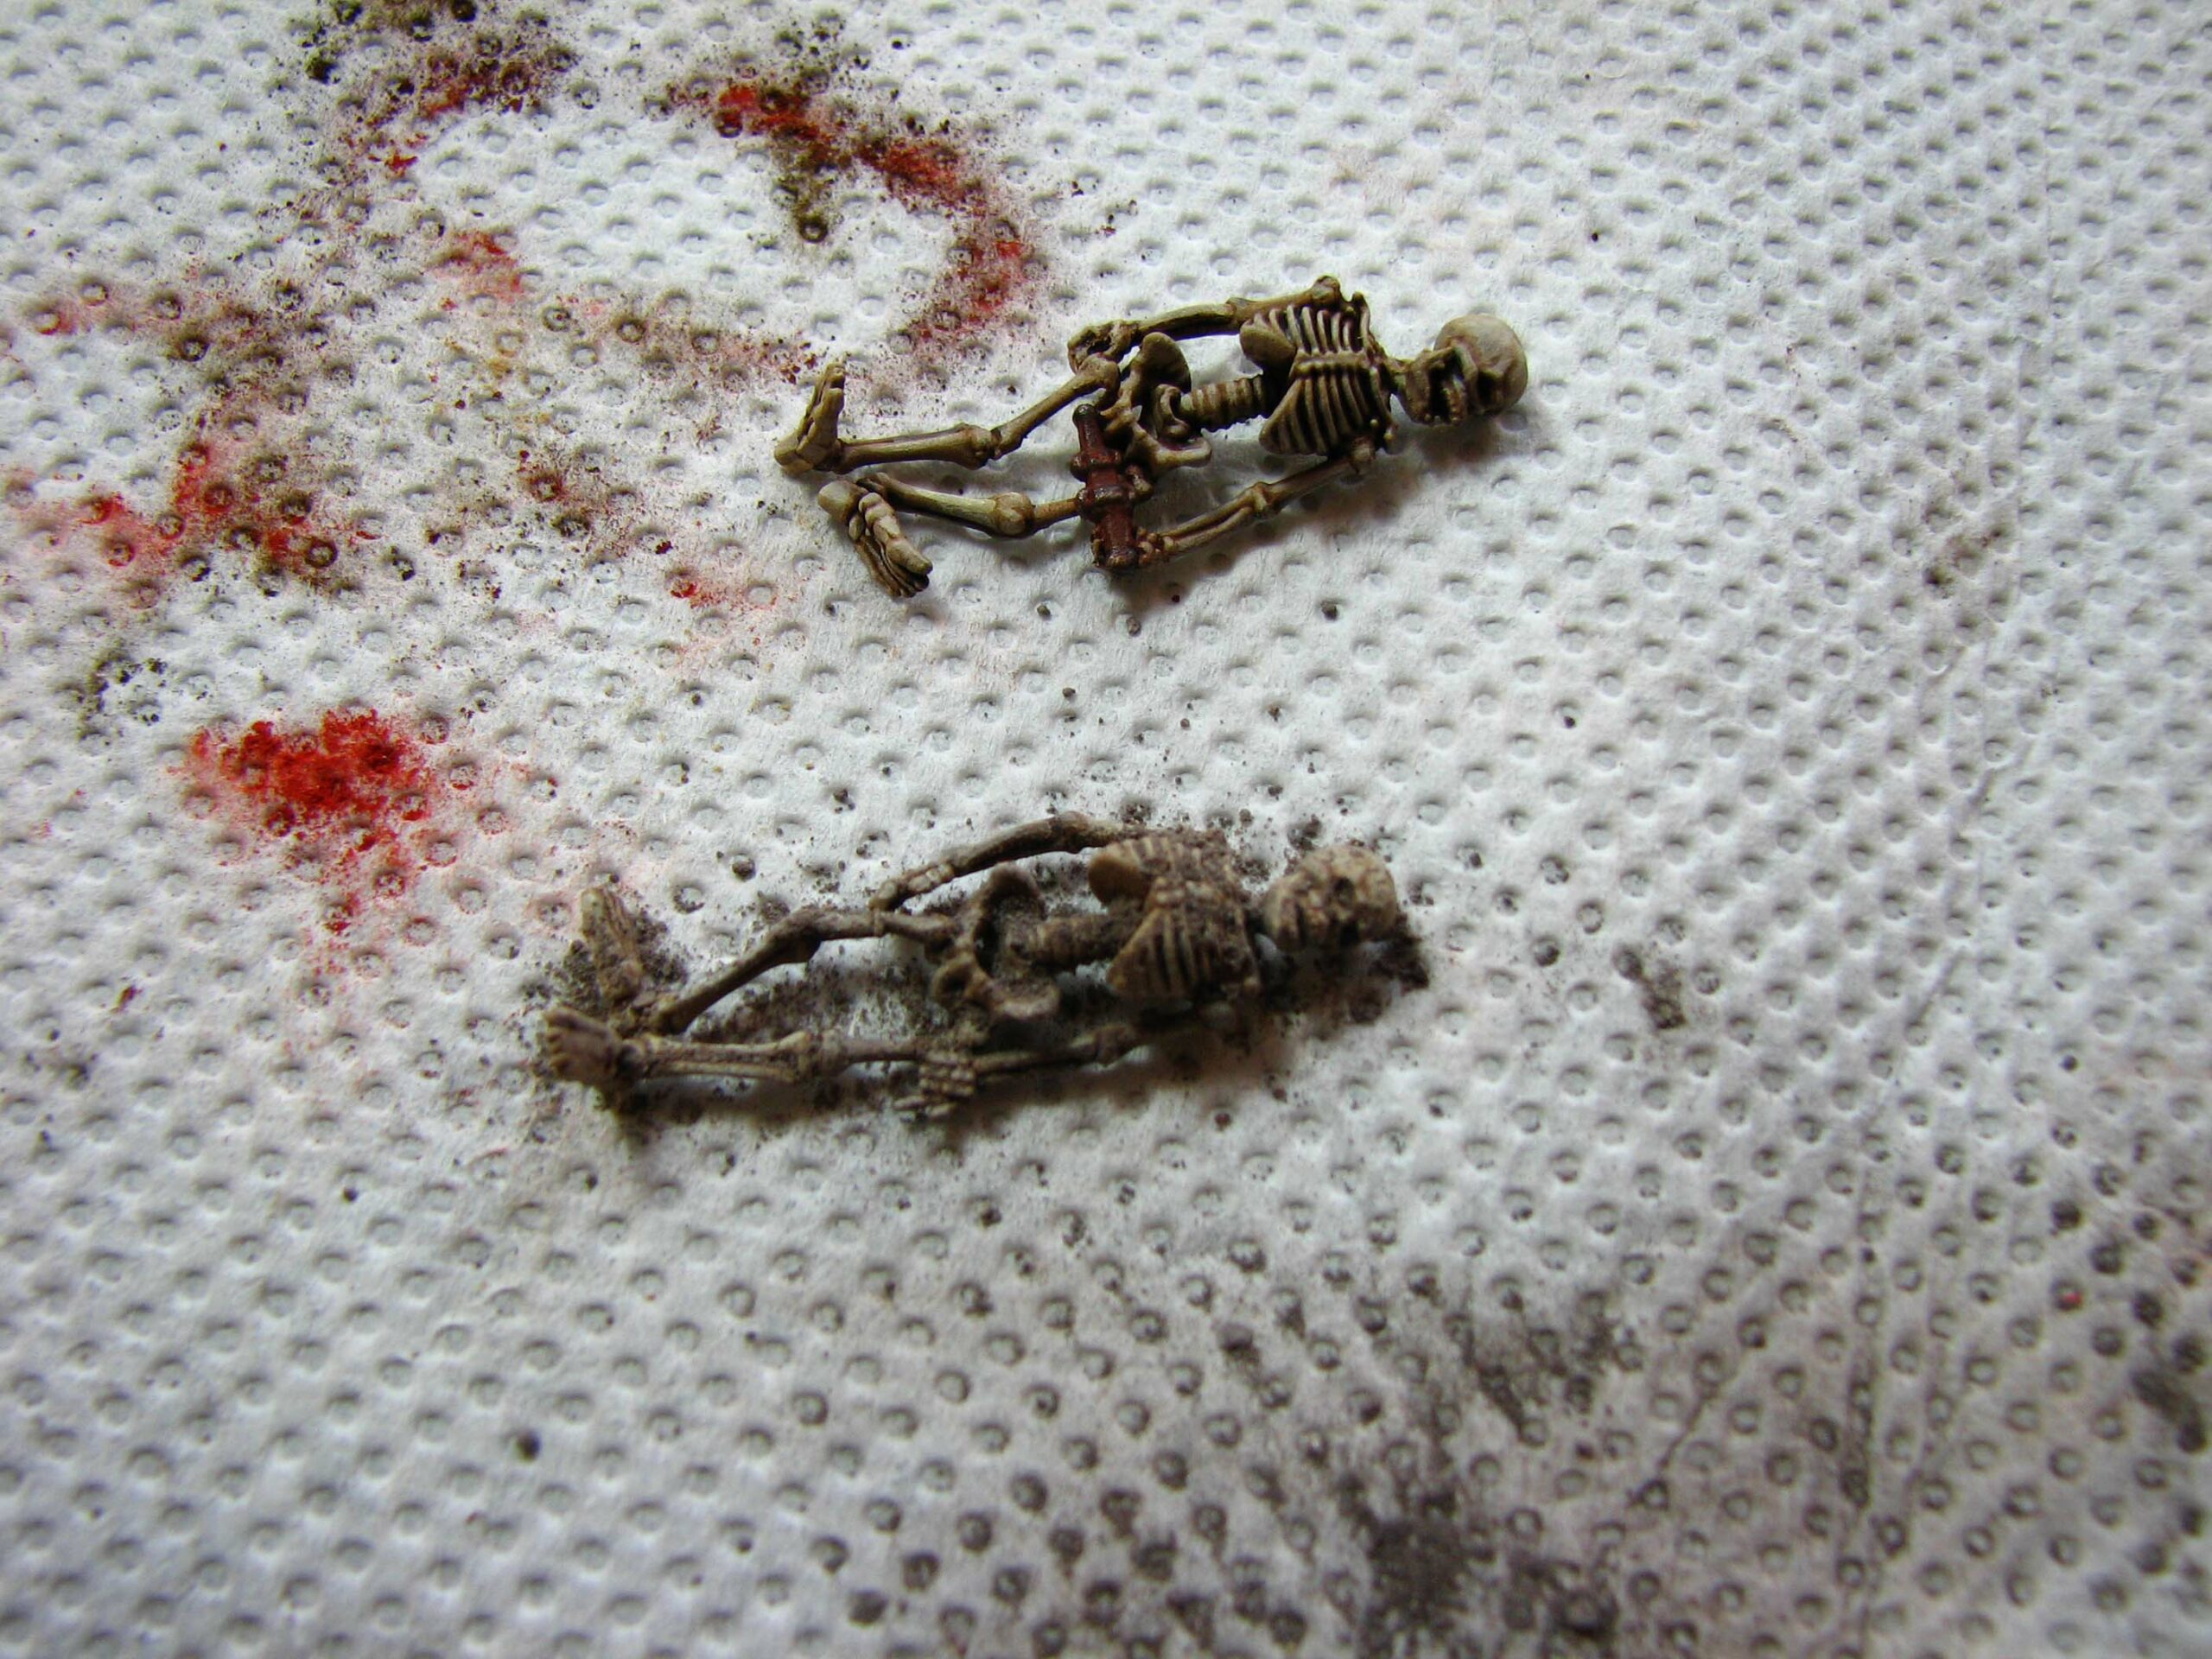
Assemble the Warlord Skeletons. The trick is, to break their bones (pun intended) to make them lie down.
Basecoat the skeletons with a bone colour. I like to use Army Painter Spray Primer Skeleton Bone, followed by Agrax Earthshade and highlights with RMS Yellowed Bone and RMS Pure White. The sheath of the dagger is painted with a dark red, while iron fittings and the sword is painted with Vallejo Gunmetal Grey. Highlight the metals again with Vallejo Silver.
With the help of red pigments add some rust to the sword and dagger and fixate with AK Pigment Fixer.

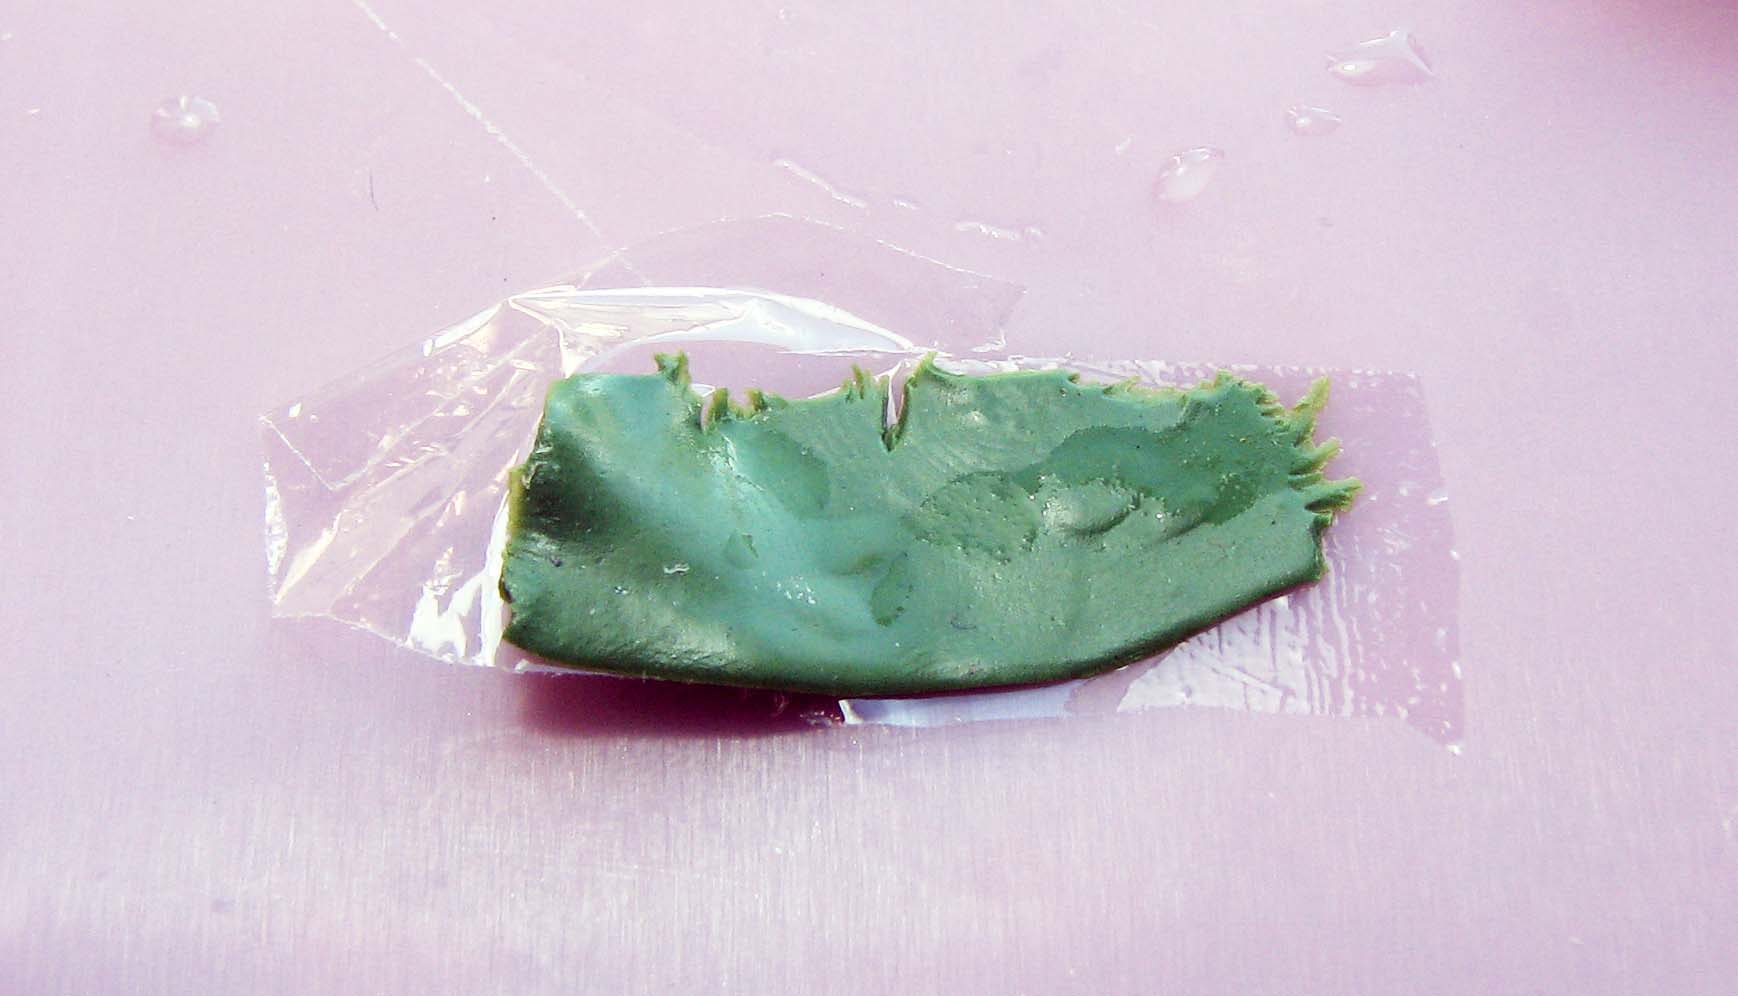
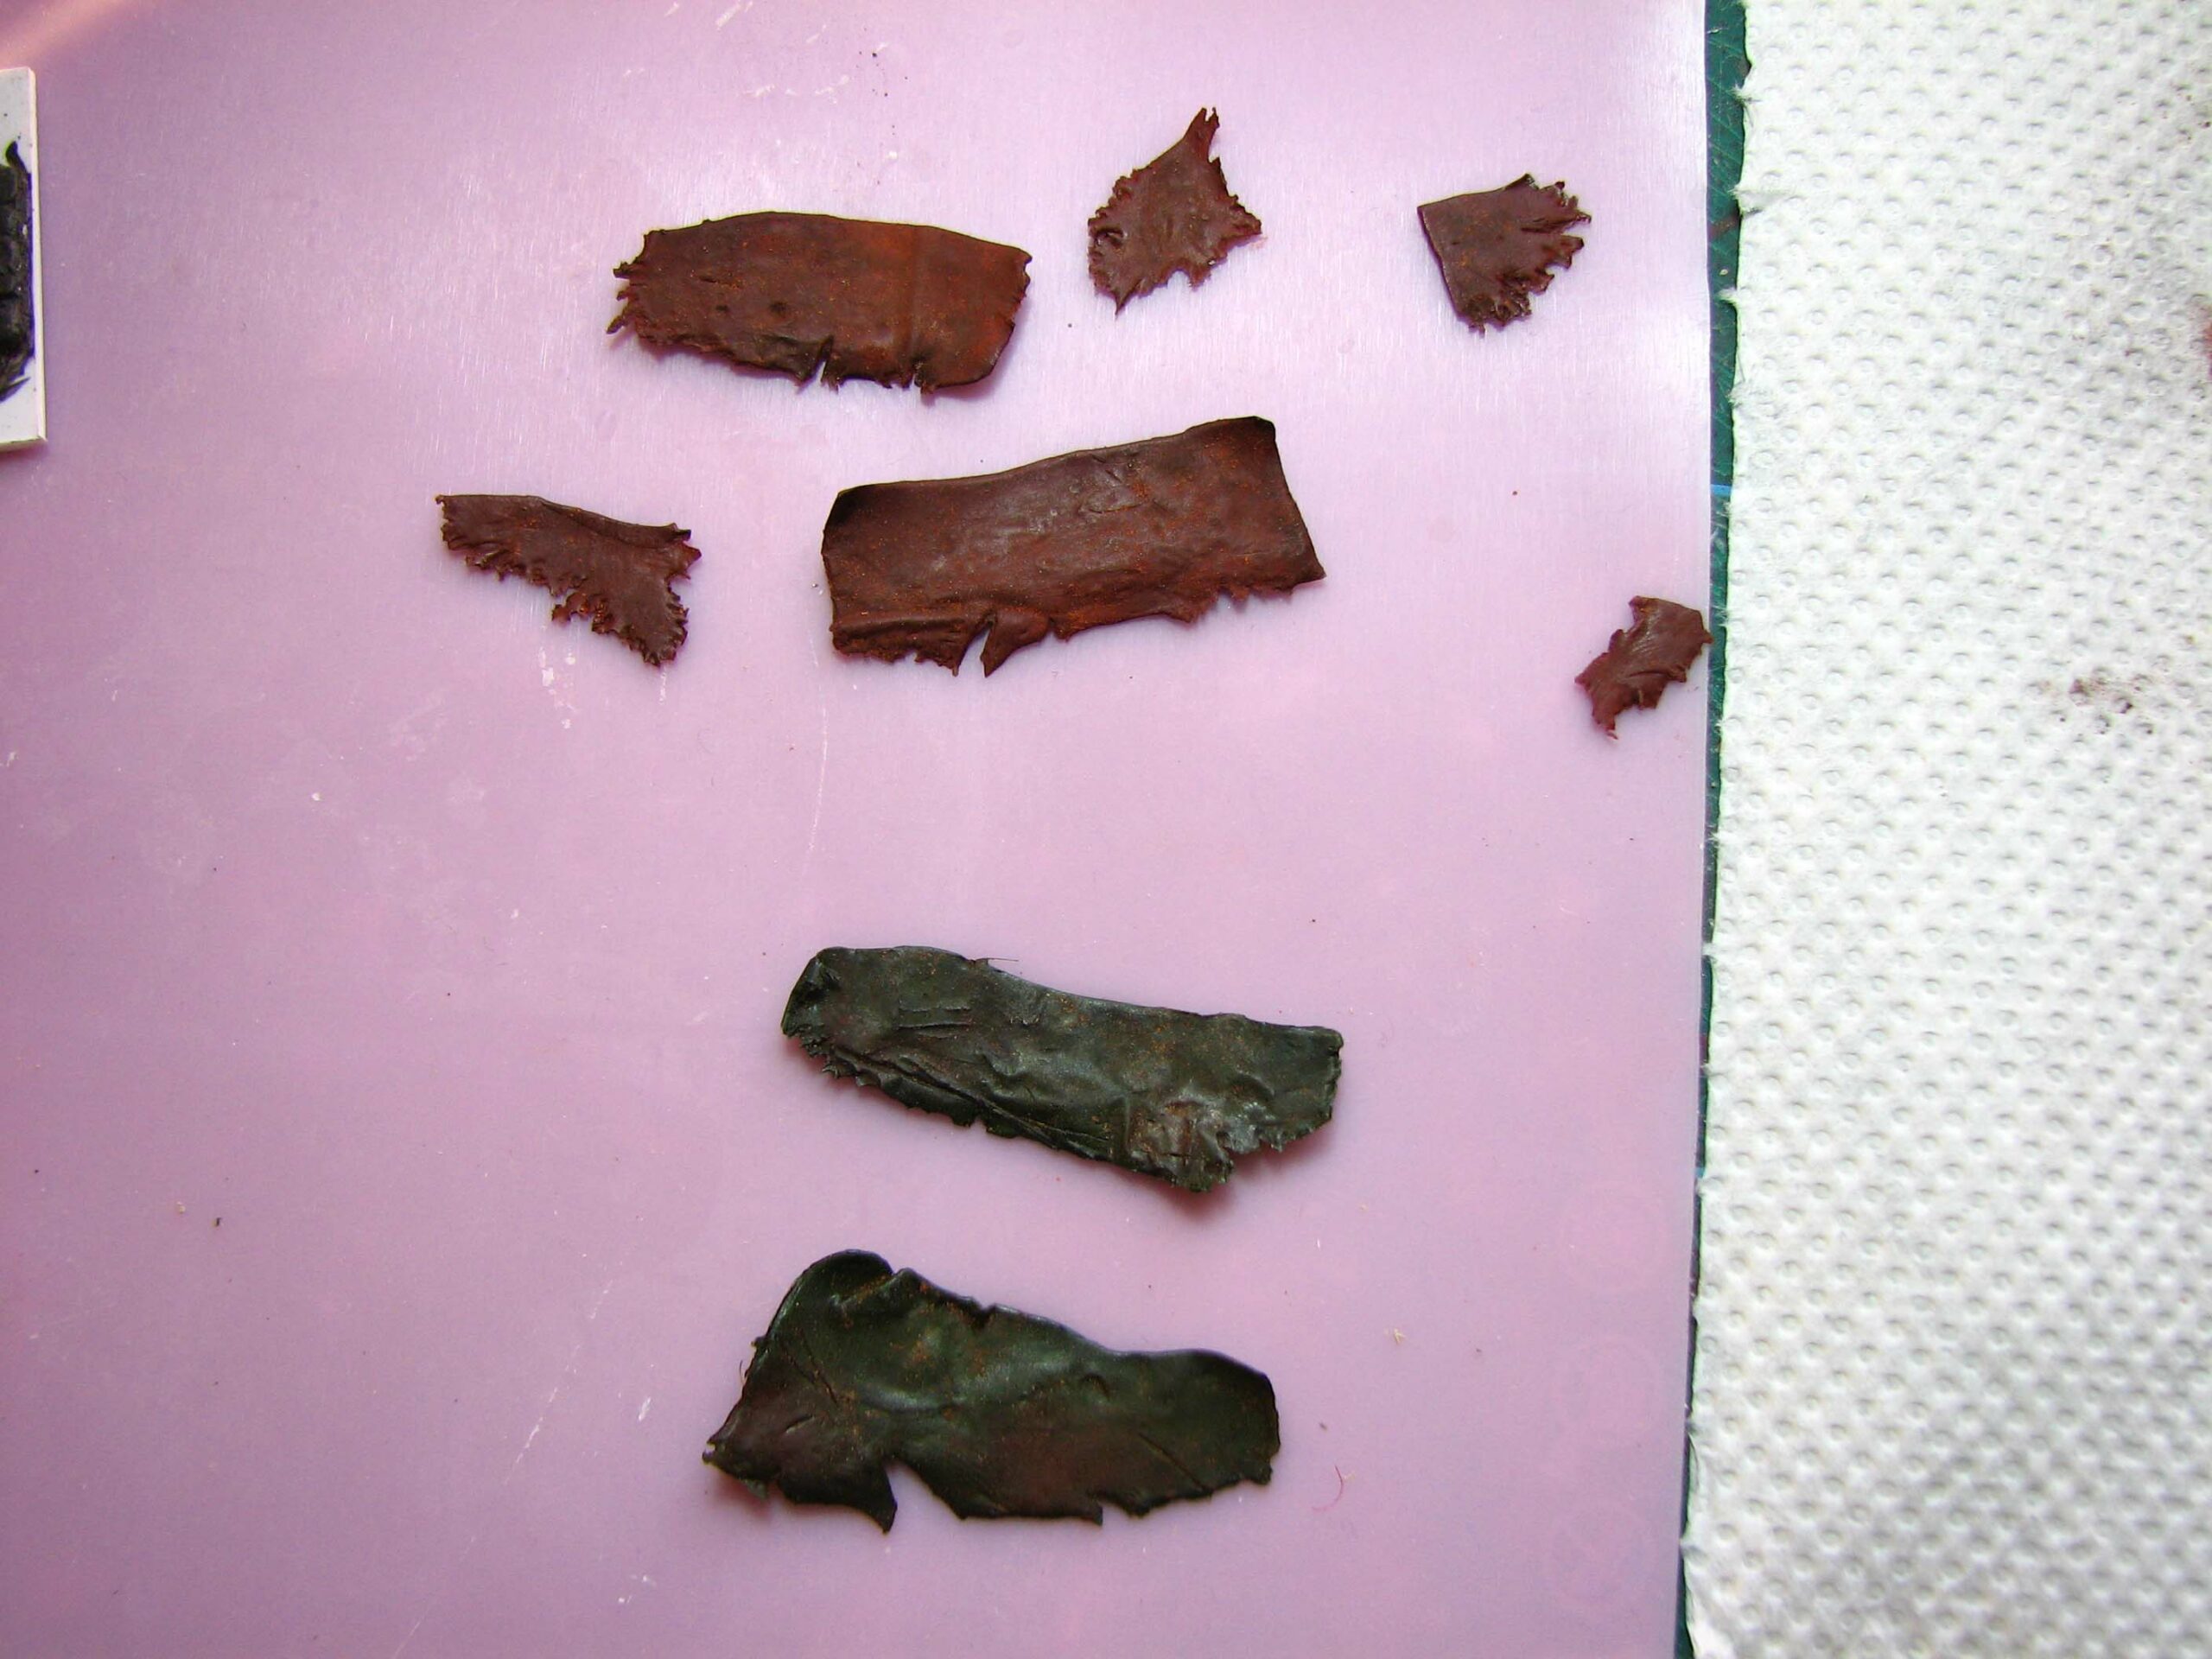
The shrouds
Sculpting shrouds is fairly easy. Place some greenstuff on a no-stick surface and flatten it out. Now cut a rectangle out and use the knife to give the edges a ripped look.
Place a piece of glad wrap in one of the alcoves and transfer the greenstuff. Position and shape the putty and let it cure. Next, take the shrouds and paint them. I used different shades off brown, red, green and yellow. I didn’t want to overdo it with the highlights, as the shrouds are old and in a process of decay.
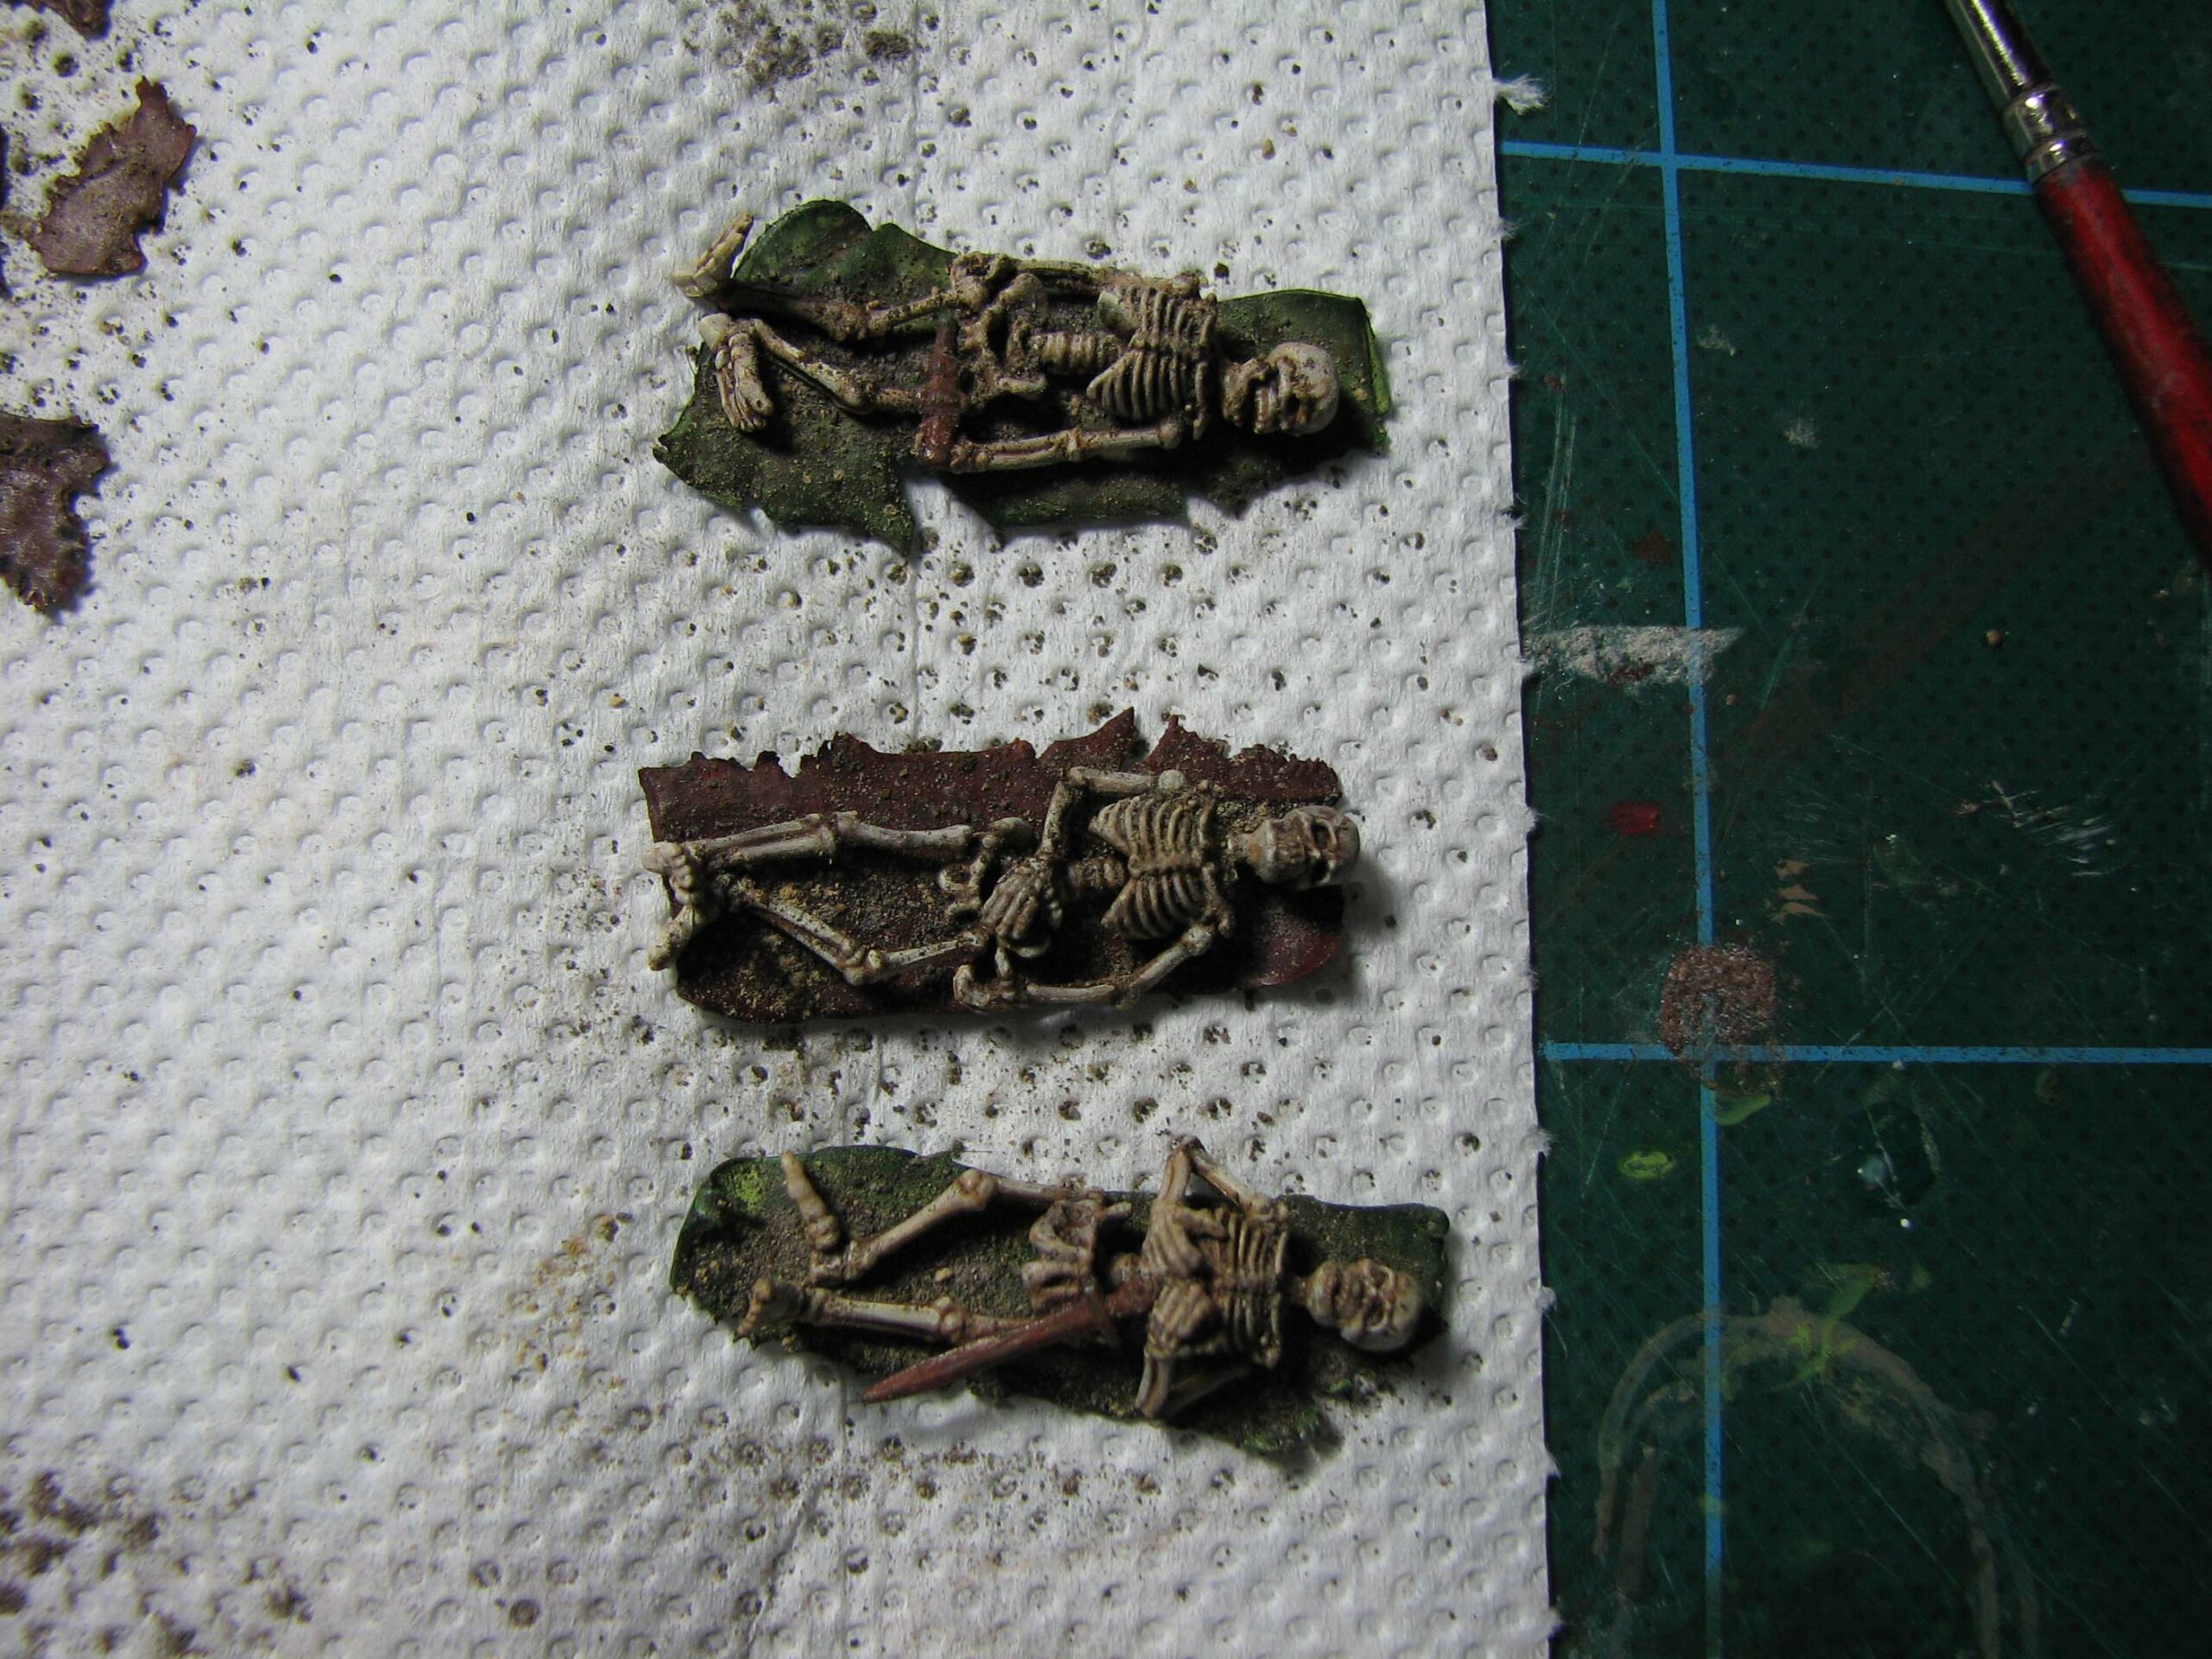
Glue the skeletons on the shrouds and sprinkle everything with pigments. Now all that is left is to glue the skeletons in the alcoves. Some of the alcoves I left empty or put only some shrouds inside.


I hope you enjoyed reading this series of tutorials and I would be very pleased if they inspire you to try your hand at some crypt terrain yourself.
[…] Here are a few of the items that will dress the scene, for tips on how to make the candles check out this link… https://daggerandbrush.wordpress.com/2014/04/26/crypt-of-the-damned-a-soul-shattering-tutorial-part-… […]
thanks thats a very encouraging compliment, i looked for shellac on ebay and it just brought up nail varnish after nail varnish. but it only seems to look like that in the sunbeams, i really like the door in the last image where the lights casting shadows from the boards that are more raised than others. i tried to do the door with the adornments but it was not going very good so i went for a plain strip of wrought iron but i seem to have lost that piece of green stuff.
Look for a shellac-based varnish at your local hardware store. Your piece is looking very impressive so far, by the way!
thanks for the compliment azazal and the tip on the shellac varnish. I find i have to do the door detail on a different surface and then transfer it to the door other wise the green stuff takes the weathered shape of the door and makes it all much harder. @daggerandbrush
I second Azazel. You should find shellac in a bigger hardware store. I use Briwax Sanding Sealer/Shellac. I like the detailing on the door. You can always add to it at a later tage, should you decide to do so.
Yeah just looked at the candle now, been thinking something was missing, the contrast is a bit mild so i shall give it a wash.
Feel free to link to a picture when you are finished. Would love to see what you came up with.
yes i shall show you., the bowl for the candle I messed up, tried to peel the matt medium back as very little of the paint job could be seen, it took some of the paint off. So I changed my plan a little bit, anyway to get to the point I will base coat the stairs and the top level, get some dry brushing and weathering on these few items that have detail. It will be an ipad photo so it will need all the help it can get for you to pick anything out, also I have the Wizard’s house with painted decking to show you as well, that is the only progress on that though.
Sounds excellent. I recommend to take pictures close to a window with natural daylight. IPad cameras are actually quite good resolution wise. You caa post a link to the picture directly in the comments. If need be I approve it, so that it can be displayed.
right I got some images of the Wizard’s house, they are not very good but gives a basic idea. I should have maybe taken them when the sun was a bit higher, the balsa looks quite fluffy with the sunlight directly on it. I am still dry brushing the terrain thing i am working on.
Thank you for the images. Looks already very cool. I think the Balsa has a nice weathered look to it and the detailing on the door worked out well, too. If you are concerned about the Balsa you could try to apply a bit of shellac (maybe thinned) and paint it afterwards, so that it is sealed against moisture.
Well the thing I was painting was only very small and no nooks and crannies where the wash might leave tide marks, so that was not a problem.
It turned out the technical and the verdigris are as far as I can tell the same shade, but the technical was more wash like and its chalky, so I think that one seemed the best.
However, now I have stuck the candle on you do not see much of the effort I put into painting them. Do you think I should bother pigmenting candles that in an outdoor setting? Bearing in mind it is supposed to be very old, like your vampire graveyard. Cheers
If it is a very old setting I would recommend to use some very fine pigments and dust them lightly on. Then brush away excess and fixate. The candles would surely be covered in dirt or dust over the years.
If the candles don’t have enough contrast dry a brown wash and highlight them as you would do with a miniature. Bleached Bone works well for this.
hello me again hope all is well, just a question about using the vallejo smoke on the bowls and stuff. just wondering how heavily to thin am i using it more like a wash or a normal colour ?
All going well over here Shane. Thank you for asking.
To answer your question: I use Smoke more like a wash. At least thinned 1:1 up to 1:5 (Smoke to Water). Smoke is pretty opaque and strong unthinned, but the magic happens when applied sparingly. You can build the effect up and experiment. It works best with metalic paints to add contrast.
If you use it straight from the bottle it can be used for rust effects. Maybe use some pigments to add a bit of body.
Happy crafting and all the best!
i usually use airbrush thinner to thin paints but ill use water so it works the same way as yours does. i did an experiment with the smoke and i noticed when it was thinned on my little pot it seemed to be gritty, but it was all drying so that might be what that was about. im going to try one of the citadel technicals nihilakh oxide for the verdigris, i have a vallejo game colour paint called verdigris going to see the diffrence in the shades prehaps one could be a heavier effect than the other.
There is a bit of a gritty texture there, but thinned down it behaves likr a wash. Could be that feature makes it so good for bronze.
You can use acrylic thinner, too. Less problems with water marks.
good thinking on the going thicker but then thinning as needed. I got a matt medium from winsor and newton, but it was a bit thin for doing the first branch layer, took a few coats sometimes. Doing the candles it would run down to the bottom. Ordered some regular, thanks for the help.
You are welcome. Yes, matt medium will be a bit thin if it is supposed to be used to give your paints more body. The gel I went for has the consistency of hair gel, not quite toothpaste, but as I said, you can easily thin it down if it tuns out too thick for your specific application.
This is great work as ever, but I’m a bit confused as tot which golden’s matt gel you use. There seems to be quite a few, is it the same stuff you use in the ancient yew tree also.
Generellay speaking I use the Golden Acrylic matte Gel both soft and regular, depending how much body you want. I still thin it slightly depending on the application. As a topcoat I try to achieve a consistency similar to slightly thinned acrylic paint from the usual modelling brands like Vallejo, Citadel or Reaper. If you go too heavy the gel can get cloudy (which is by the way an excellent effect to depict wax). Coating branches etc. is done using acrylic caulking, because it is cheaper. You could use some heavy body gel and see if you can already achieve a bark texture at this stage, but I prefer to carve it in an additional layer of woodfiller.
I think buying a heavier body gel is always a better choice. You can easily thin it down to whatever consistency you need. The other way round is not possible.
Acrylic gel gloss is excellent for water features, puddles and snow/ice effects. You can use it to stabilise surfaces, too, if you paint over it. For instance if you use the crackle medium you can use thinned down acrylic gel to make it more resilient.
[…] quality every (and I mean every) time. Whether it’s his super detailed and easy to follow tutorials or delightful, story and character-infused reviews, a Dagger and Brush post in my WordPress reader […]
I loved it rather than lived it obviously 😉 damn that predictive text and my fat fingers!
Wow have lived this tutorial, effects & painting are fantastic, you should be well chuffed. Wish I could play on it!
Thank you, much obliged! Chuffed and puffed. I need to work on several pieces at a time to get more modules ready to play faster. I guess now, as I learned quite some lessons, it should be easier to built other crypt modules.
Outstanding work. I love finely and lovingly detailed elements on scenery as you’ve done here. I’ve also really enjoyed reading through your rationale for the different elements. Kudos!
Thank you. Always pleased if the tuts are inspiring. I am already thinking about where to go from here. More crypta themed stuff or some more generic modules. I might stick with the crypt theme, without getting too boring or samey. I am thinking of an underground lake or doing something with that massive Kaladrax model I have lying around.
I’m really liking the crypts, though you can always create some tiles transitioning into underground caverns or into “dungeon basement”. Maybe both over a period of time. Crypts transitioning into natural caverns and caves into an underground river feeding into a lake would be an amazing project to see…
You know what, I think that is exactly what I will aim for. It also makes sense if one applies a bit of logic to the Dungeon. First they realise there are natural caverns under the soil and they built a necropolis on top. The caverns are extended where necessary, but surely some smaller natural caverns remain. Here I can see some nice transition into some kind of grotto. The actual living quarters for priests can be separated by a steel door. This way I can use the living quarters as generic dungeon rooms, too. Finally I could even have some underdark terrain. Might even be an idea to have a stack of tiles, with staircases allowing to climb deeper into the dungeon…Thank you for the inspiration. Connecting it all like a organic structure should make it easy to combine all of the tiles without having unused ones stored away or the whole thing making no sense, a problem many video games have.
Fantastic work, like stepping into one of the crypts in Skyrim. I haven’t worked with pigments before, going to give it a try on future terrain projects.
Thank you. At first I had some problems with getting the pigments fixed in place without destroying the look. The AK pigment fixer on enamel basis (basically enamel paint without pigment) works like a spell. I can only recommend it to spare you some frustration when you start out using pigments.
Very well done and such attention to detail! I particularly like the 15mm mini used as a statue. The resting skeletons have very realistic poses too.
Thank you for your kind words. The detailing was really the best part. Finally I found some good use for that uninspired 15mm miniature I once ordered as a trial. The rough face really works for a statue. To achieve the realistic poses for the skeletons one really needs to cut the legs off the hip bones or cut them at the knees. The arms can be arranged easily, however. I can only recommend the WGF skeletons for any dungeon dressing projects.
So very cool! The verdigris looks perfect.
Thank you. I am surprised it turned out so well, given it is such a simple technique, but I guess in the end the simple stuff does sometimes yield the best results.
Wow! Such an amazing crypt 🙂 styrene siding be damned, we need to get some adventuring minis into that right now and have a game! 😀
There be Games and potentially dragons, but surely undead.