
I started out creating some simple modular floor tiles for our Dungeon & Dragons sessions, but they lacked a three-dimensional feel. Building a layout using these tiles during a session did also prove time-consuming – just too many small bits. Finally, I decided to go for something resembling the beautiful Dwarven Forge dungeon sets, only with a more rigid room design. Over on my YouTube channel you can get an idea what we are going to built: some fancy crypt terrain.
In this first part of the tutorial I will document the creation of my initial module, the Crypt of the Damned, providing the reasoning behind my design choices, a list of all materials needed and detailed step-by-step instructions. The crypt’s design is inspired by the video game Skyrim and its long forgotten burial mounds, featuring skeletons and mummified bodies in small wall alcoves garnished with urns, sacrificial offerings, spider webs and overgrown rough stone floors.

Design philosophy
The crypt module is supposed to be compatible with any other module I will create in the future. All modules should be durable, yet lightweight, aesthetically pleasing and have a professional finish. Nevertheless, it is also very important that they can be used with different rule systems, no matter if they are grid based or allow free movement.
Having a grid often implies geometric, artificial room shapes. To avoid this I decided to indicate a grid in parts of the module, but not in all places. For instance a stone floor lends itself better to integrating a grid pattern than does a section with a dirt floor. I also tried to avoid a geometric look, taking into account that this would in some cases limit the number of usable tiles.
To match the bases of my miniatures and to allow bigger miniatures to be placed easily I went for 3 cm by 3 cm tiles, with a maximum room size of 8 tiles by 8 tiles, making the room a square with 24 cm long sides. This would, however, not allow to add walls in a room that uses the entire space. Accordingly I added a rim of 1.5 cm, which in turn will create a 3 cm by 3 cm tile when placed against a connection point of another module, making the final module a square with 27 cm long sides.
To allow free combination of modules they would all need to have the same floor height and entrances/exits would need to be placed in the centre of each side. Naturally, special modules could be made allowing a change in height via a staircase. Another idea are bigger entrance/exit sections or double-sized and quadrupel-sized modules to depict oblong or very spacious caverns.
Another issue is the height of the crypt walls. While the integration of walls is indispensable to achieve a three-dimensional appearance, ease of access and effortless placement of bigger miniatures or miniatures with a sweeping stance is of equal importance. I first thought of 4 cm high wall segments, but realised soon that bigger miniatures like Dragons, Ettins and so on would be difficult to place. 3 cm seemed to be a good compromise between accessibility and appearance. In some cases the need might arise to have slightly higher walls to depict a certain room feature.
What you need – the basic layout
- XPS to provide the basic structure for the floor and the walls. I used sheets with a thickness of 1 cm, but thicker sheets can obviously be used, too.
- Any glue that can glue EPS or XPS. Be careful here to choose an appropriate product, as many glues react with XPS and dissolve it. I use Selleys Liquid Nails Fast.
- Wood filler to fill in gaps.
- Air-drying modelling clay to sculpt the rock walls and oven bake modelling clay, for instance Fimo Soft or Premol Sculpey. The latter will be needed to make a master and pressure mold for the rough rock floor.
- Finely sieved soil from your garden or backyard.
- Wood glue.
- Craft paint (brown, gray, black) to paint the rough stone floor and the rock walls.
- Plastic card to cover the sides, bottom and top of the module for a professional finish. Please see Part IV of this tutorial. Alternatively: laser cut profiles.
- Sharp implements come in handy, too. Best is a X-acto knife.
- Sculpting tools and a needle with a sharp tip.
- Brushes of various sizes to apply paint and wood glue, but also to drybrush.
- Different pigments ranging from dark brown to light brown.
How to build the crypt
We start with the frame. You can cut it by hand or use a laser cutter. Plywood is an option, acrylic, styrene sheet or MDF. Set it aside for now. We will come back to it later. Just keep in mind the thickness of your material, when you cut the XPS. Otherwise it won’t fit!
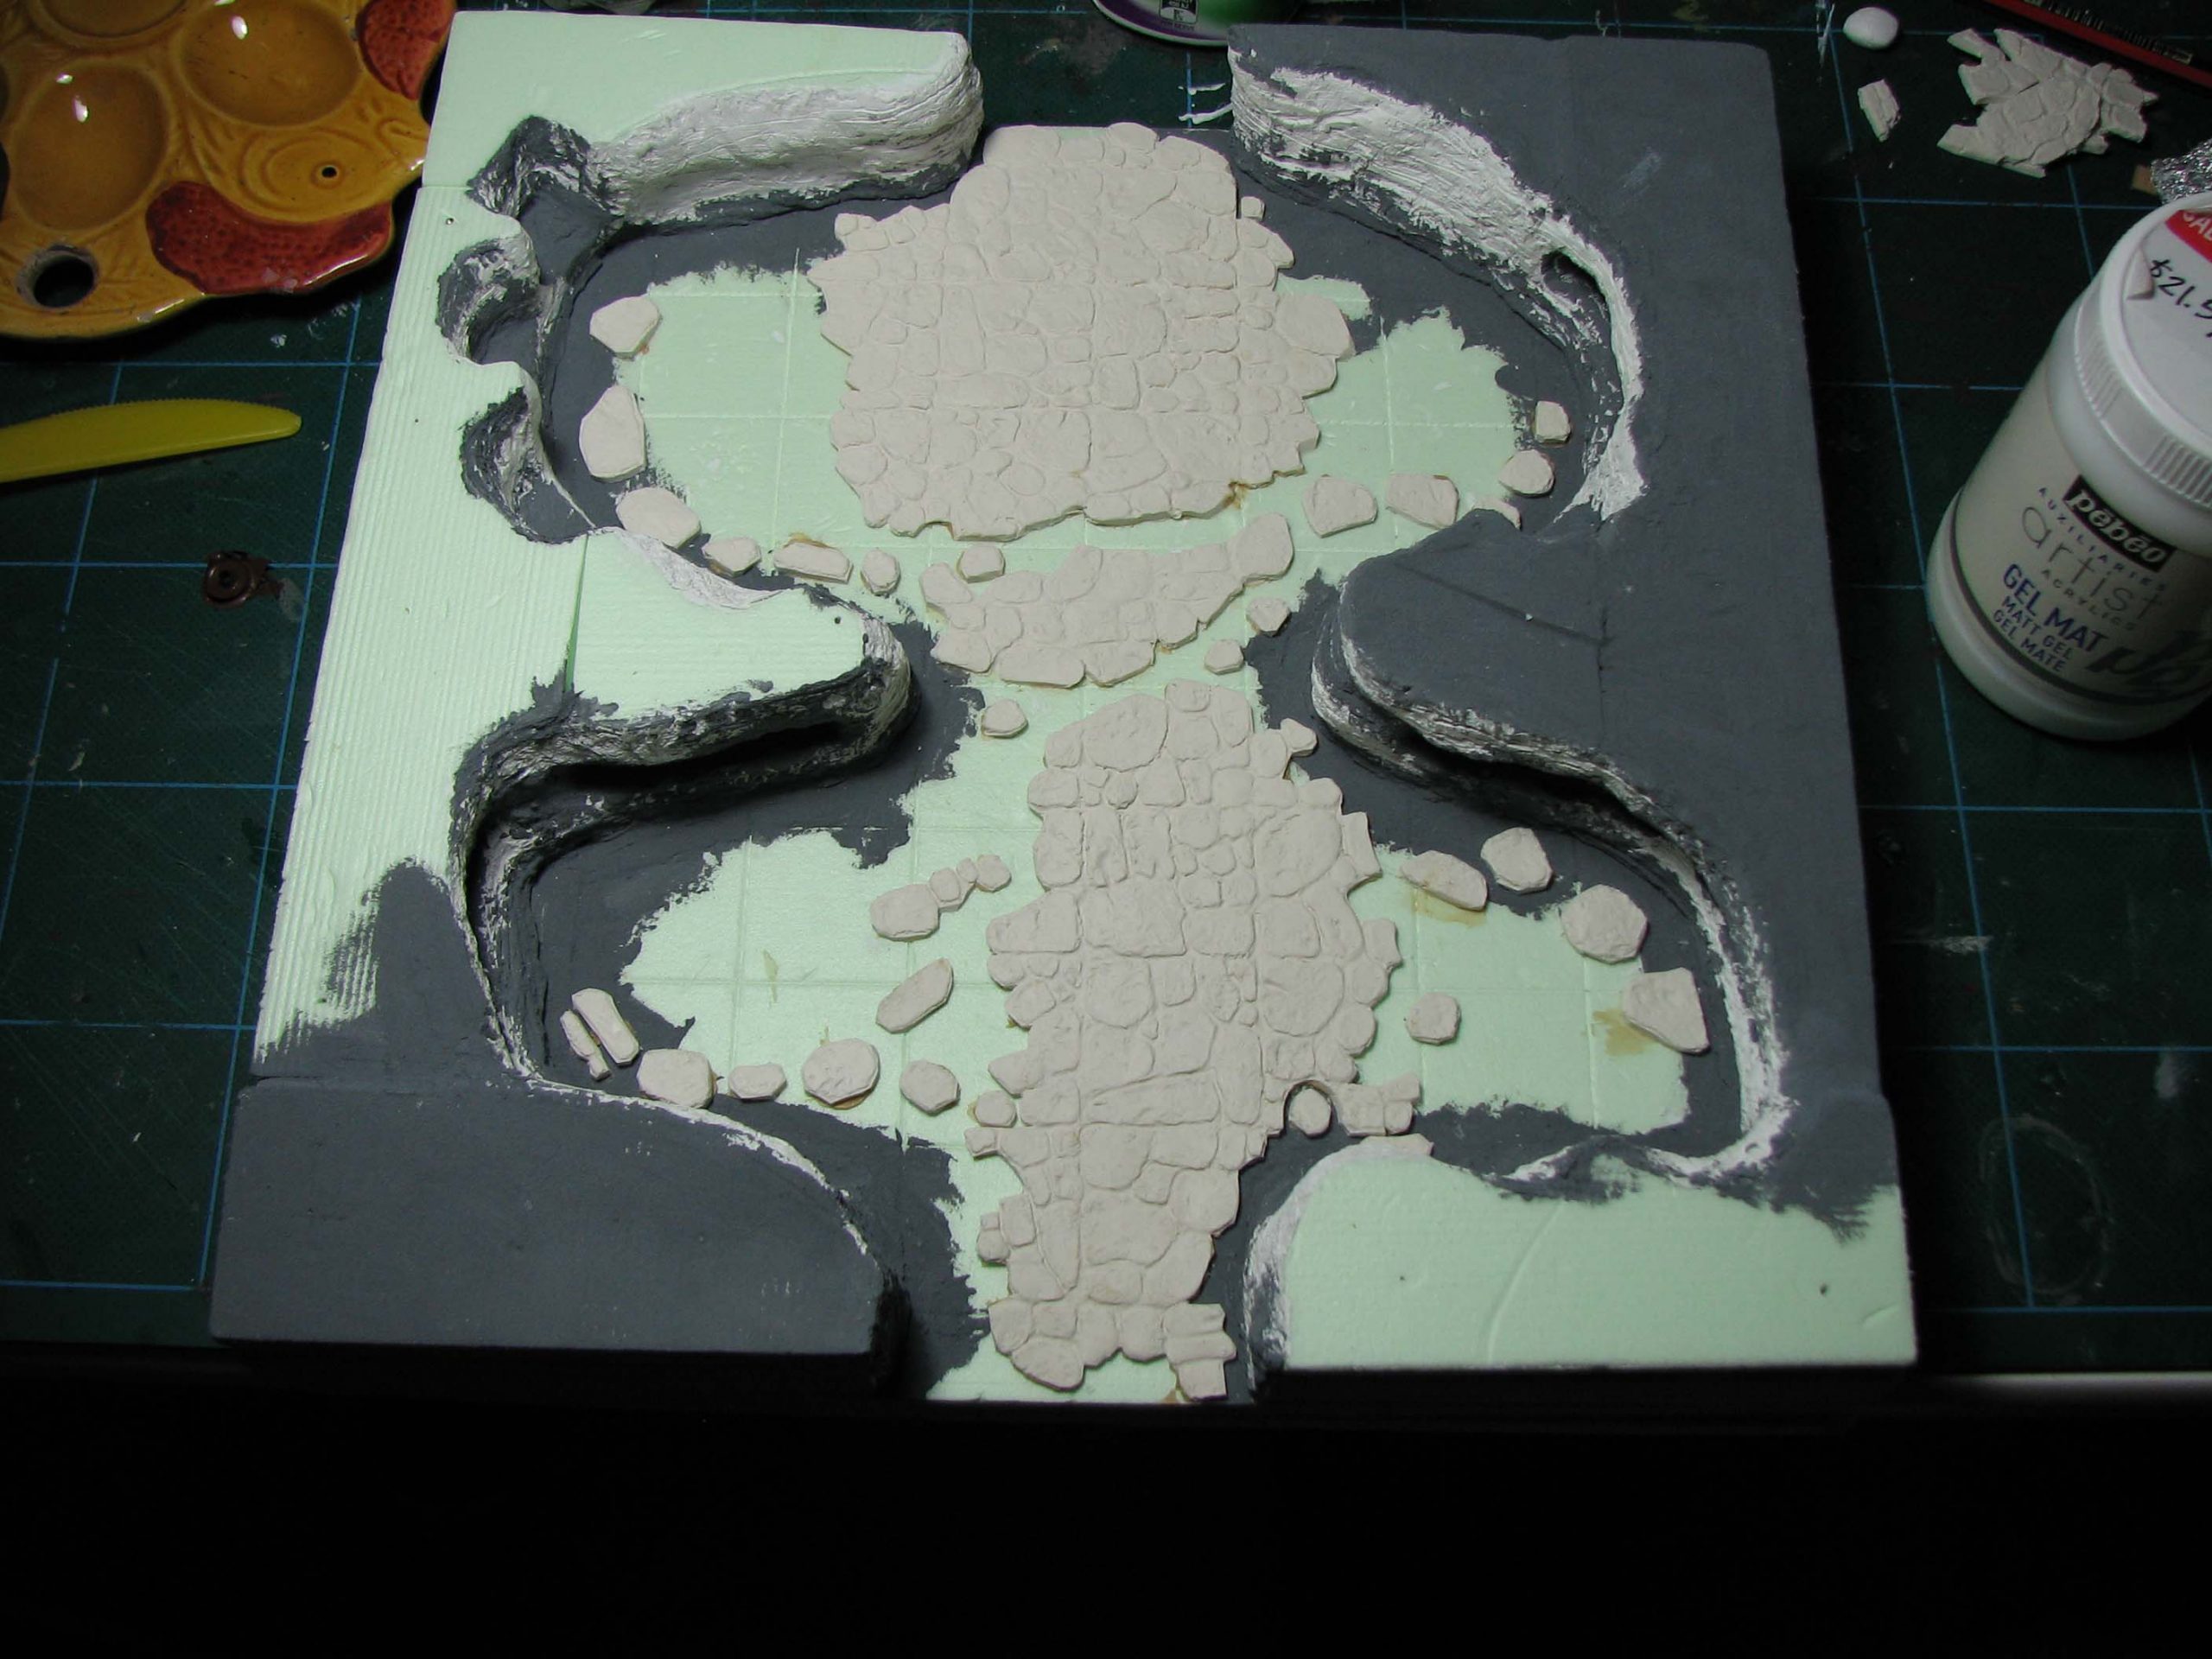
Cut two squares – in my case 26.7 x 26.7 x 1cm – and glue them together. See if they fit in the frame, if not sand or cut the edges. Take the base out of the frame and draw a grid pattern to facilitate the design of the room.
Sculpting the crypt walls and floor
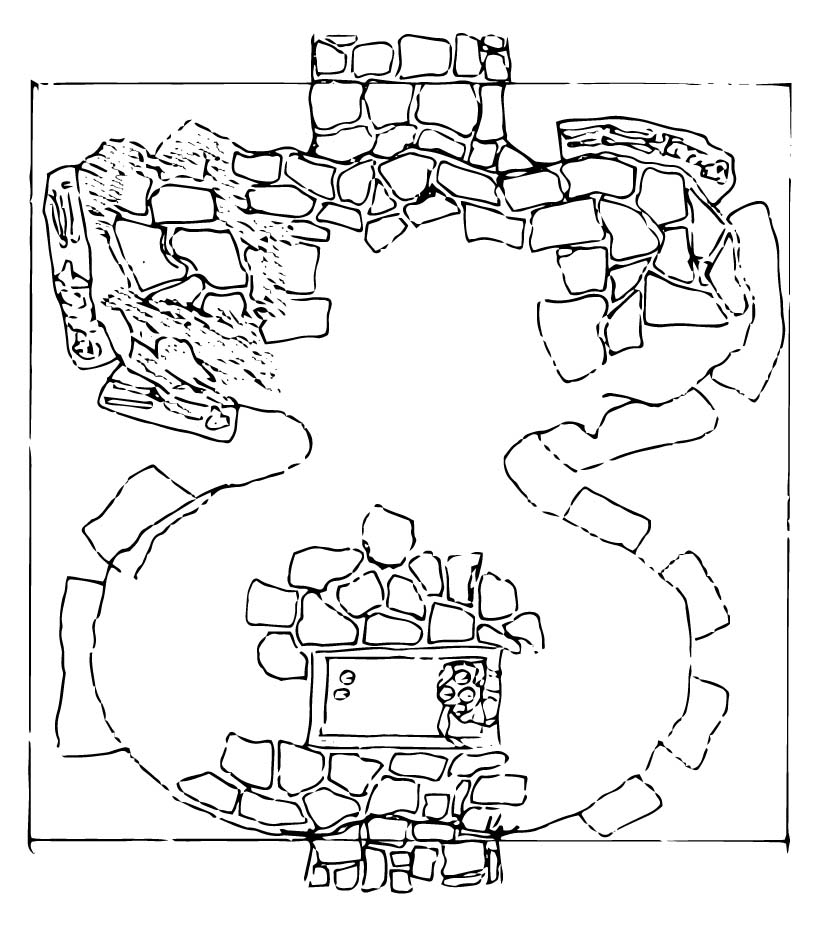
Making a sketch of the room on a piece of paper before you start building up the wall and floor is a good idea. It is much easier that way to visualise the final look.
When you are happy with the outline, built up the wall sections using cut-to-size pieces of styrofoam. If you built it up horizontally it is a good idea to use the bottom one as a template and cut the remaining layers using this aid. If the wall segments are very thin it might be an idea to build them up vertically. No matter how you go about it, make sure the sides are fairly even. Otherwise you have to sand them later to fit the frame. If you stack thin pieces of XPS it is easier to build the alcoves. Otherwise you have to cut their shape out of the middle section of a larger piece.
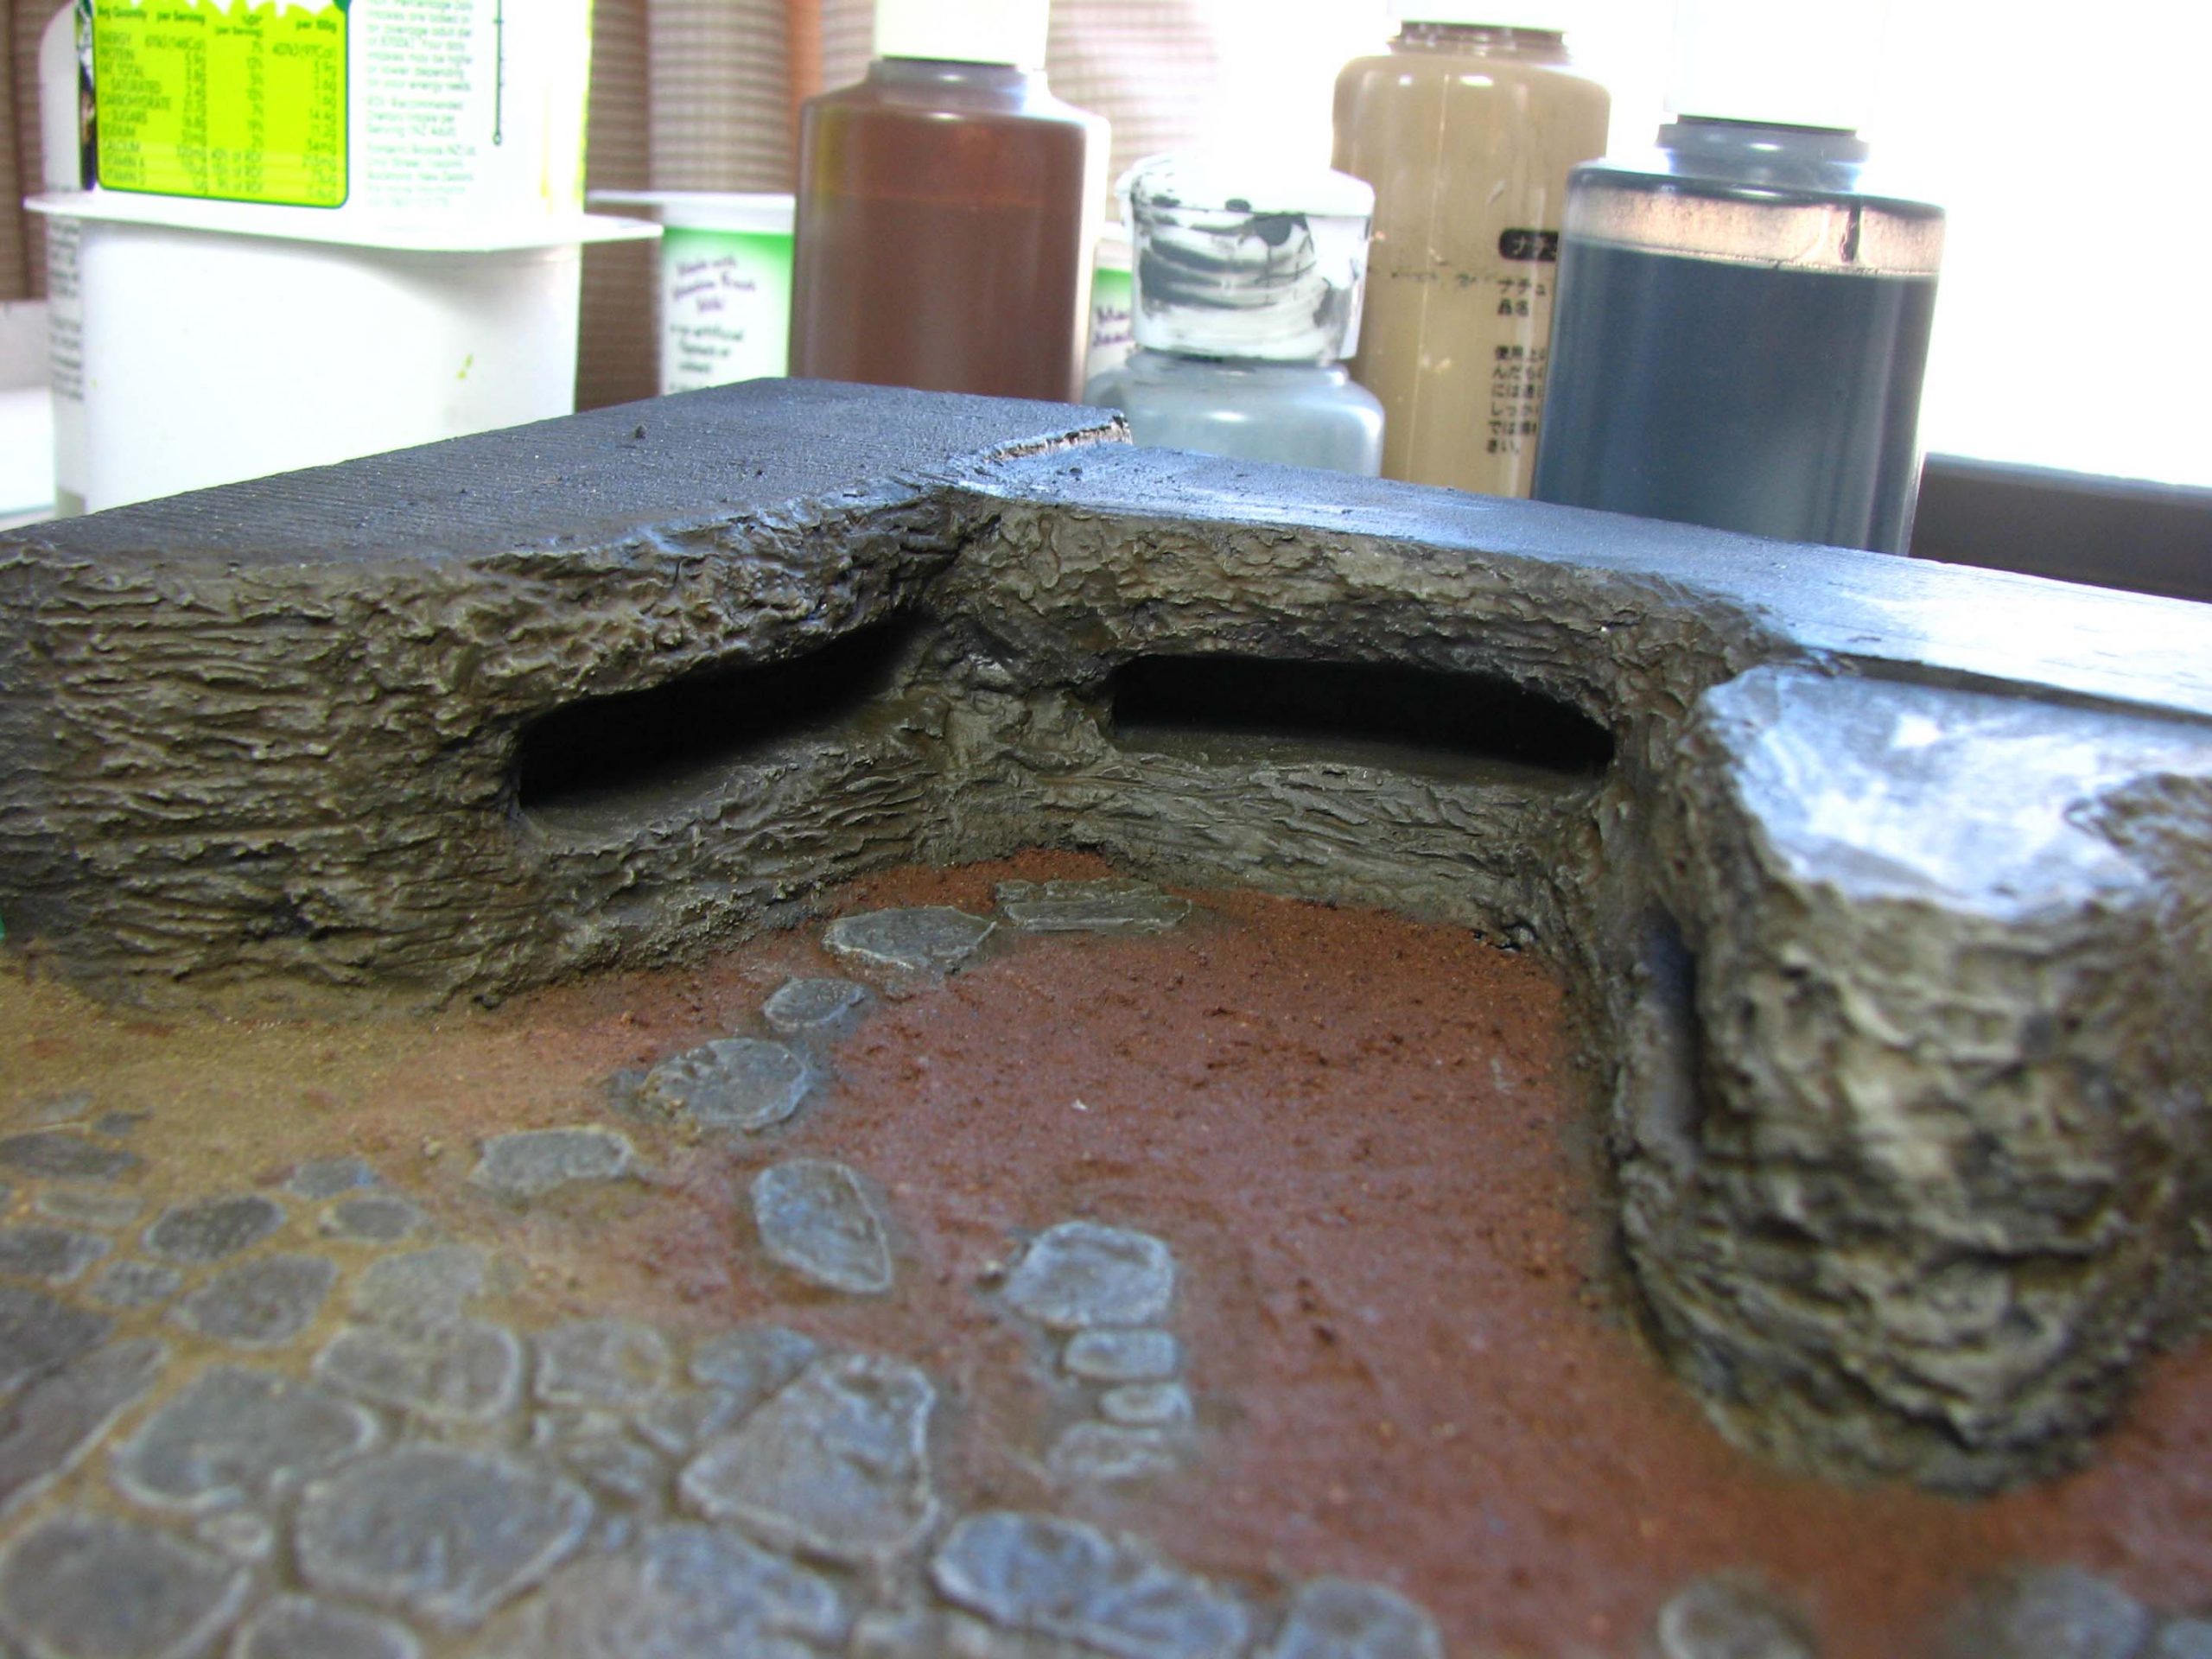
Use a sharp knife and refine the shape of the rock face, adding protruding elements and deeper crevices. Next, take the air-dry modelling clay and cover the walls with it. Using a sculpting tool, rolled up tin foil, bark or other objects with an interesting rock like texture, to texture the clay. Let the clay dry overnight and fill in any gaps on the next day with wood filler. I mixed some grey paint in to make it easier to paint the parts later on.
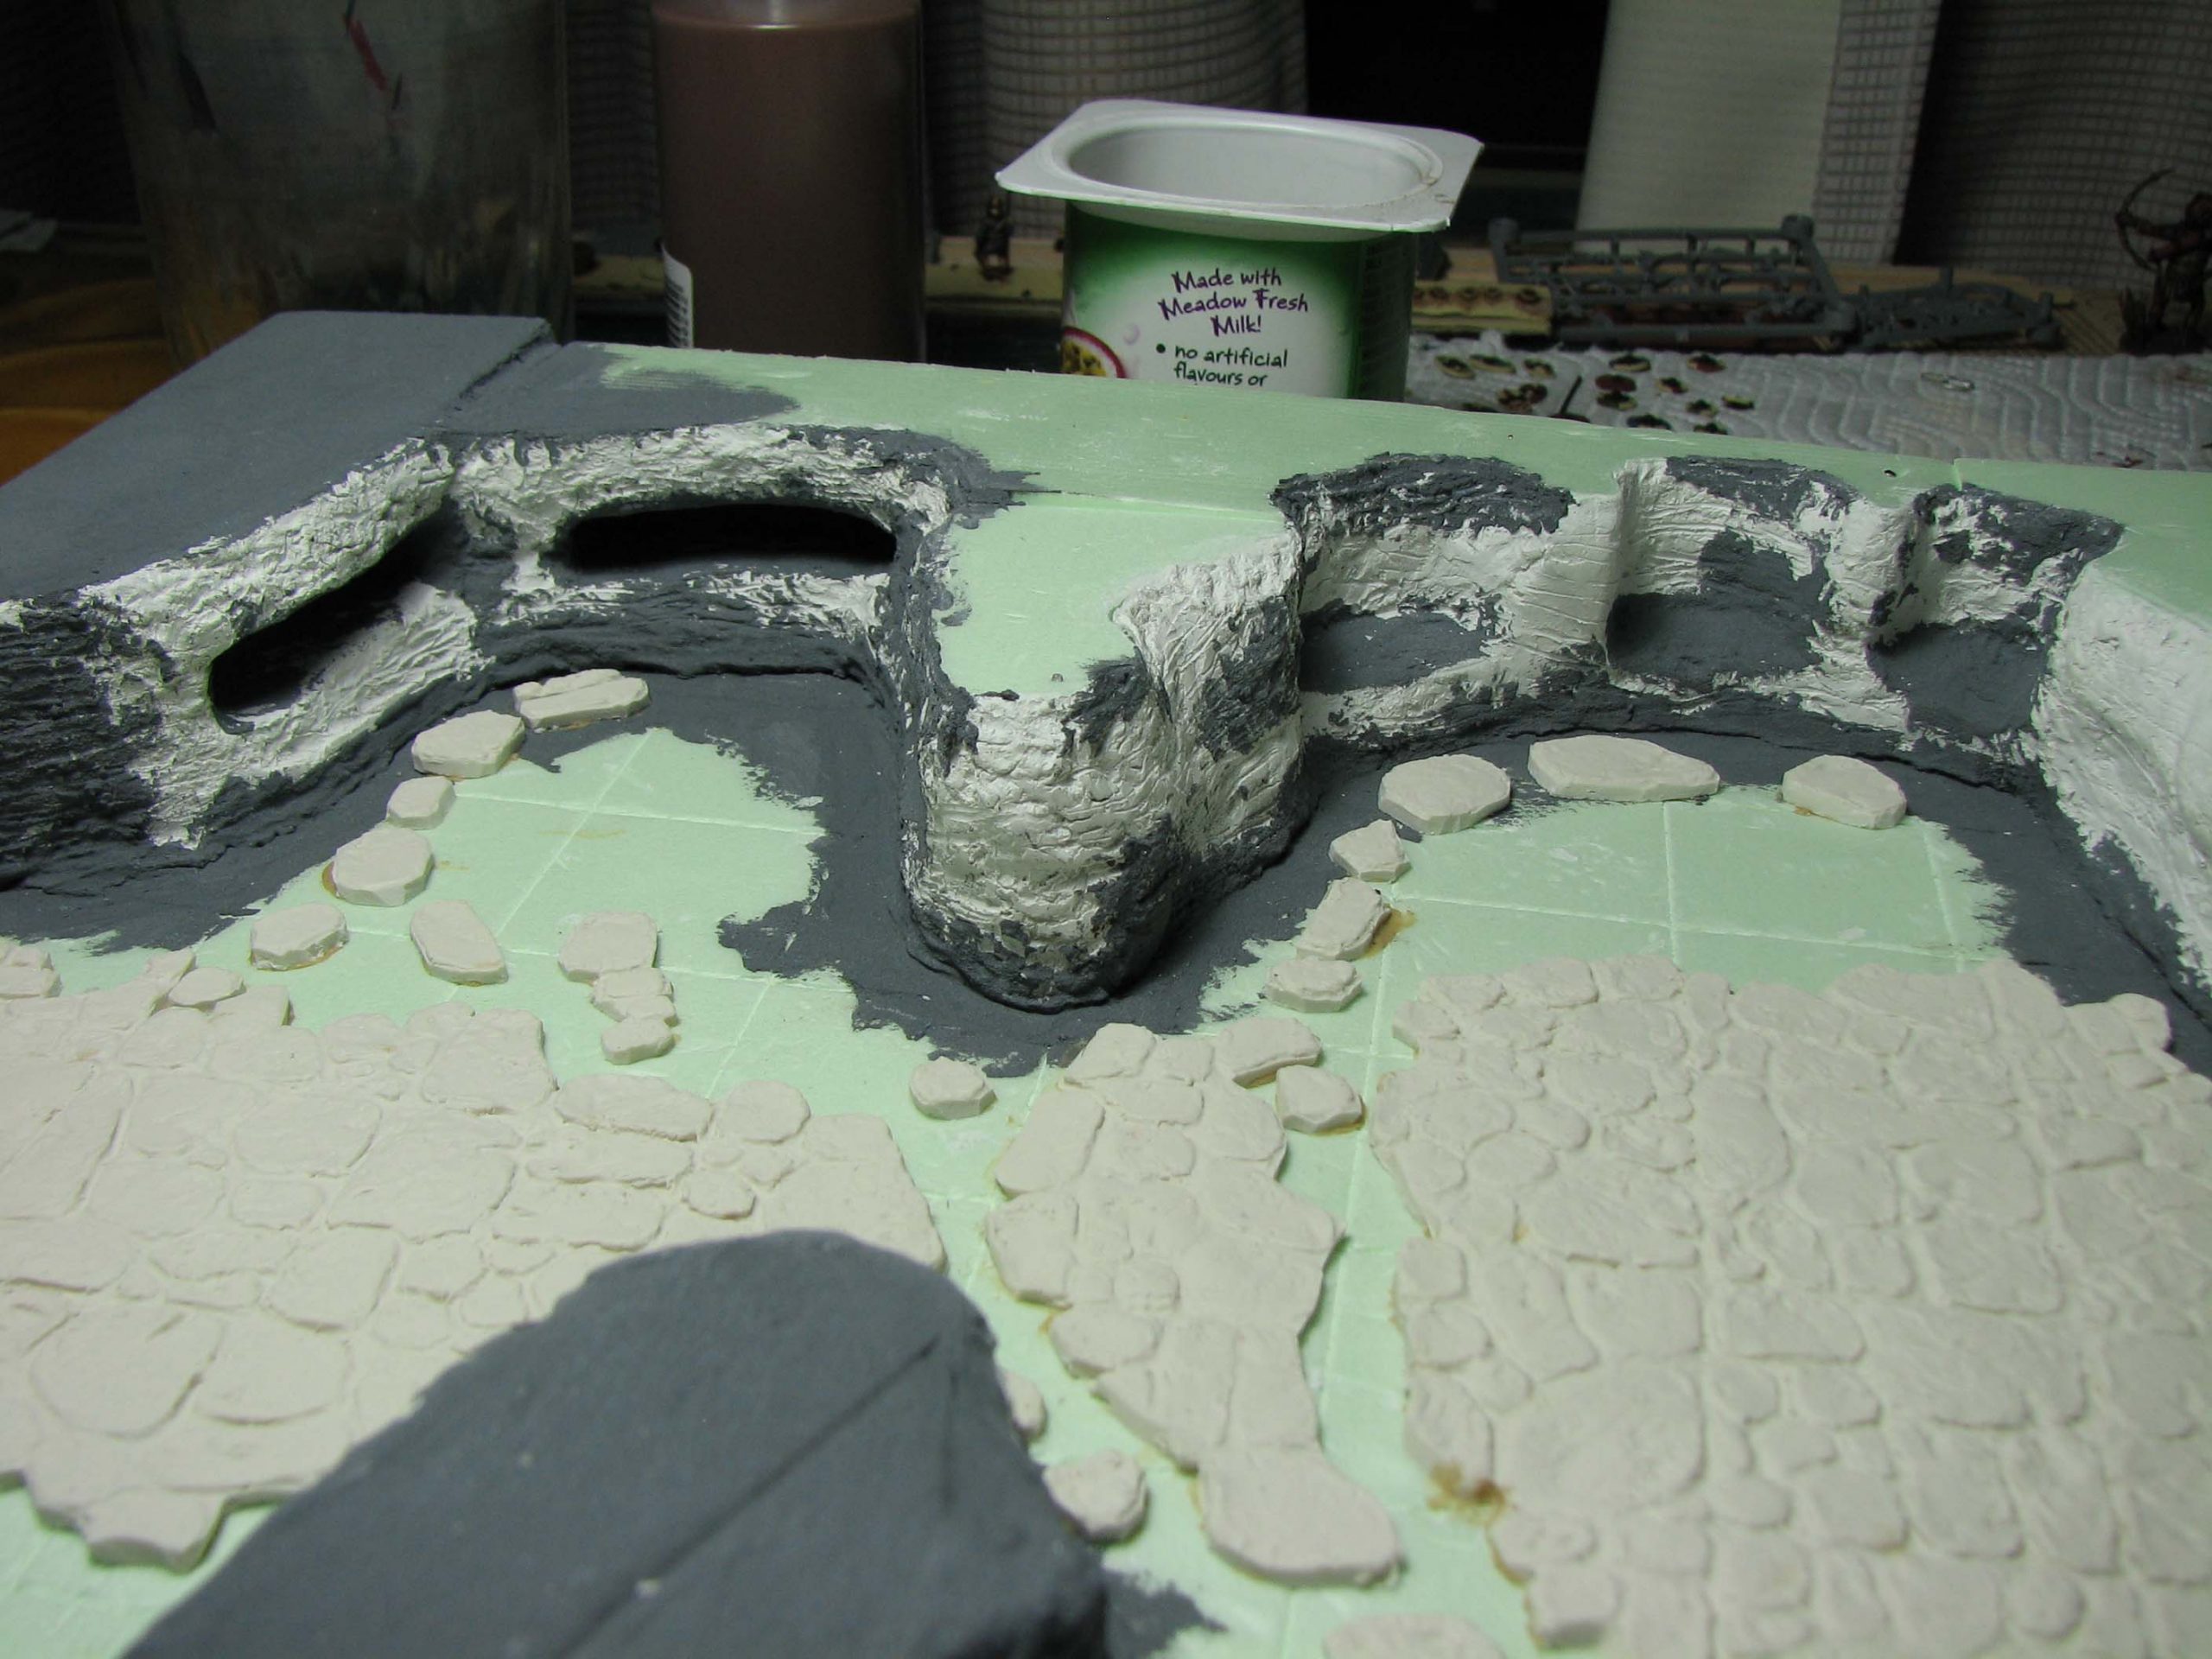
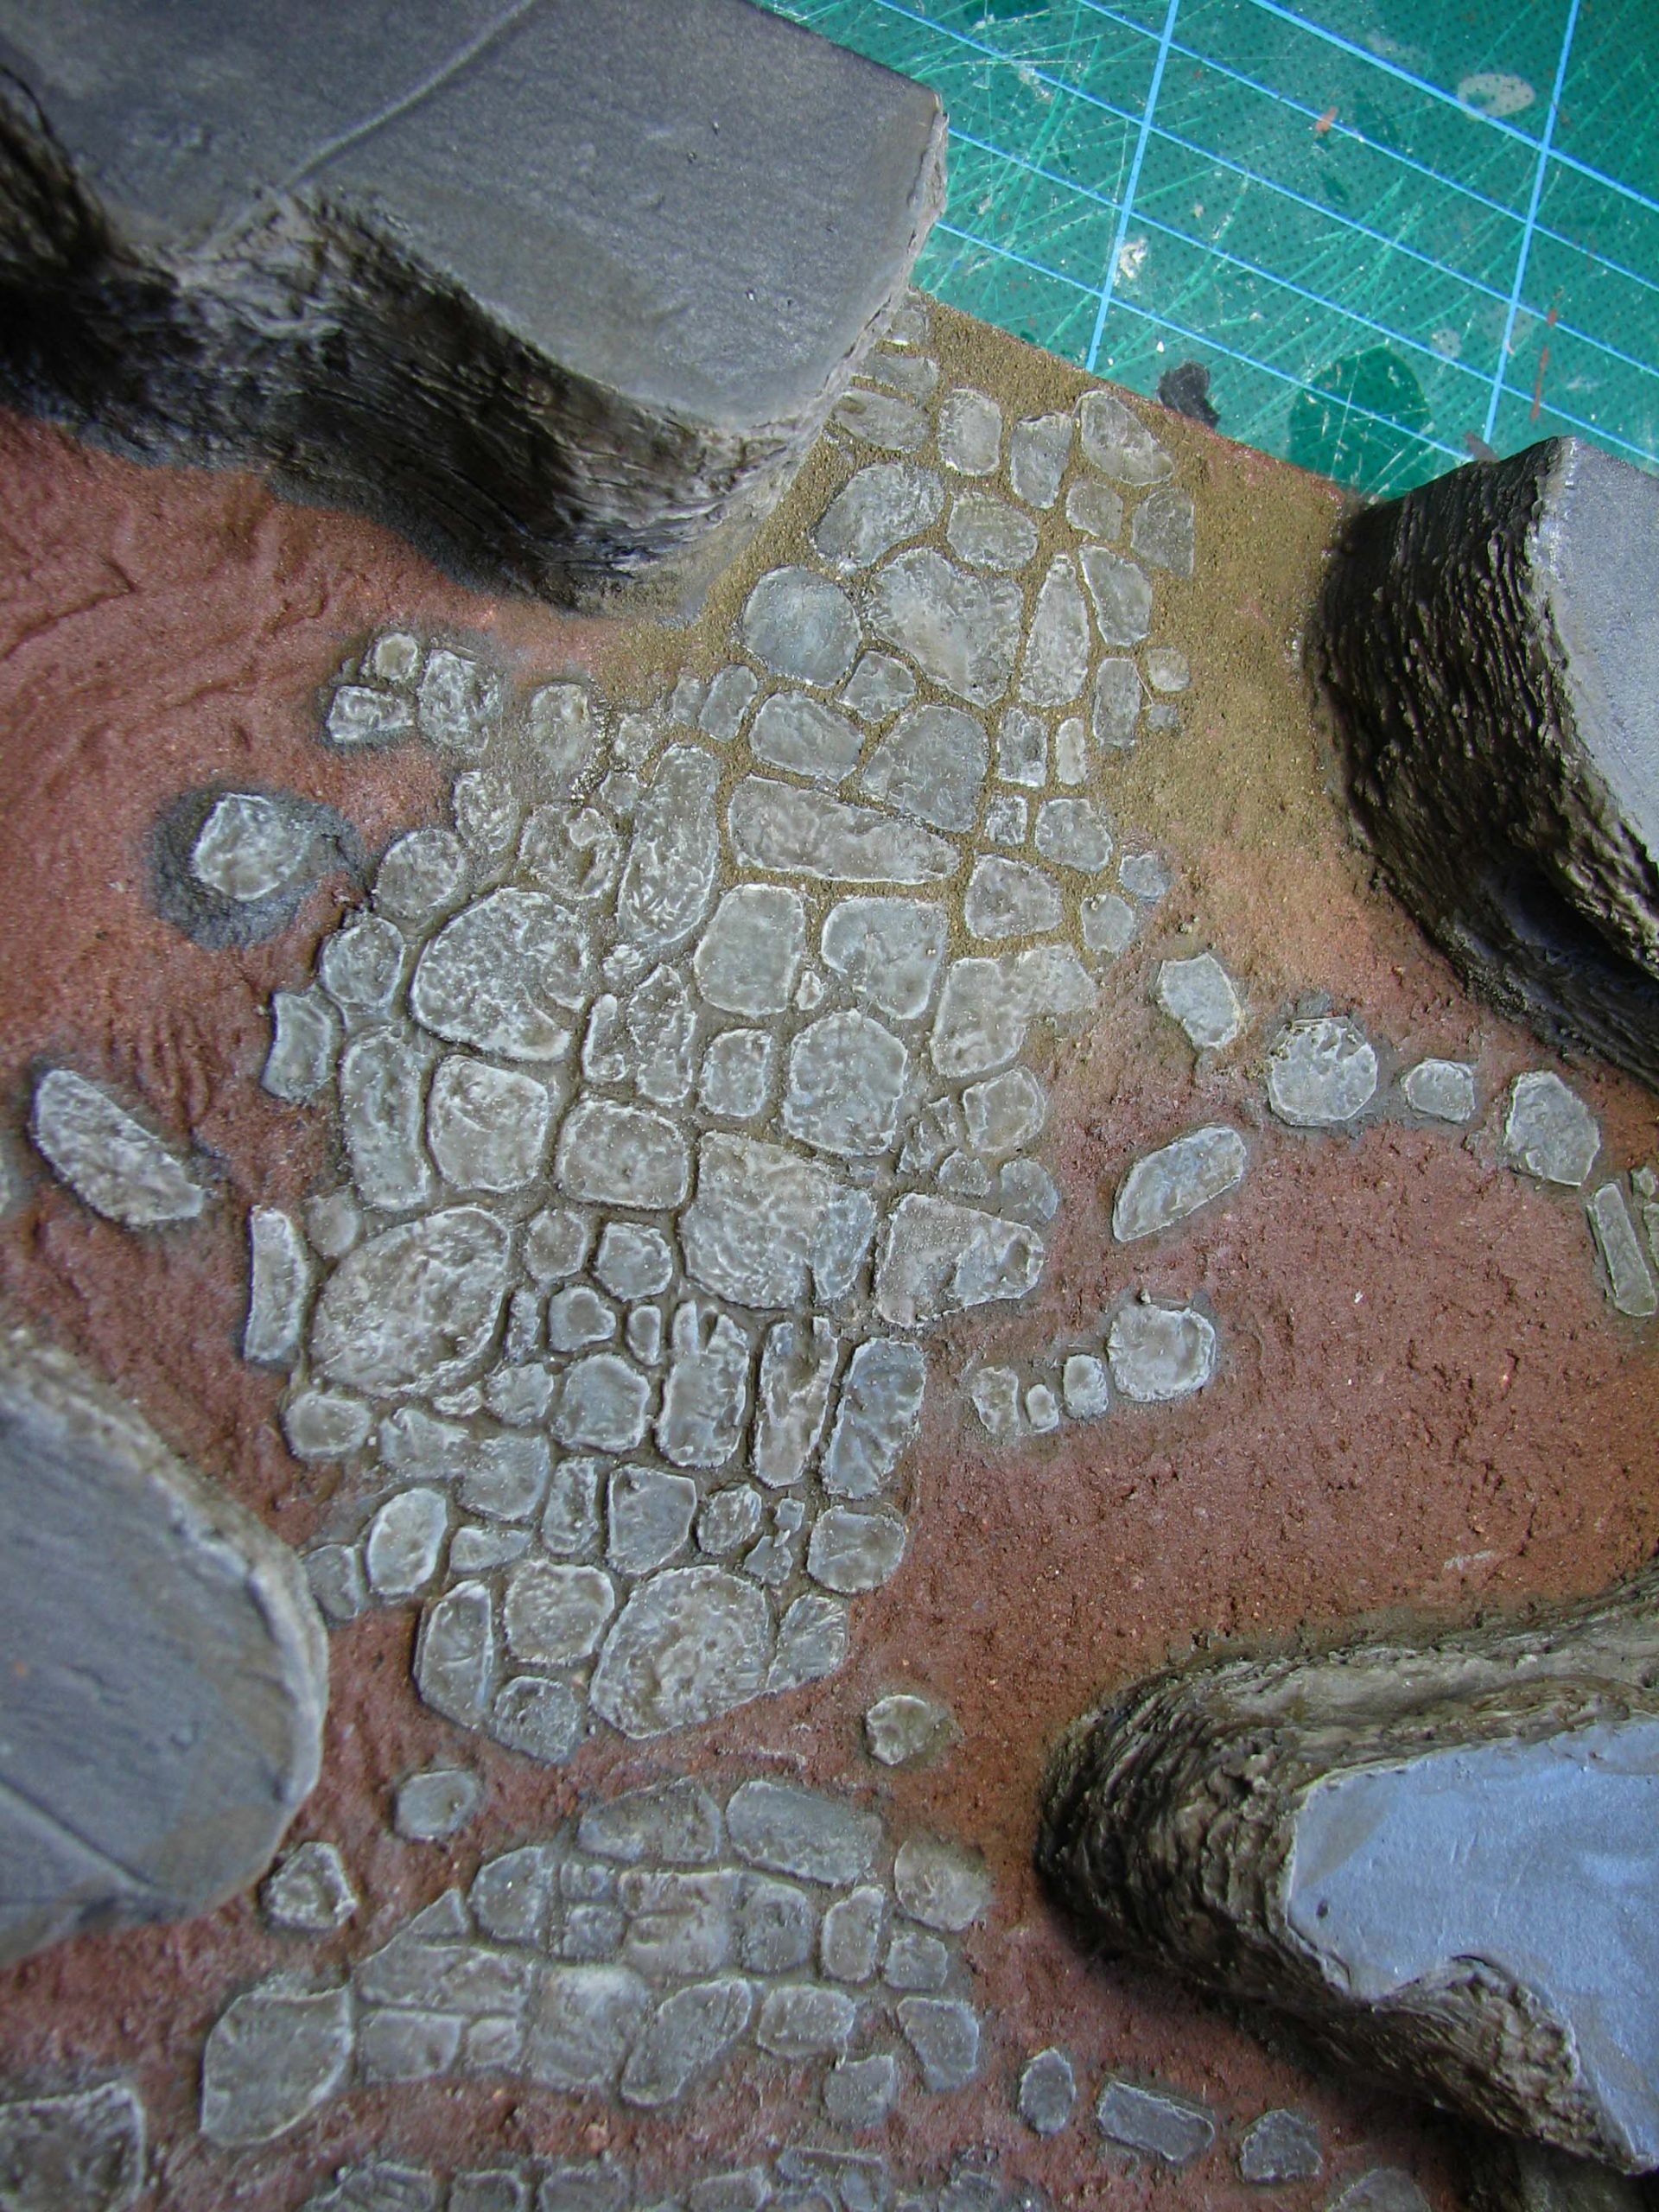
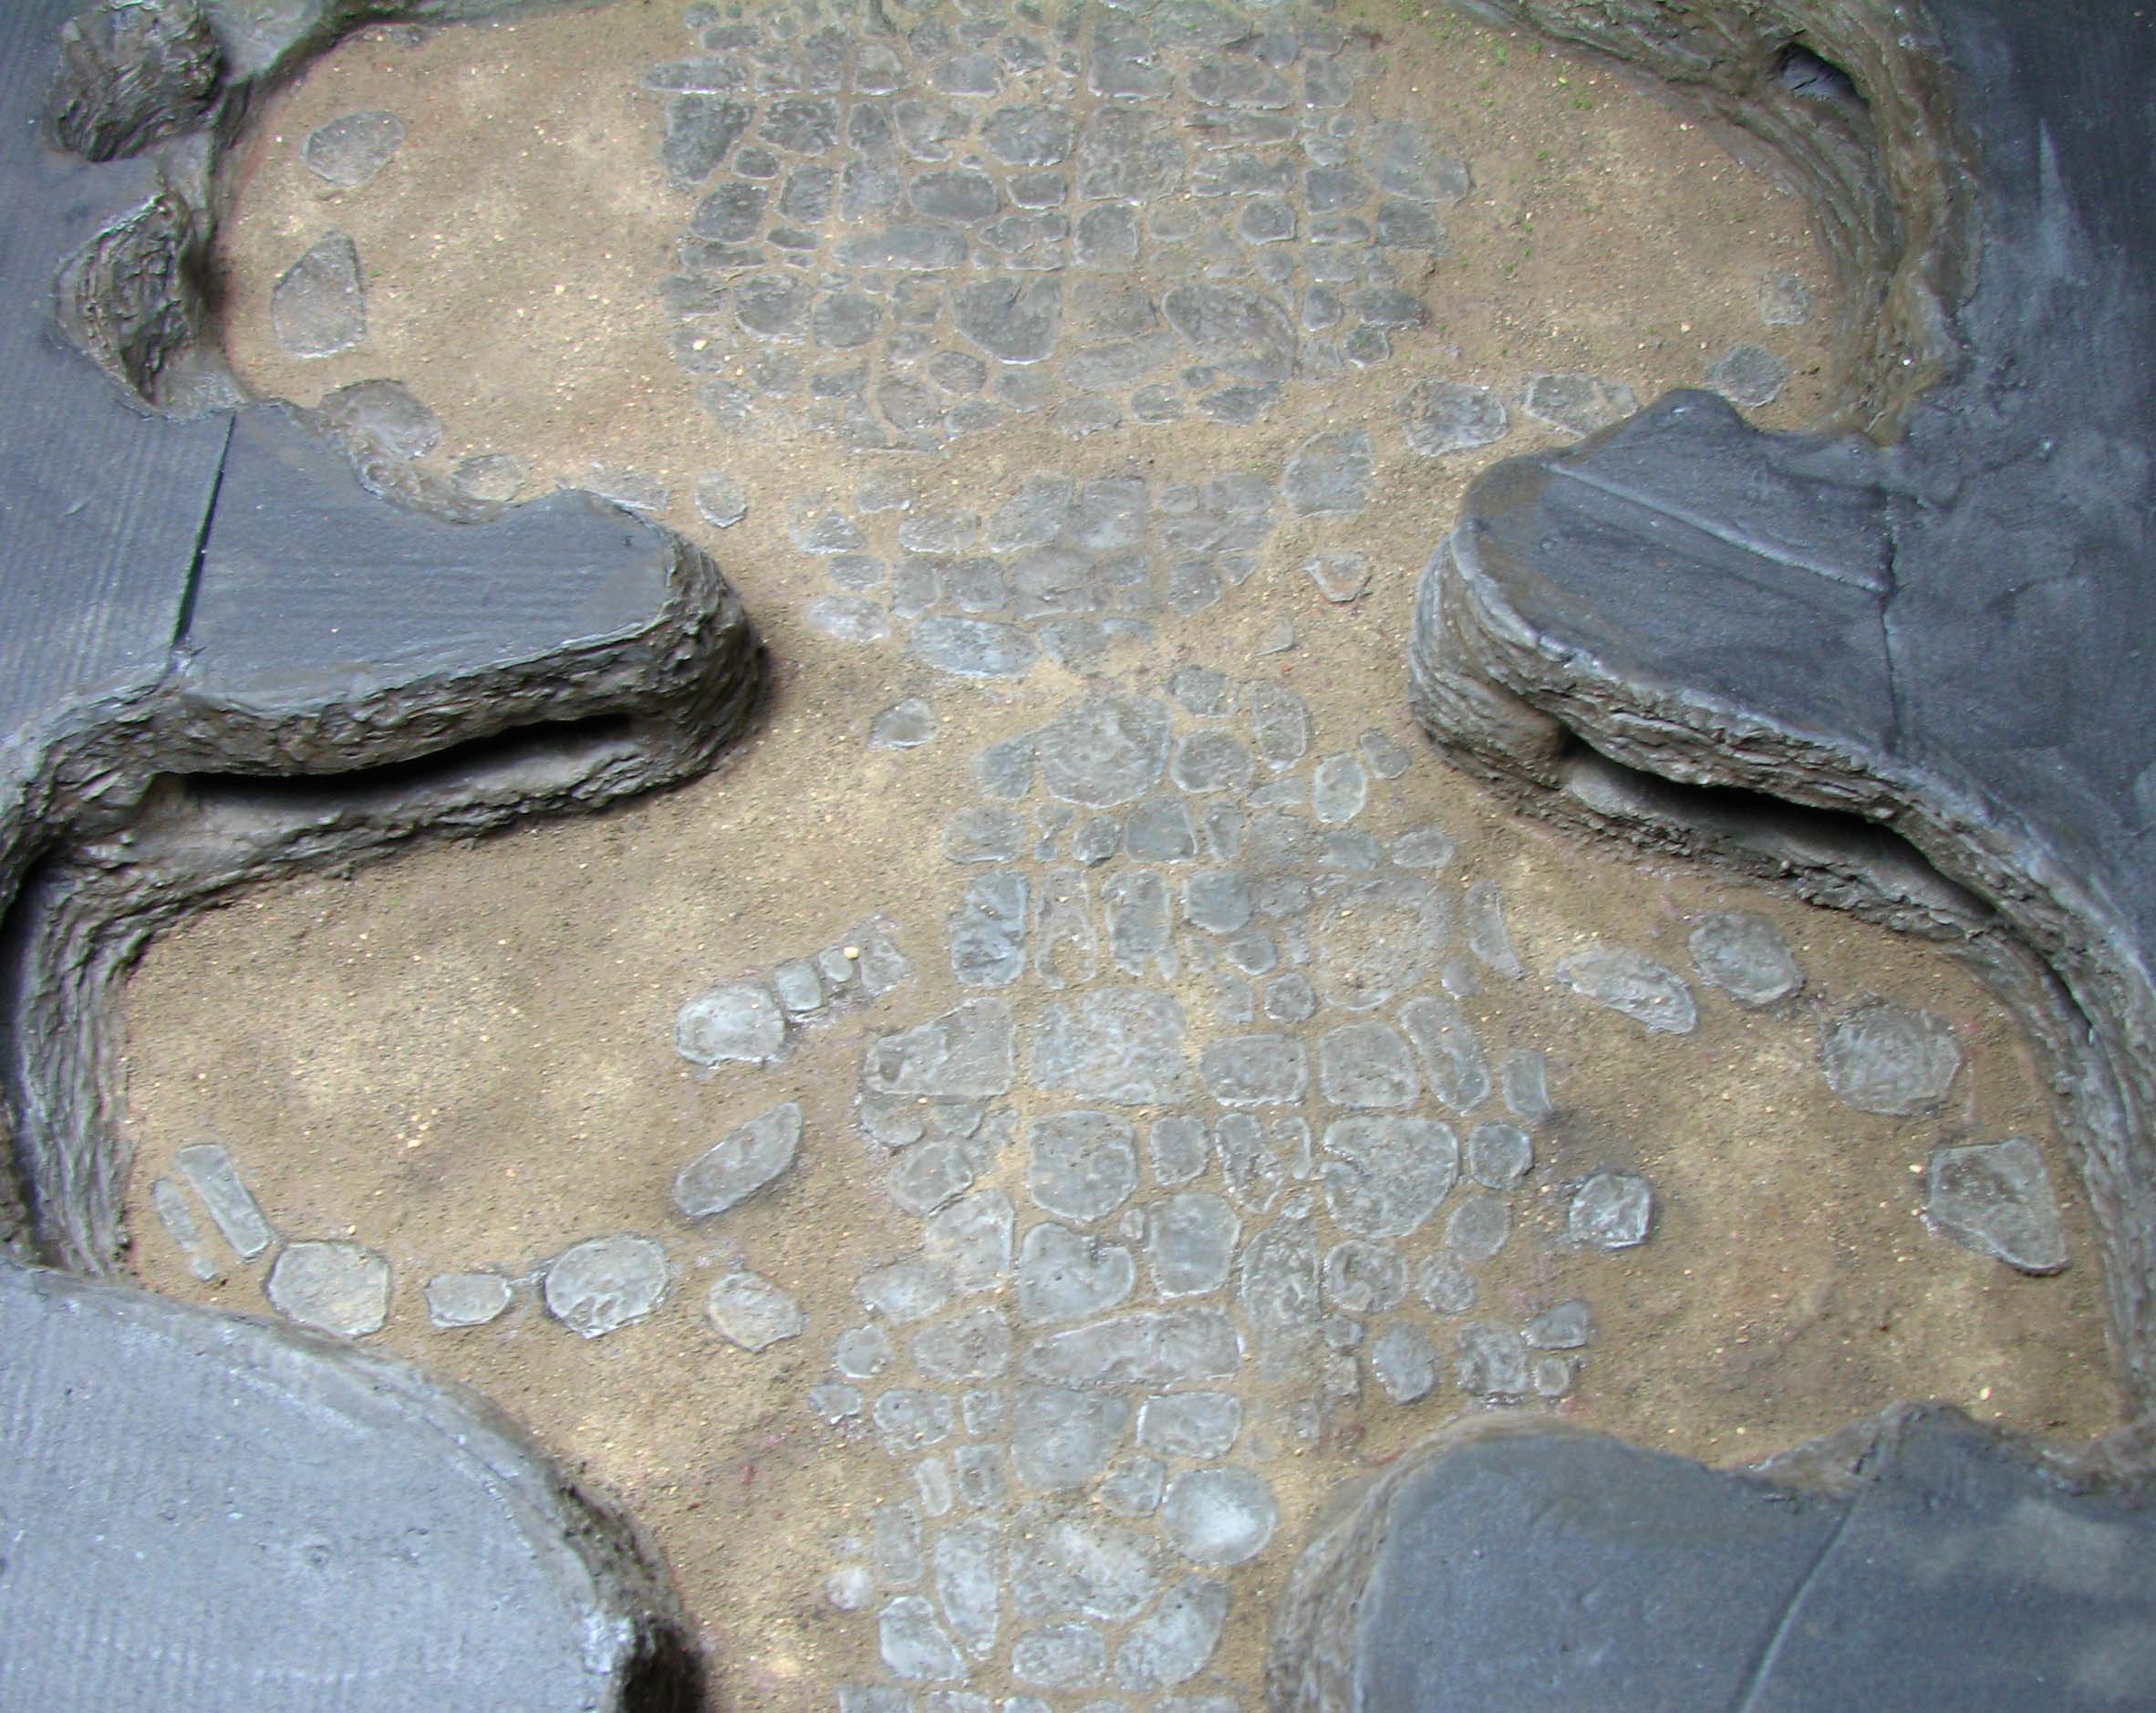
Now we have to move on to the floor. Using Fimo Soft I sculpted a master of the stone floor. Next, I created a press mold to reproduce this floor pattern and made two casts. If you are not familiar with this process please refer to my pressure mold tutorial. I cut the two casts apart to achieve more variability in shape and also being able to place singular stones. Glue the stones in place and wait until the glue is fully cured.
Paste for the floor
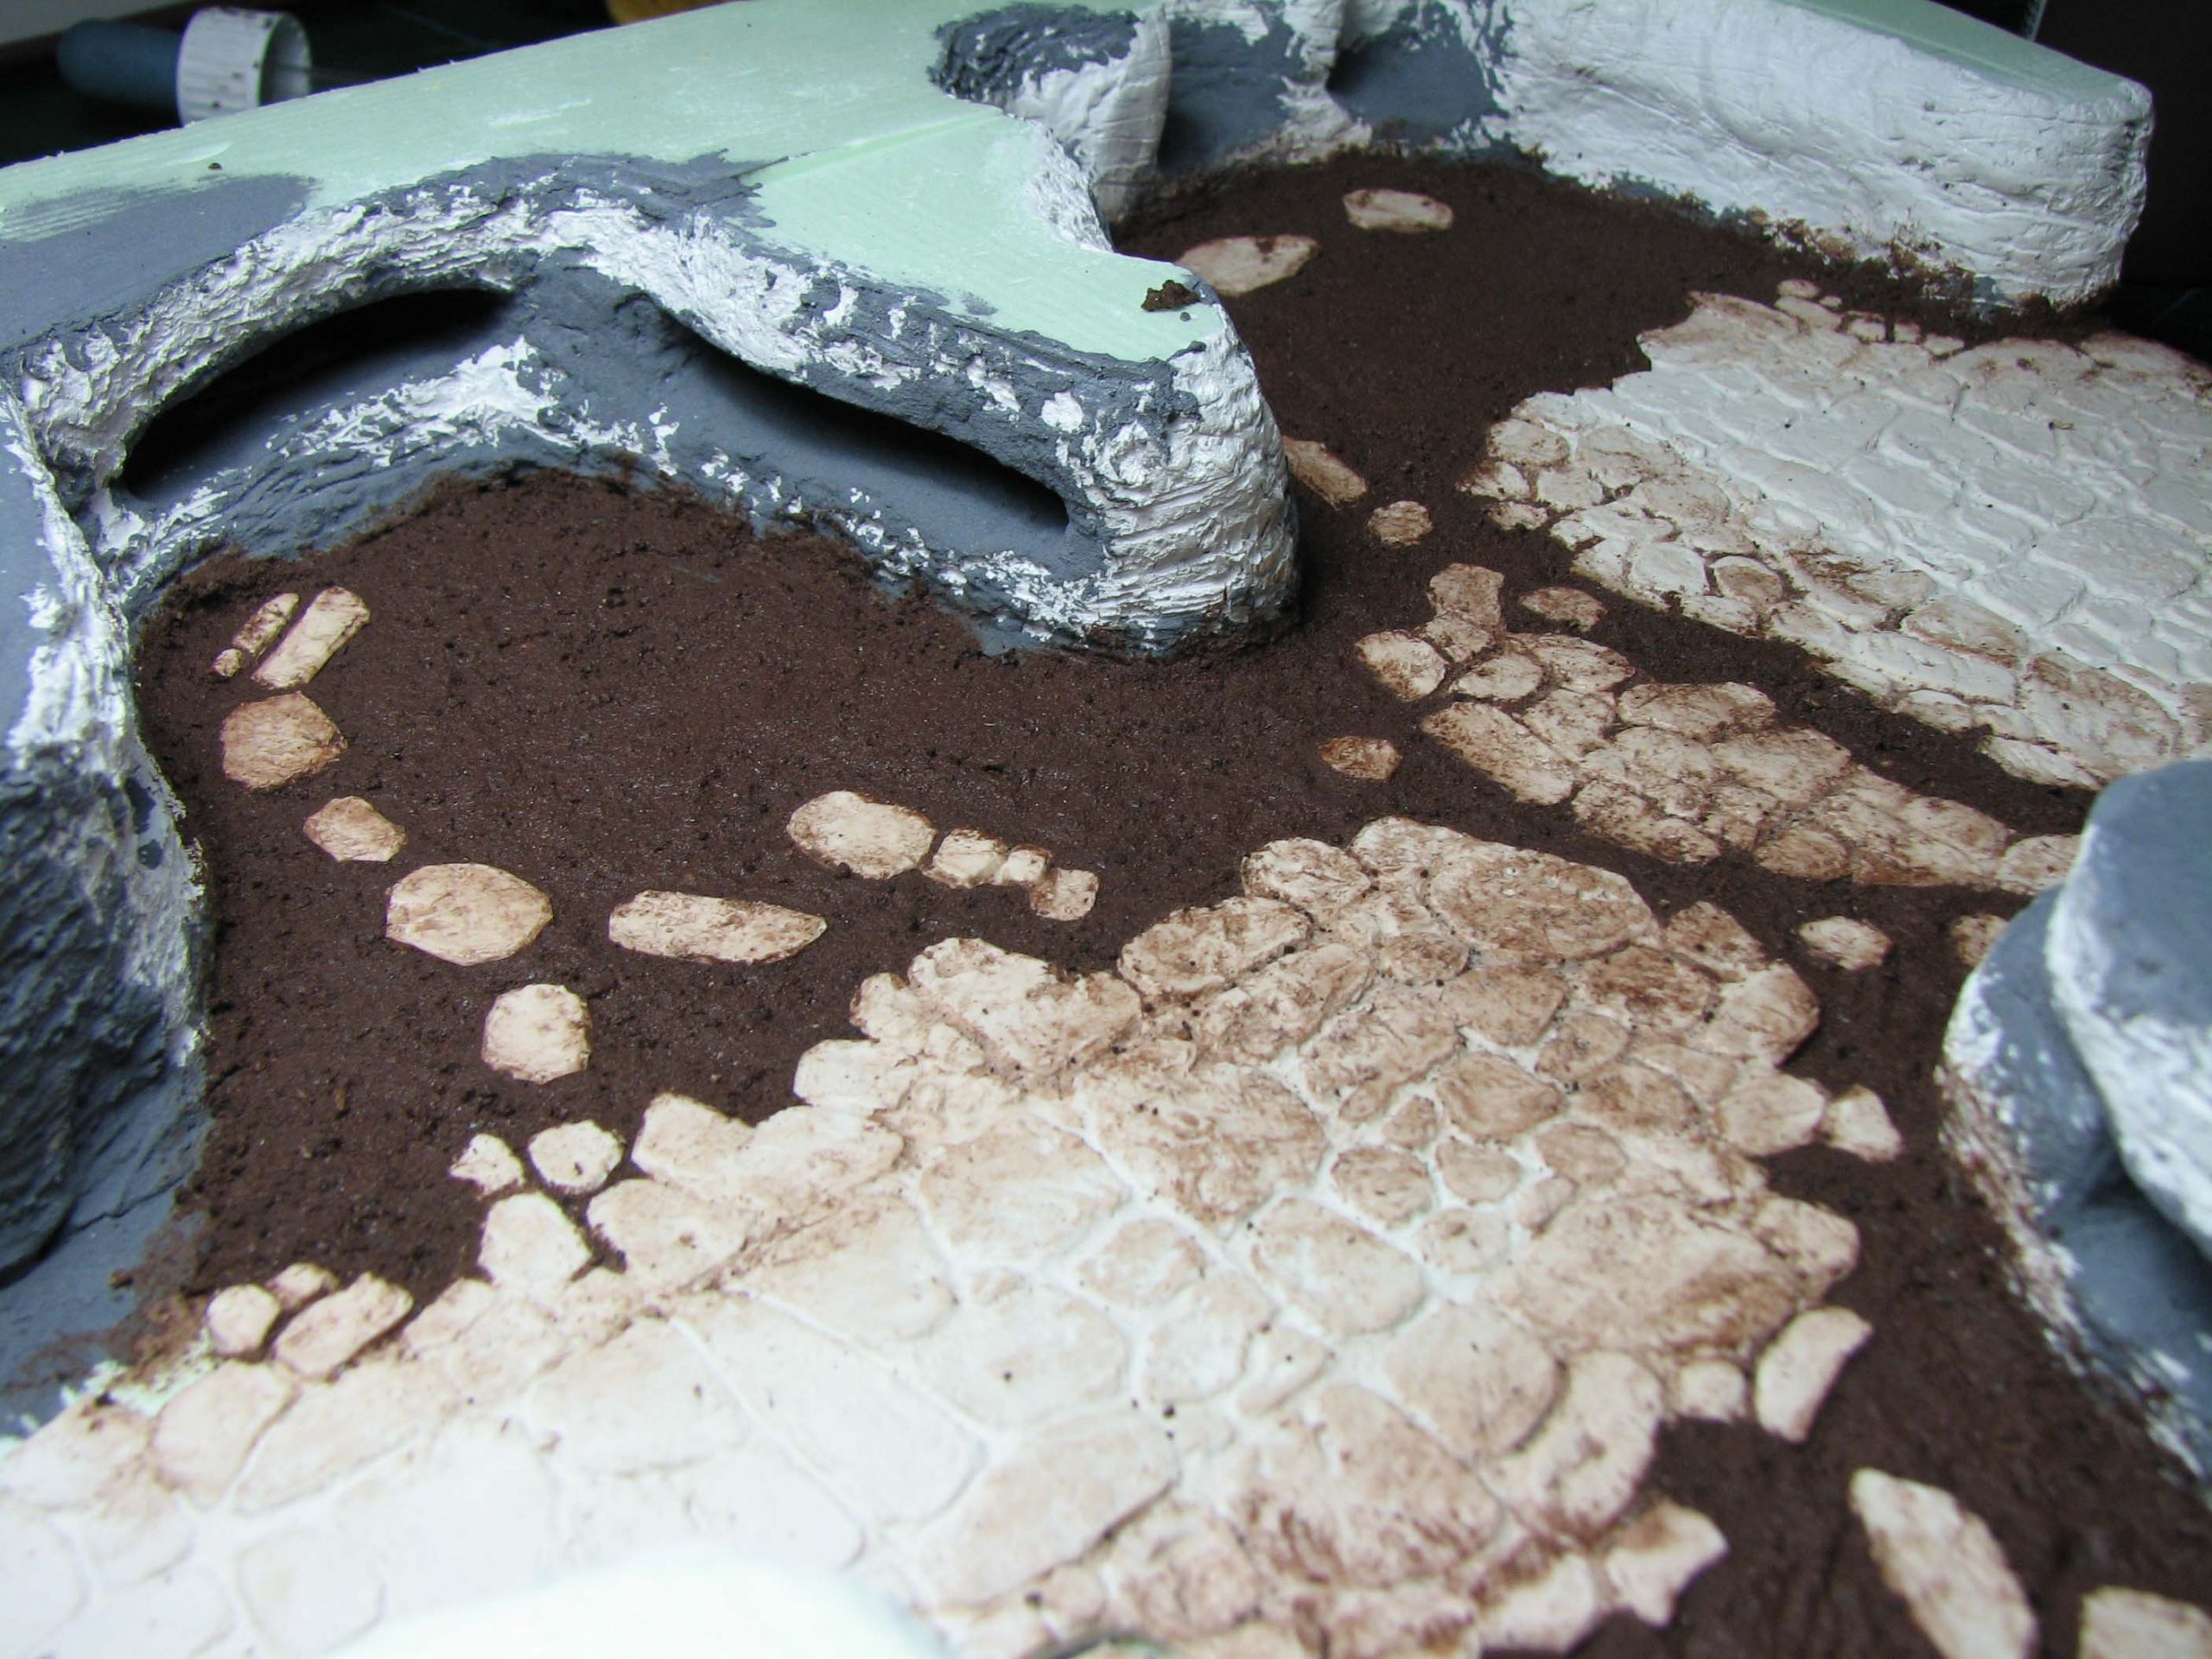
The walls are finished and the floor is coming along nicely, but we still need soil between the stones. Mix some acrylic matt medium, fine sand and brown paint together and cover all areas that will later depict soil. Make sure that the transition between stone floor and soil is smooth and that none of the paste obscures the stone floor. If you end up with some of the paste on it, just wipe it away with a damp cloth.
Painting the stone slabs
Time to get the grey paint out and basecoat the walls and floor of the crypt. I used a rather dark grey with dark brown mixed in. Some of the slabs I painted in a slightly lighter shade of grey or a more brownish shade to add some interest. After you applied the basecoat drybrush the walls and floor with succeedingly lighter shades of your basecolour. Finally, apply a wash over all the rock surfaces. A mixture of matte brush on varnish, brown pigment and a little bit of water works well.

Adding soil
The stone slabs might be finished, but we still have to add soil to the gaps between slabs and surrounding areas. Using a 1 to 1 mixture of wood glue and water, apply it to the gaps between stones and the sandy floor. Now dust the entire floor with soil. Just get a shovel from the backyard and sieve it until you end up with only the finest particles. Let dry over night and remove the excess with a brush.
Given the fine soil might obscure some of the drybrushing use a damp cloth and wipe the stones. If you feel you need still more contrast lightly drybrush the stones again untill you are satisfied. The soil texture might look realistic, but it lacks definition and contrast. Add lighter pigments to the base colour of soil/pigment and mix it in. Don’t overdo it, rather add a little bit a time until you can see a change in colour. Dust it on in some parts and fixate with pigment fixer (I use AK fixer for this).
Next up
With this last step the basic outline of the crypt is finished and we now have to move on to detailing.
Part II covers the addition of roots and vegetation such as mushrooms, moss and floor creepers.
In part III we add sacrificial offerings, candles, skeletons in the alcoves and urns to the crypt
Finally, part IV focuses on finishing off the module and adding the frame.
Blogomancy here, but that is an awesome tutorial, I really want to break out my cobwebbed modelling supplies!
You are very welcome to blogomance. After all it suits the subject well and the tutorial, unlike a forum post, is a permanent fixture and I also update it once in a while. Glad you like the tutorial. I was not aware that you are also a scale-modeller. However, if you are as good in the smaller scales as you are with full sized steel, I can see this being a full success.
Awesome! I’ve been indulging in some draugr crypt raiding recently after dusting my old copy of Skyrim off so this feels rather apt 🙂 can’t wait to see how it looks with all the toppings ! :- D
Awesome work. Where did you get the Styrofoam from in NZ?
Cheers
Kieran
Thank you! I had to search a bit because it is a while ago since I ordered some. Forman Building Systems sells various thicknesses of styrofoam sheets. A 250 x 60 x 1 sheet is 20 Dollars. Shipping 15, but you can pick up stuff in Mt Wellington.
Great tutorial. I’m always in awe of the creativity & talent that people like yourself have with modelling so it is always fantastic when you share techniques with us lesser mortals!
Thank you for your kind words. However, I think with some time and dedication everybody can achieve a nice result, no immortal qualities needed. ;).
This is a fantastic tutorial. Thanks for explaining in detail not only the how, but also the why. Very useful. I’ve been eyeing some old fantasy miniatures I have in a cabinet, thanks to you.
Thank you, glad the tutorial inspired you to try something similar. Hope to finish the module soon and move on to more crypt themed ones to have a proper gaming sized selection.