
If you are a long-time reader you may remember my plans to paint the excellent Agema Miniatures Roman Hastati and Principes metal characters. Well, it took an extraordinary amount of time – other projects, toddlers, life in general took their toll – but here we are. Good news is, I was able to improve my skills in the meantime and fashioned them with elaborate shield designs and weathering effects. Bad news is, that I am getting old and really struggled with the tiny eyes.
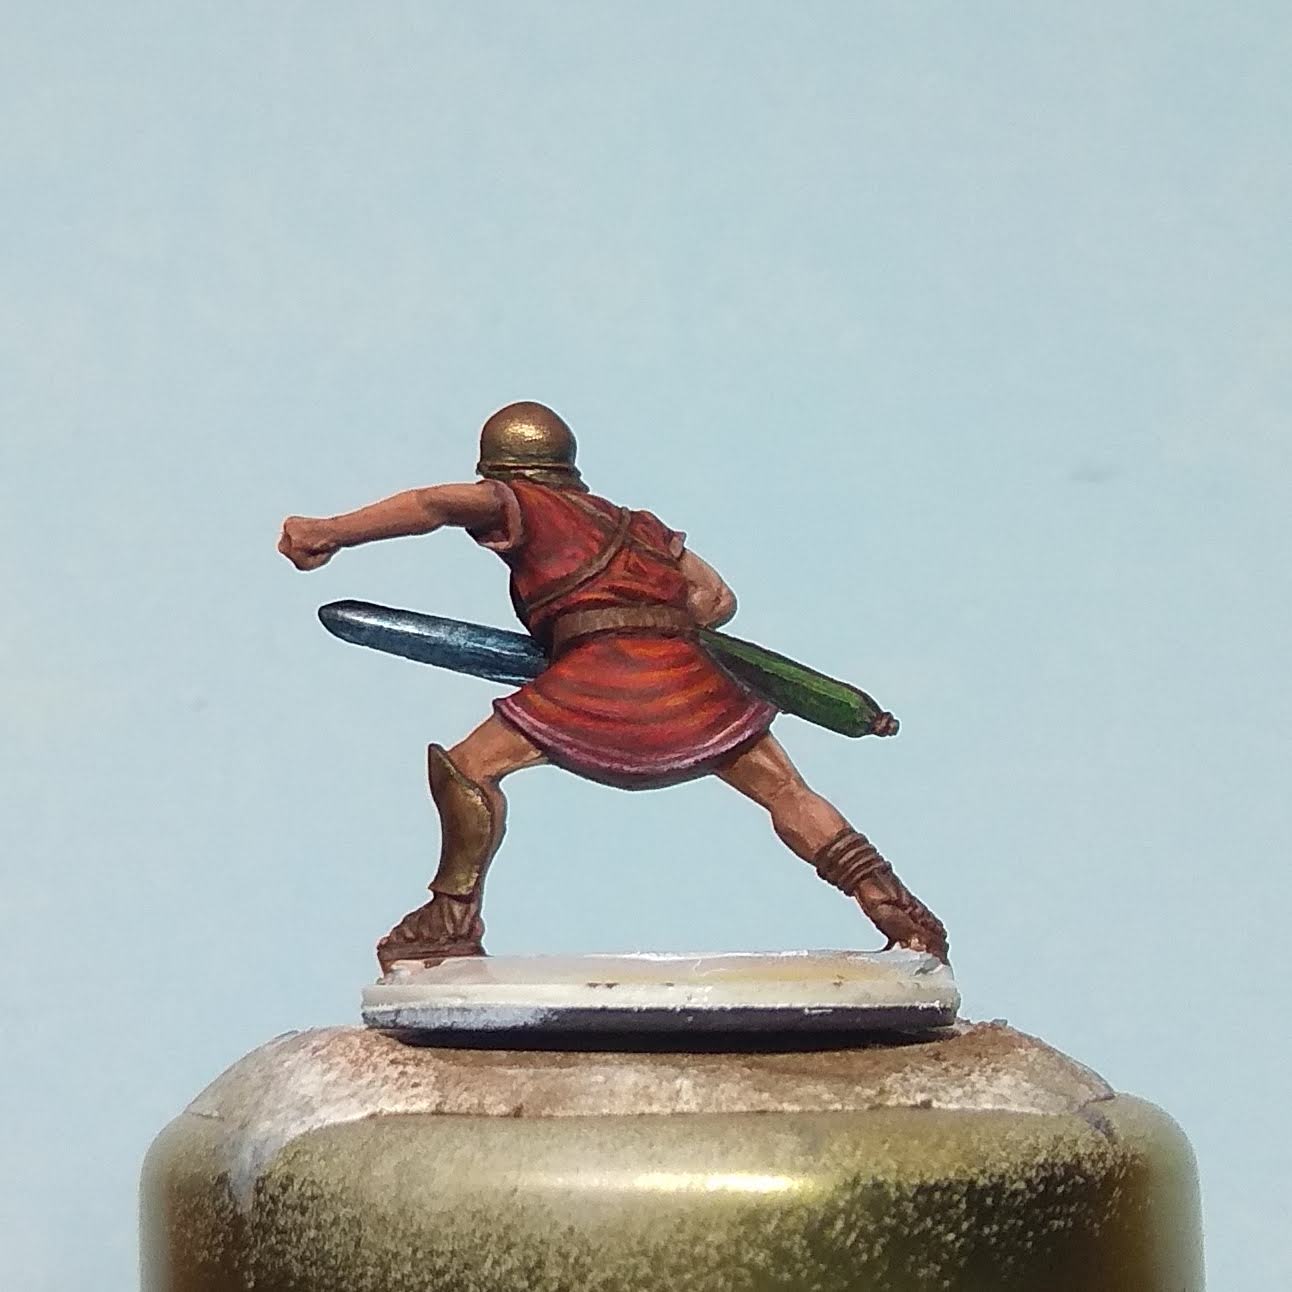
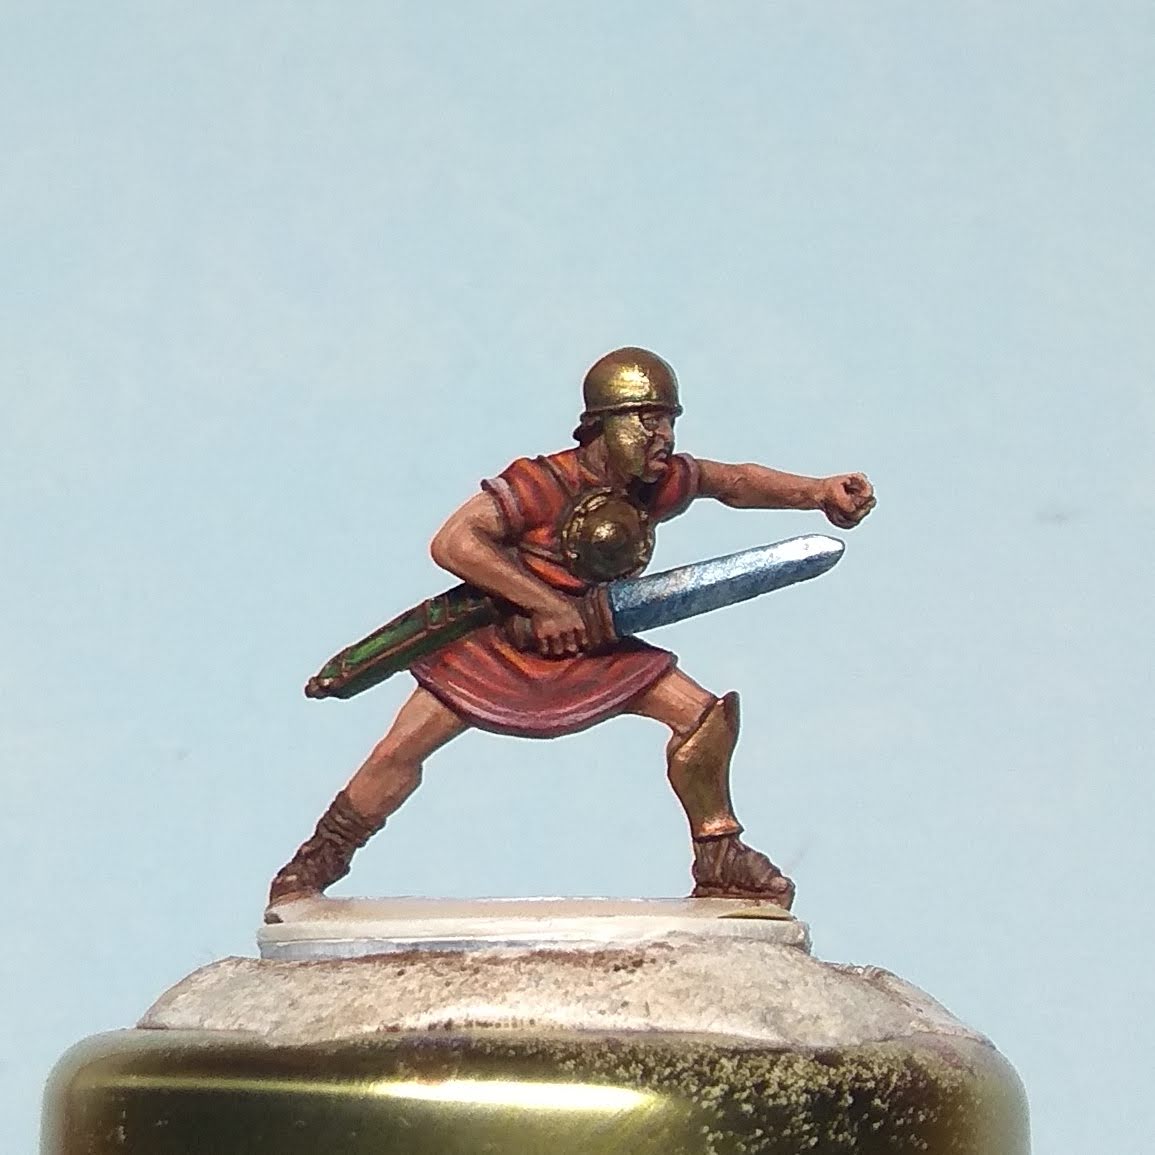
Bemoaning my accelerated speed of ageing due to toddler induced stress doesn’t provide you with the eye candy you came for, does it? So without further ado, I present Appius Caecus, Cornelius Nepos and Fabianus Crispus. There are three areas of interest, that I will elaborate on: painting red, shading TMM and naturally the shield designs. With the latter, you may witness a premiere with my next posts. If I can set up my camera and lighting properly, I would love to make a short clip showing you how I paint shield designs. For now pictures must suffice.
Principes and Hastati – what’s that again?
So, before we talk about painting these guys, new readers might wonder what are actually Hastati and Principes? The Roman Republican army – we are looking at the Punic Wars era 264-146 BC – didn’t quite look like the common Asterix tropes, instead their equipment and battlefield role was quite unlike what you see in later imperial times. The army was divided in several divisions: the Velites, Hastati, Principes and Triarii. As the ancient historian Polybios describes,
the youngest and poorest [were] to form the Velites, the next to them the Hastati, while those who are in the prime of life they select as Principes, and the oldest of all as Triarii. For in the Roman army these divisions, distinct not only as to their ages and nomenclature, but also as to the manner in which they are armed, exist in each legion.
Plb. 6.21
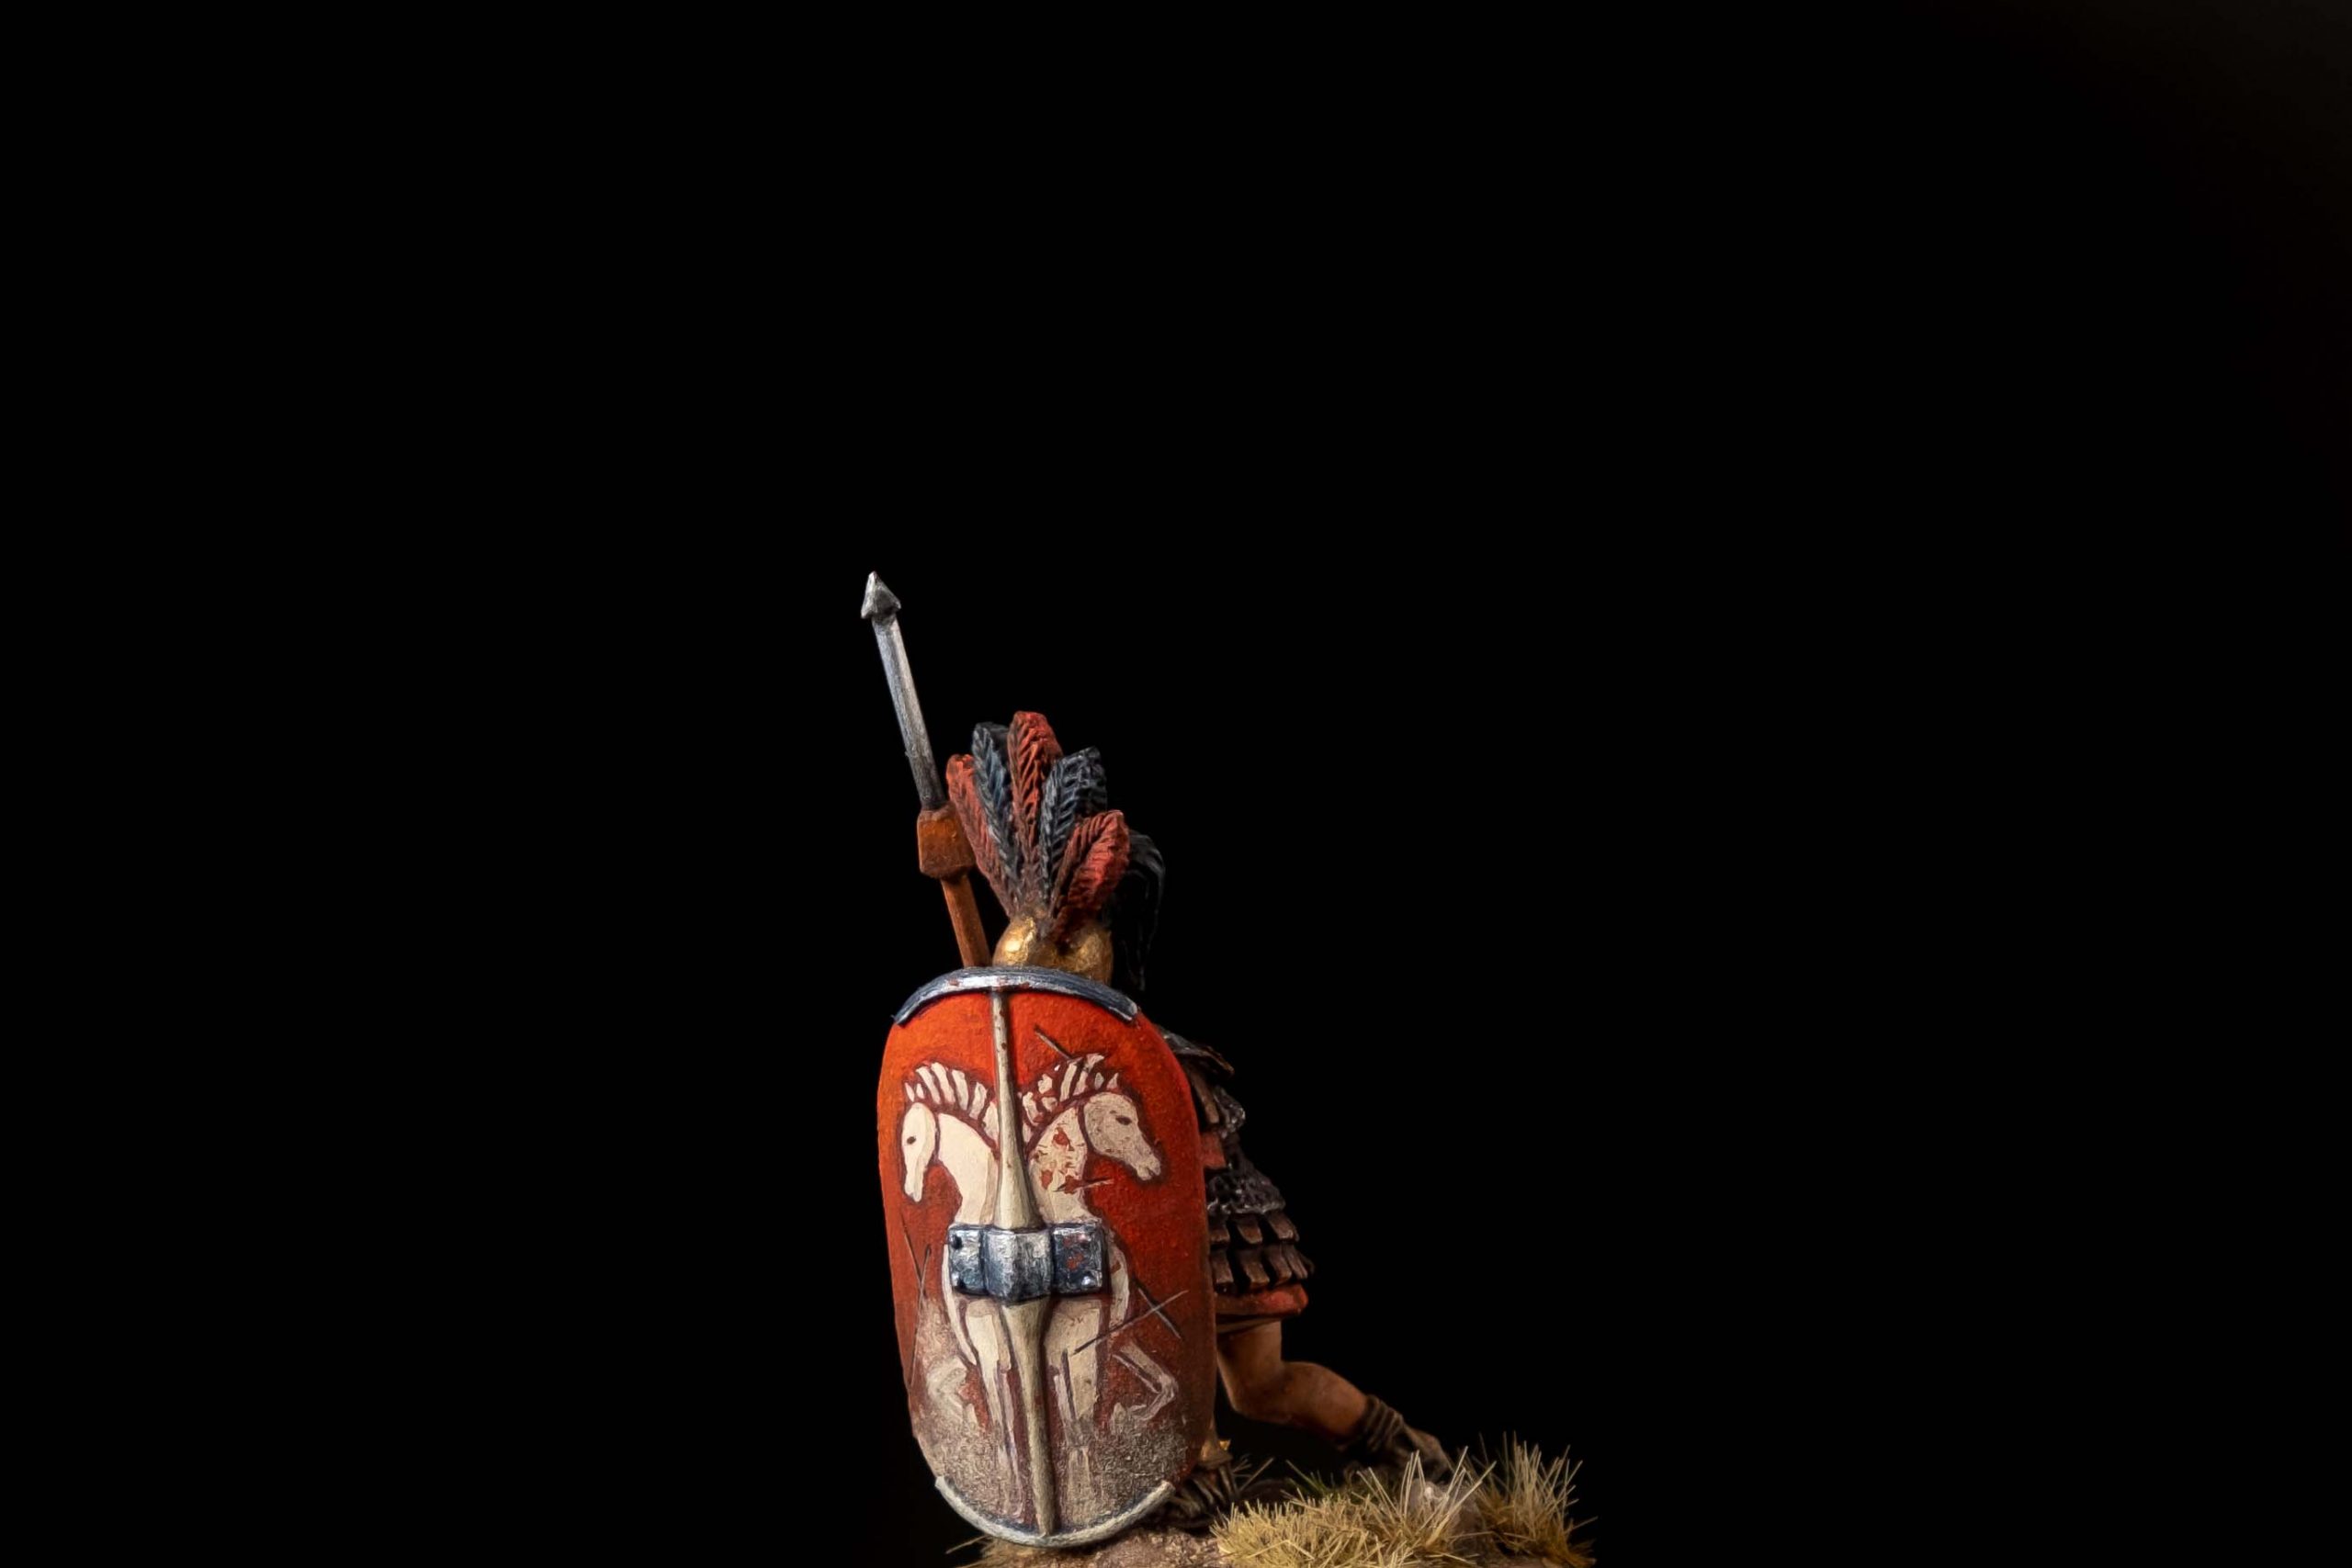
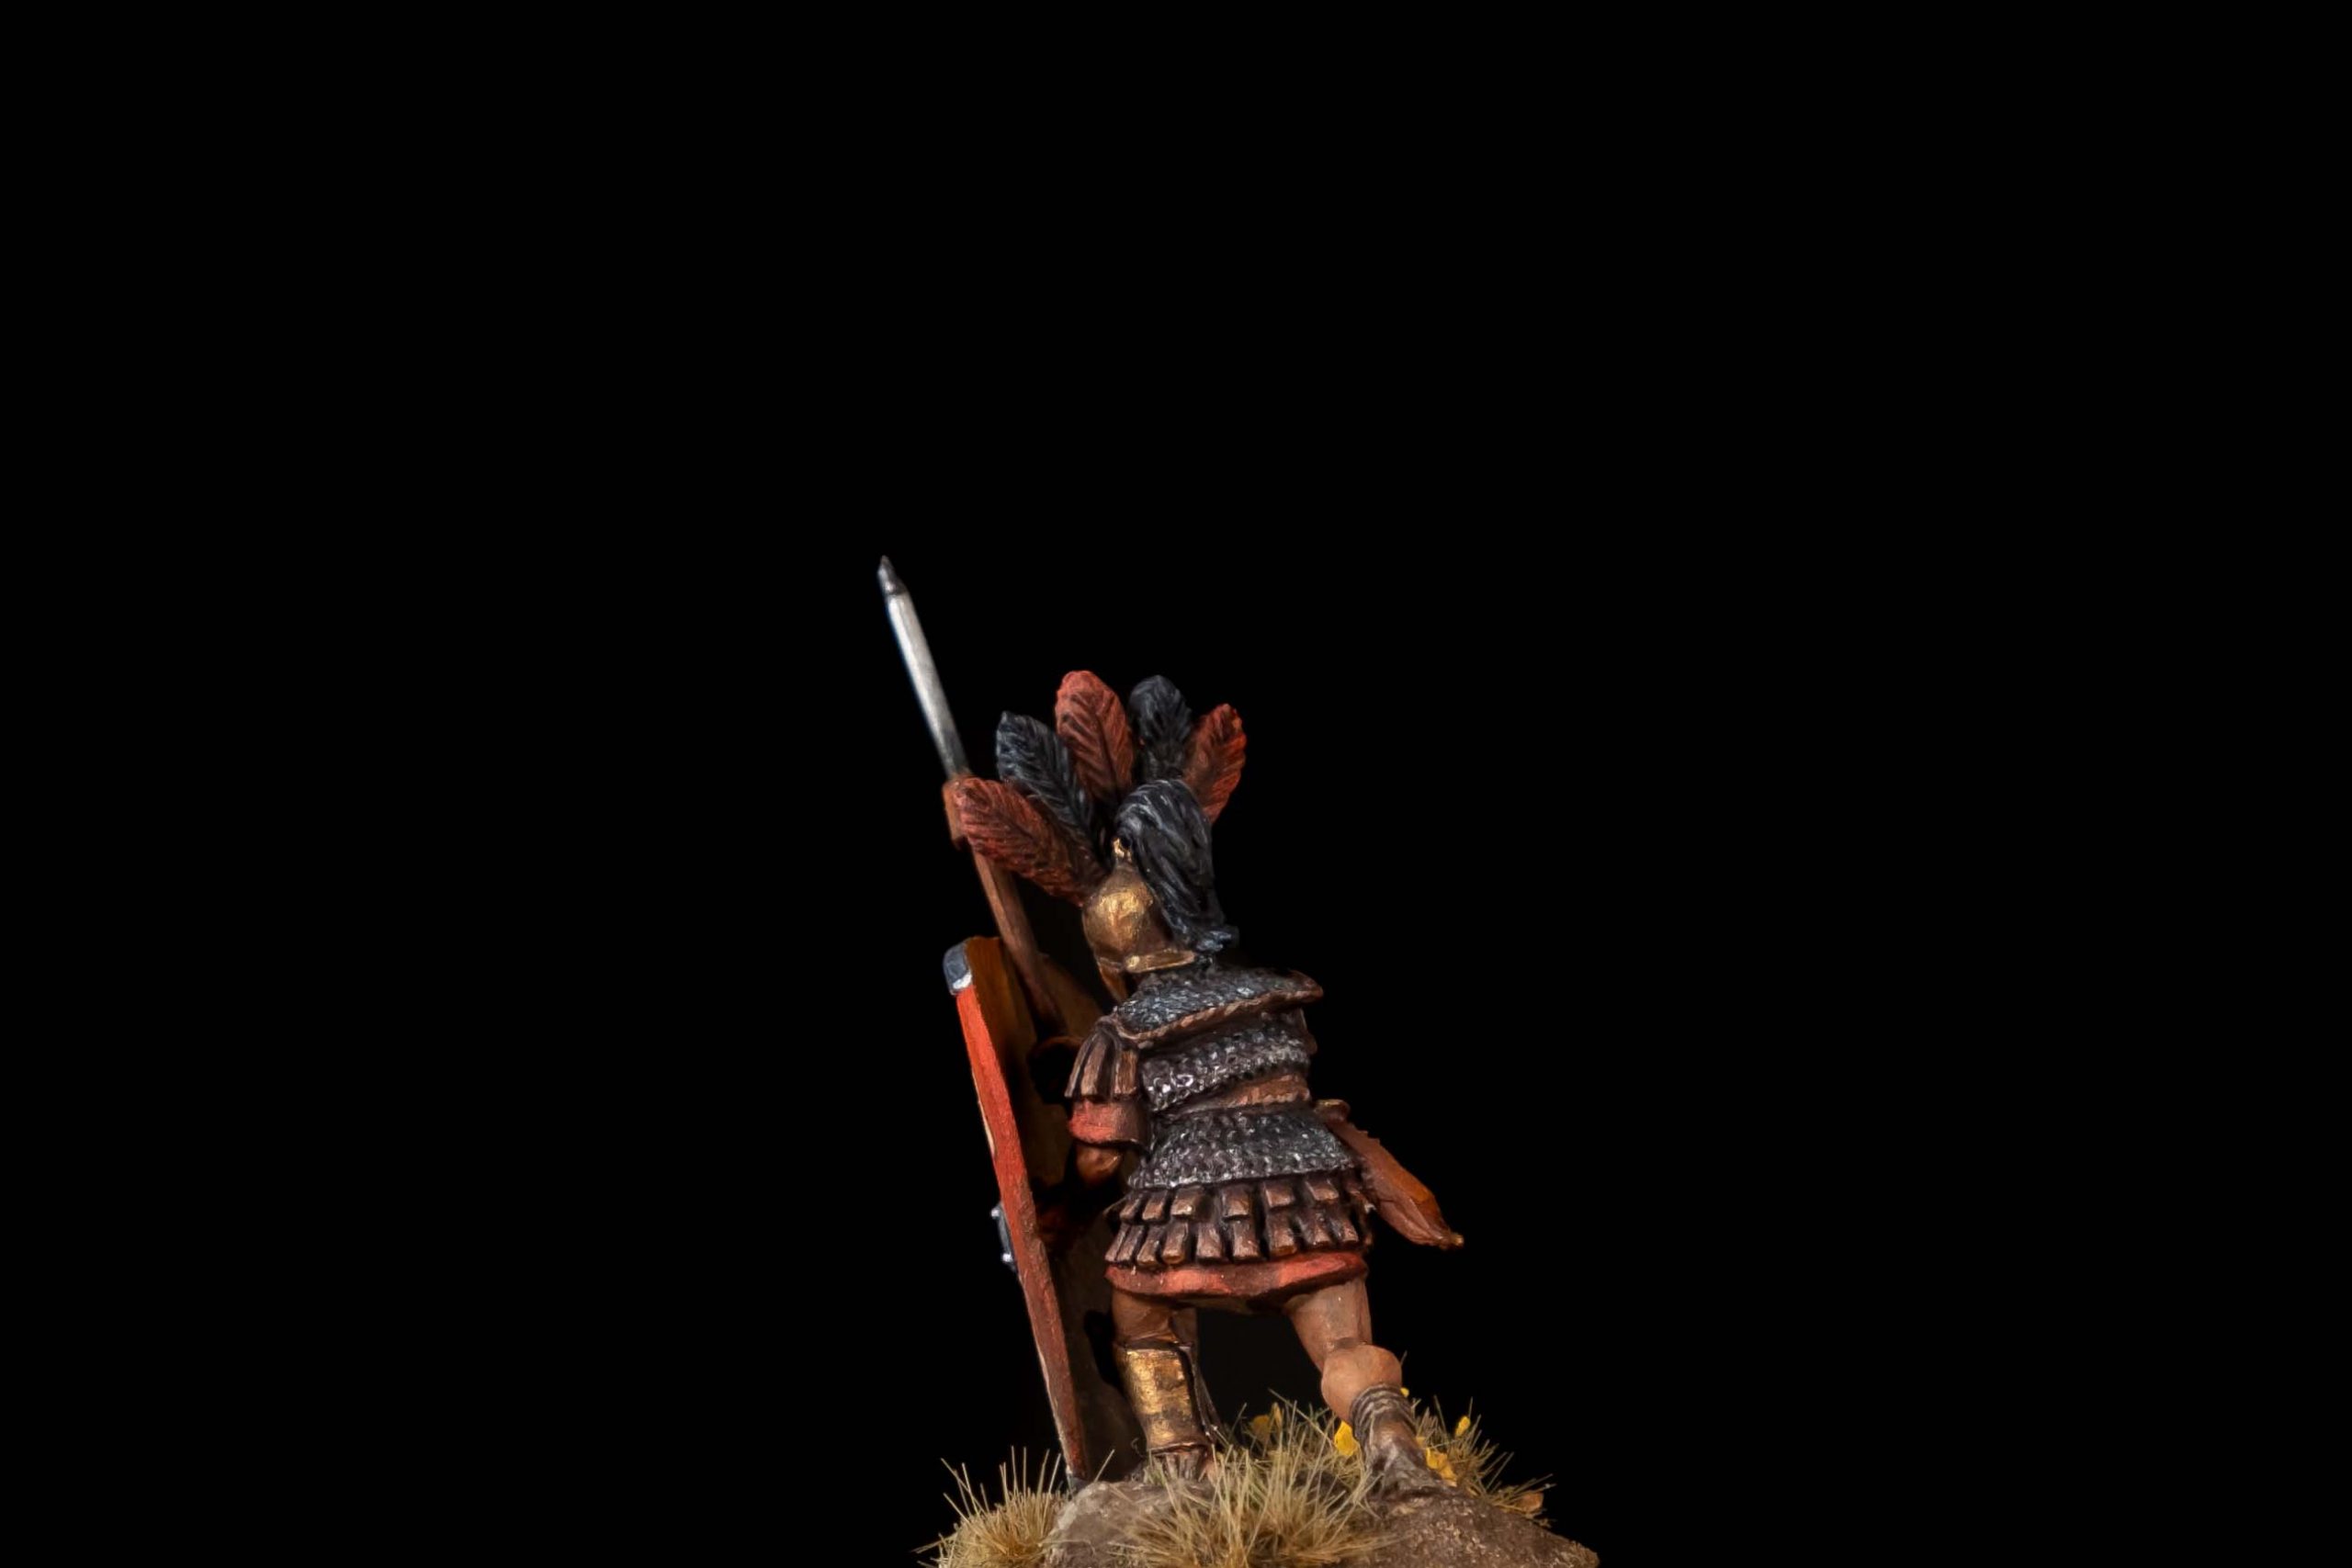
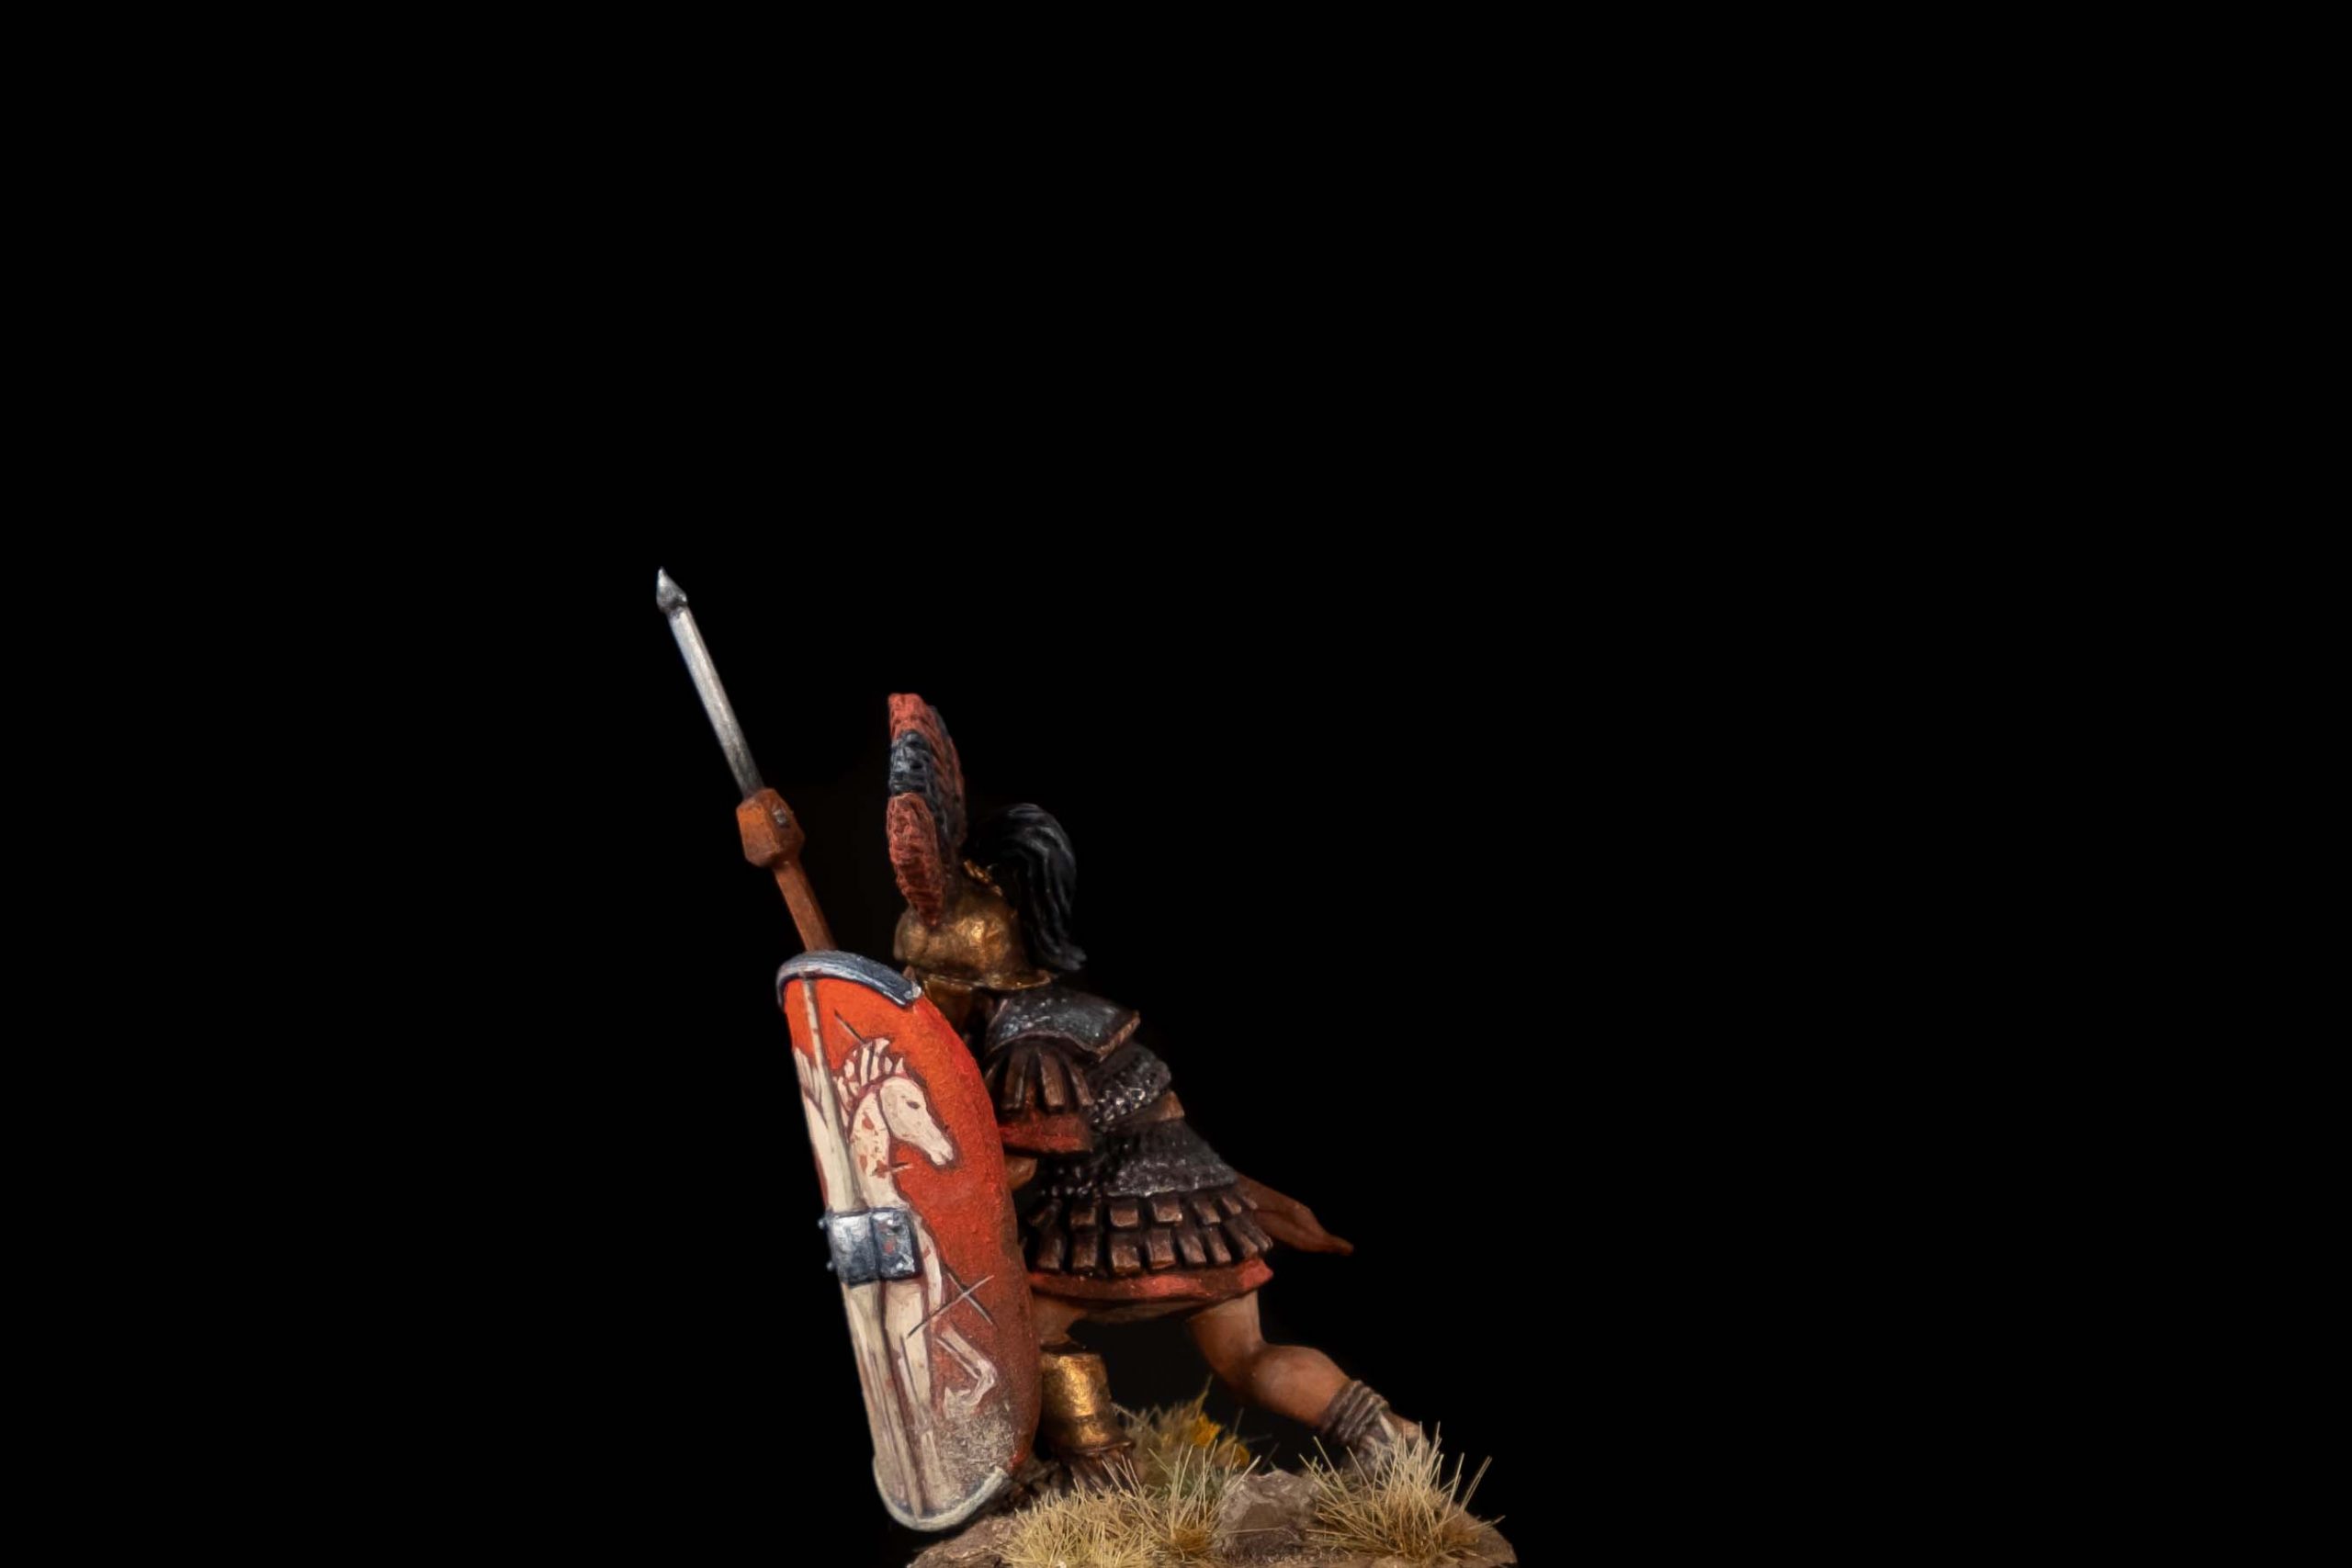
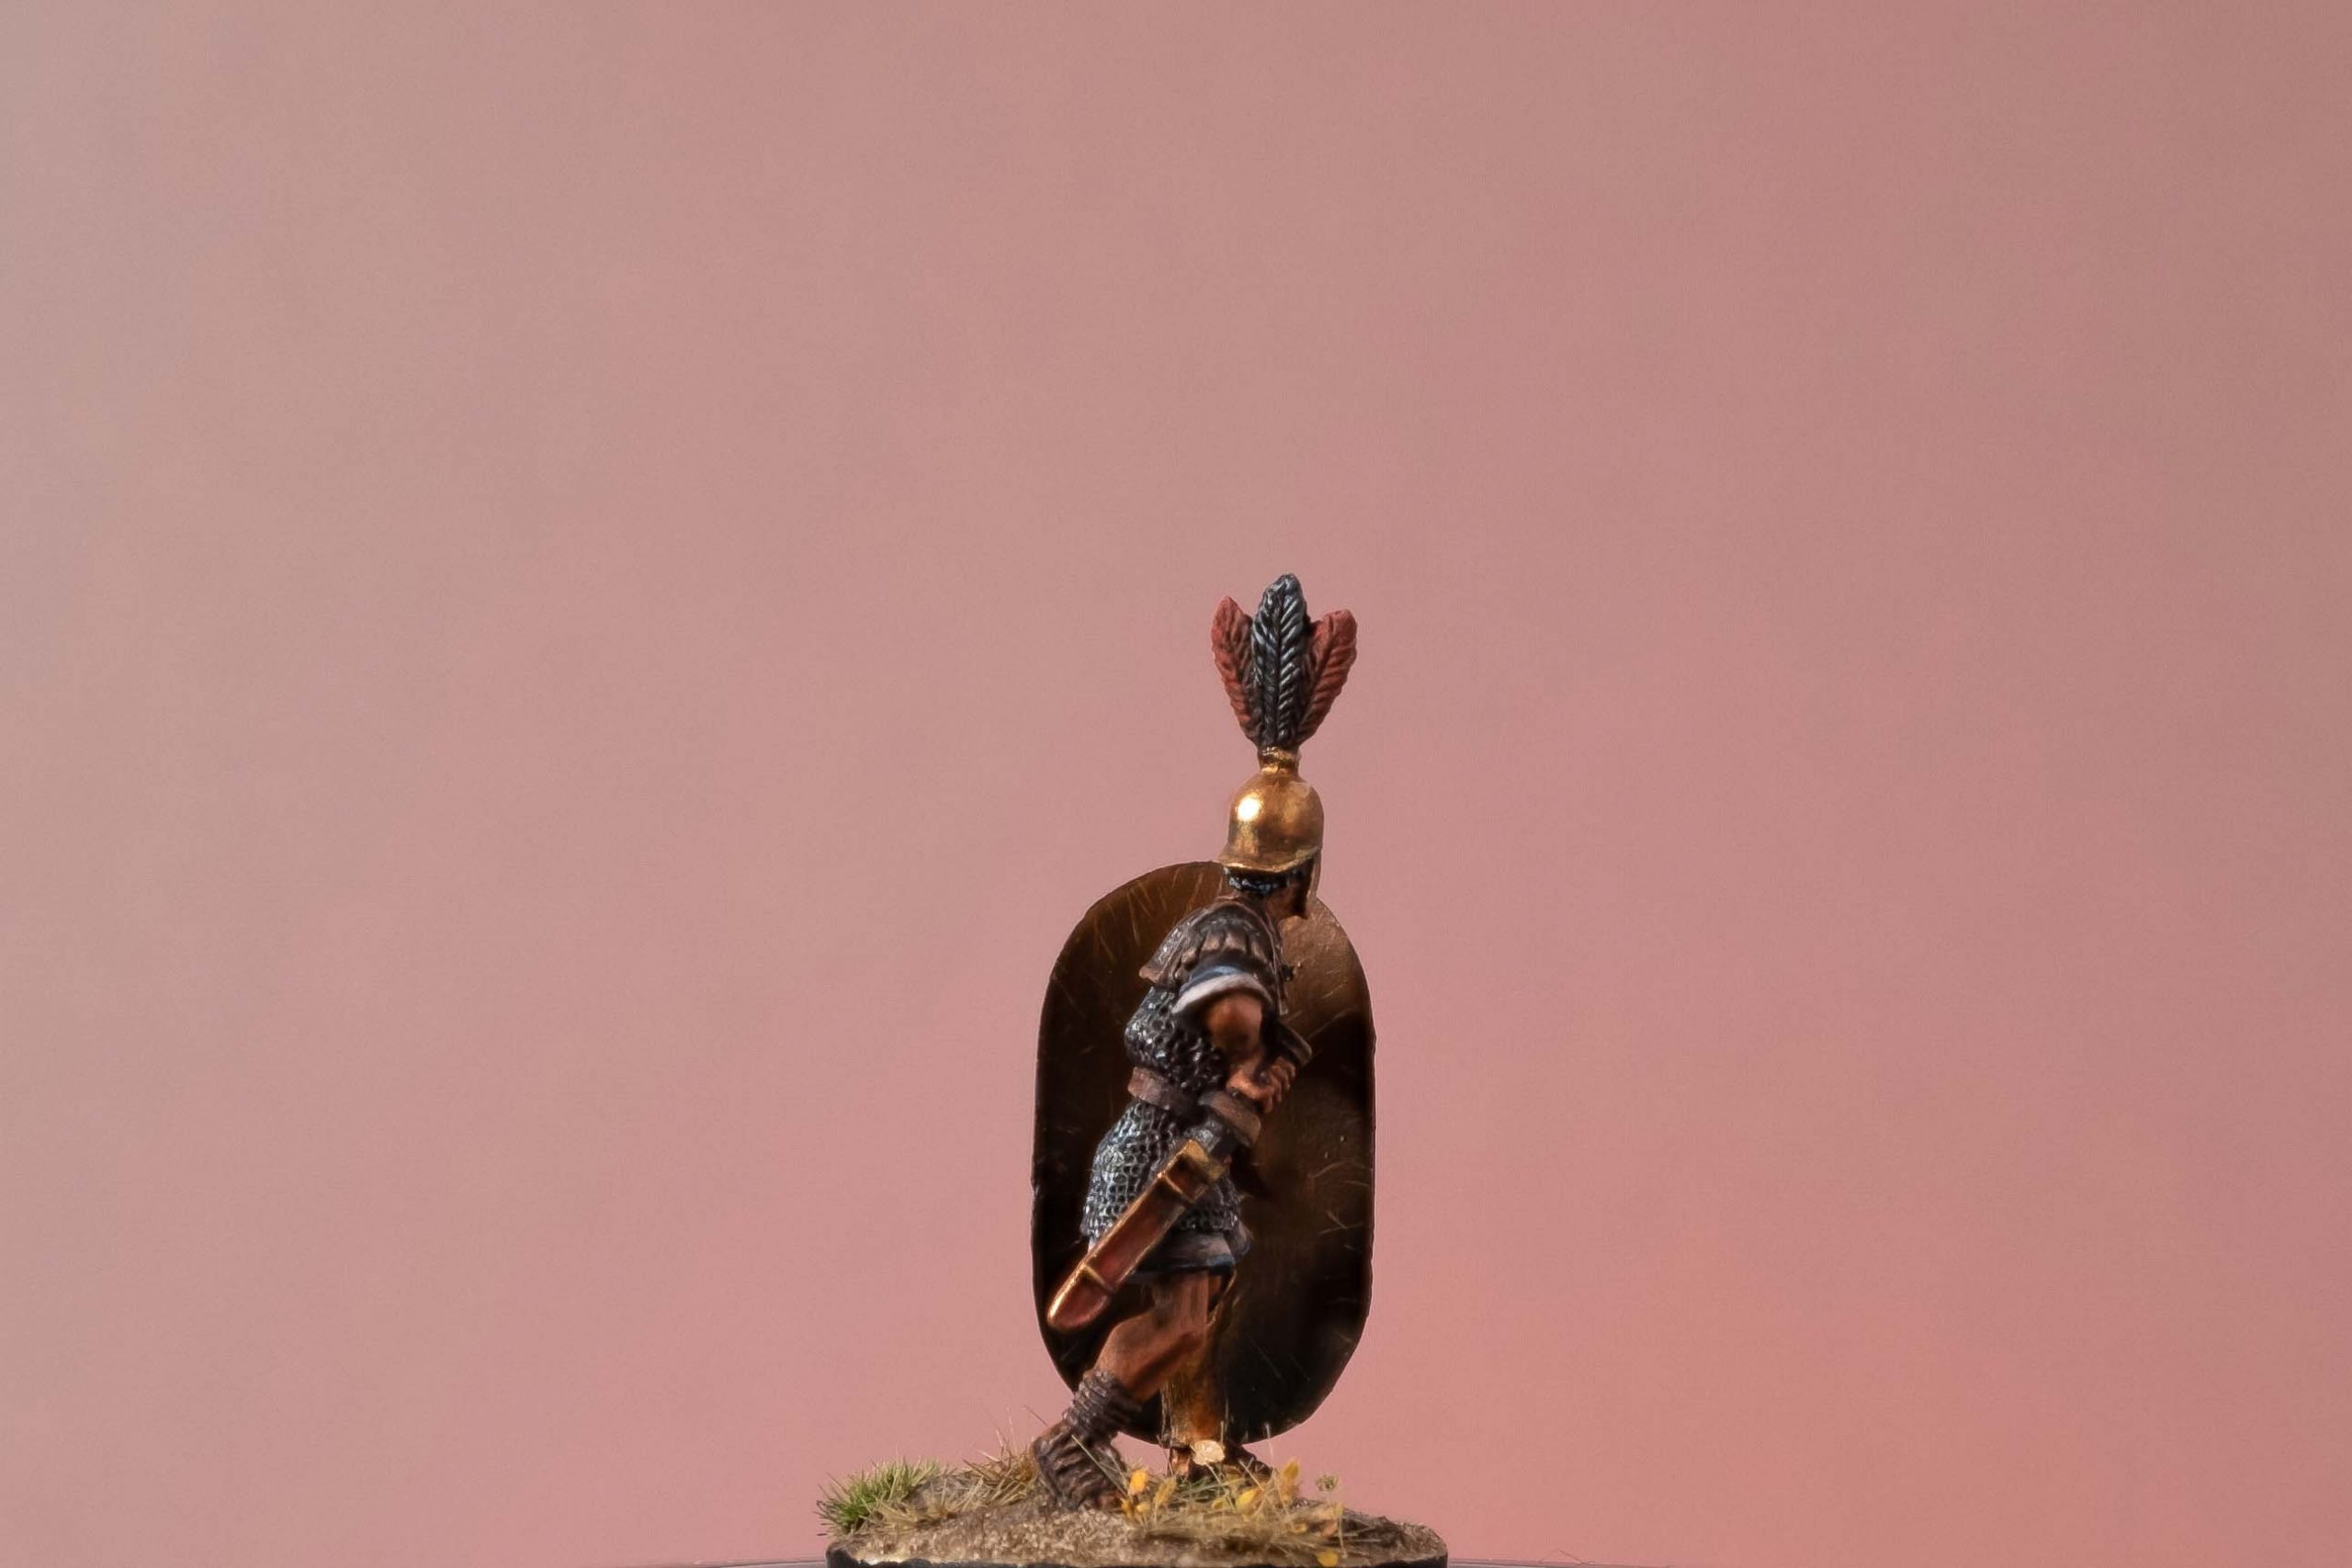
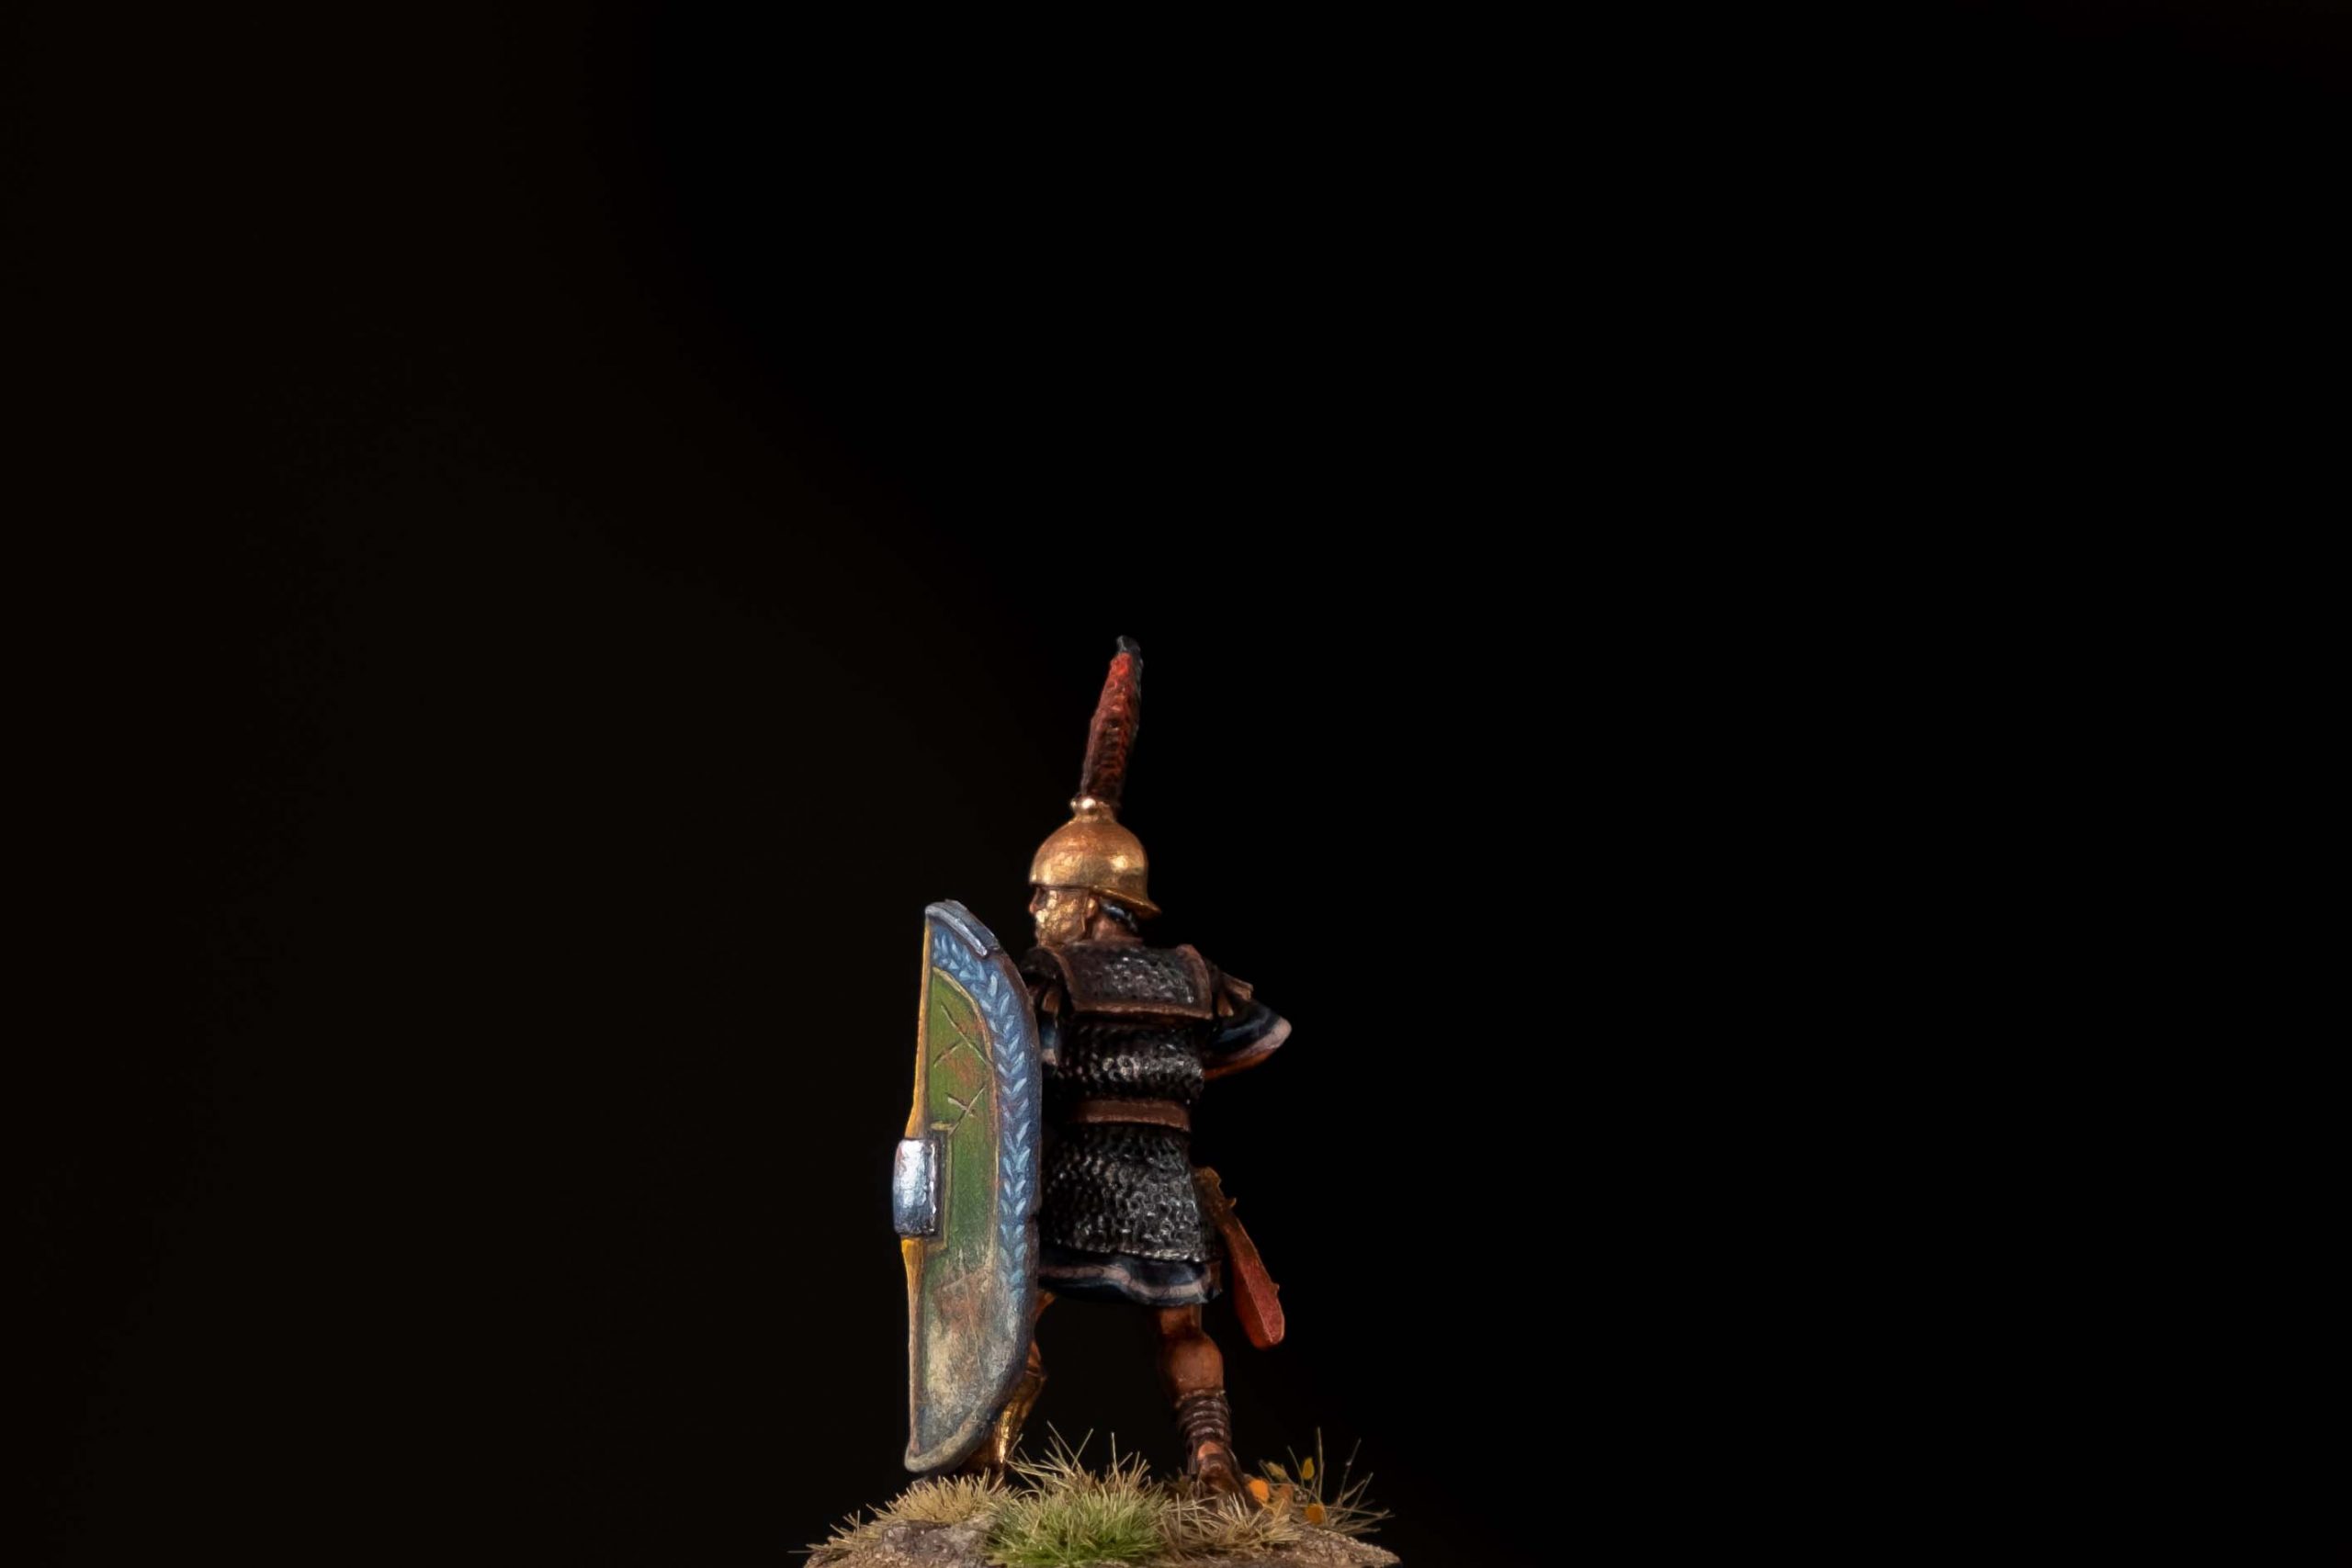
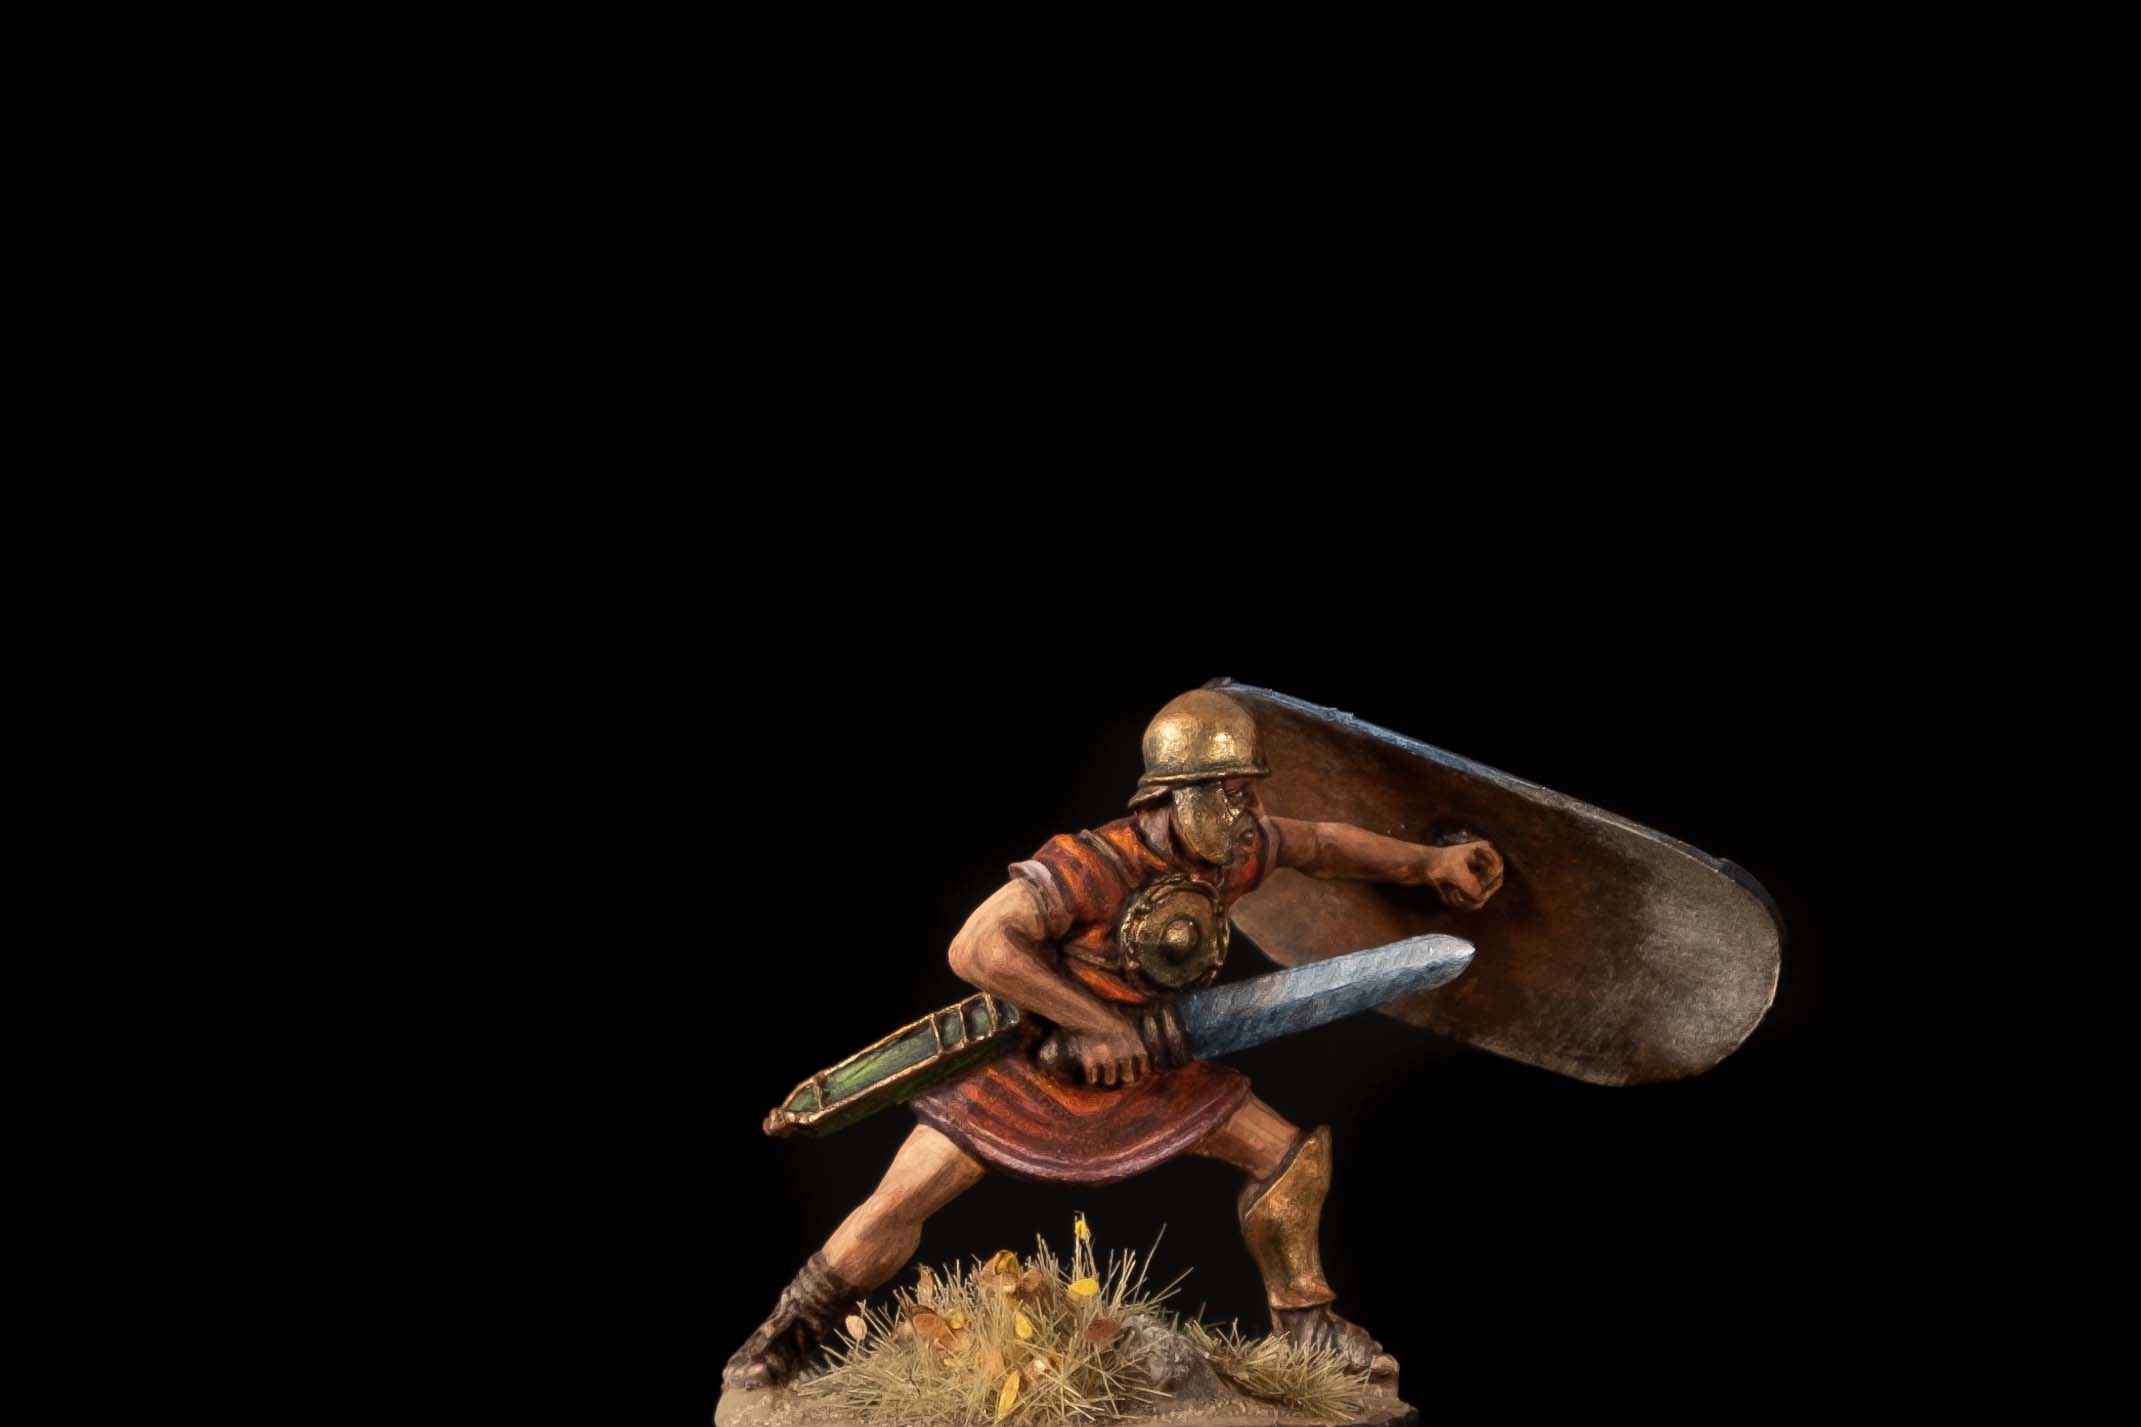
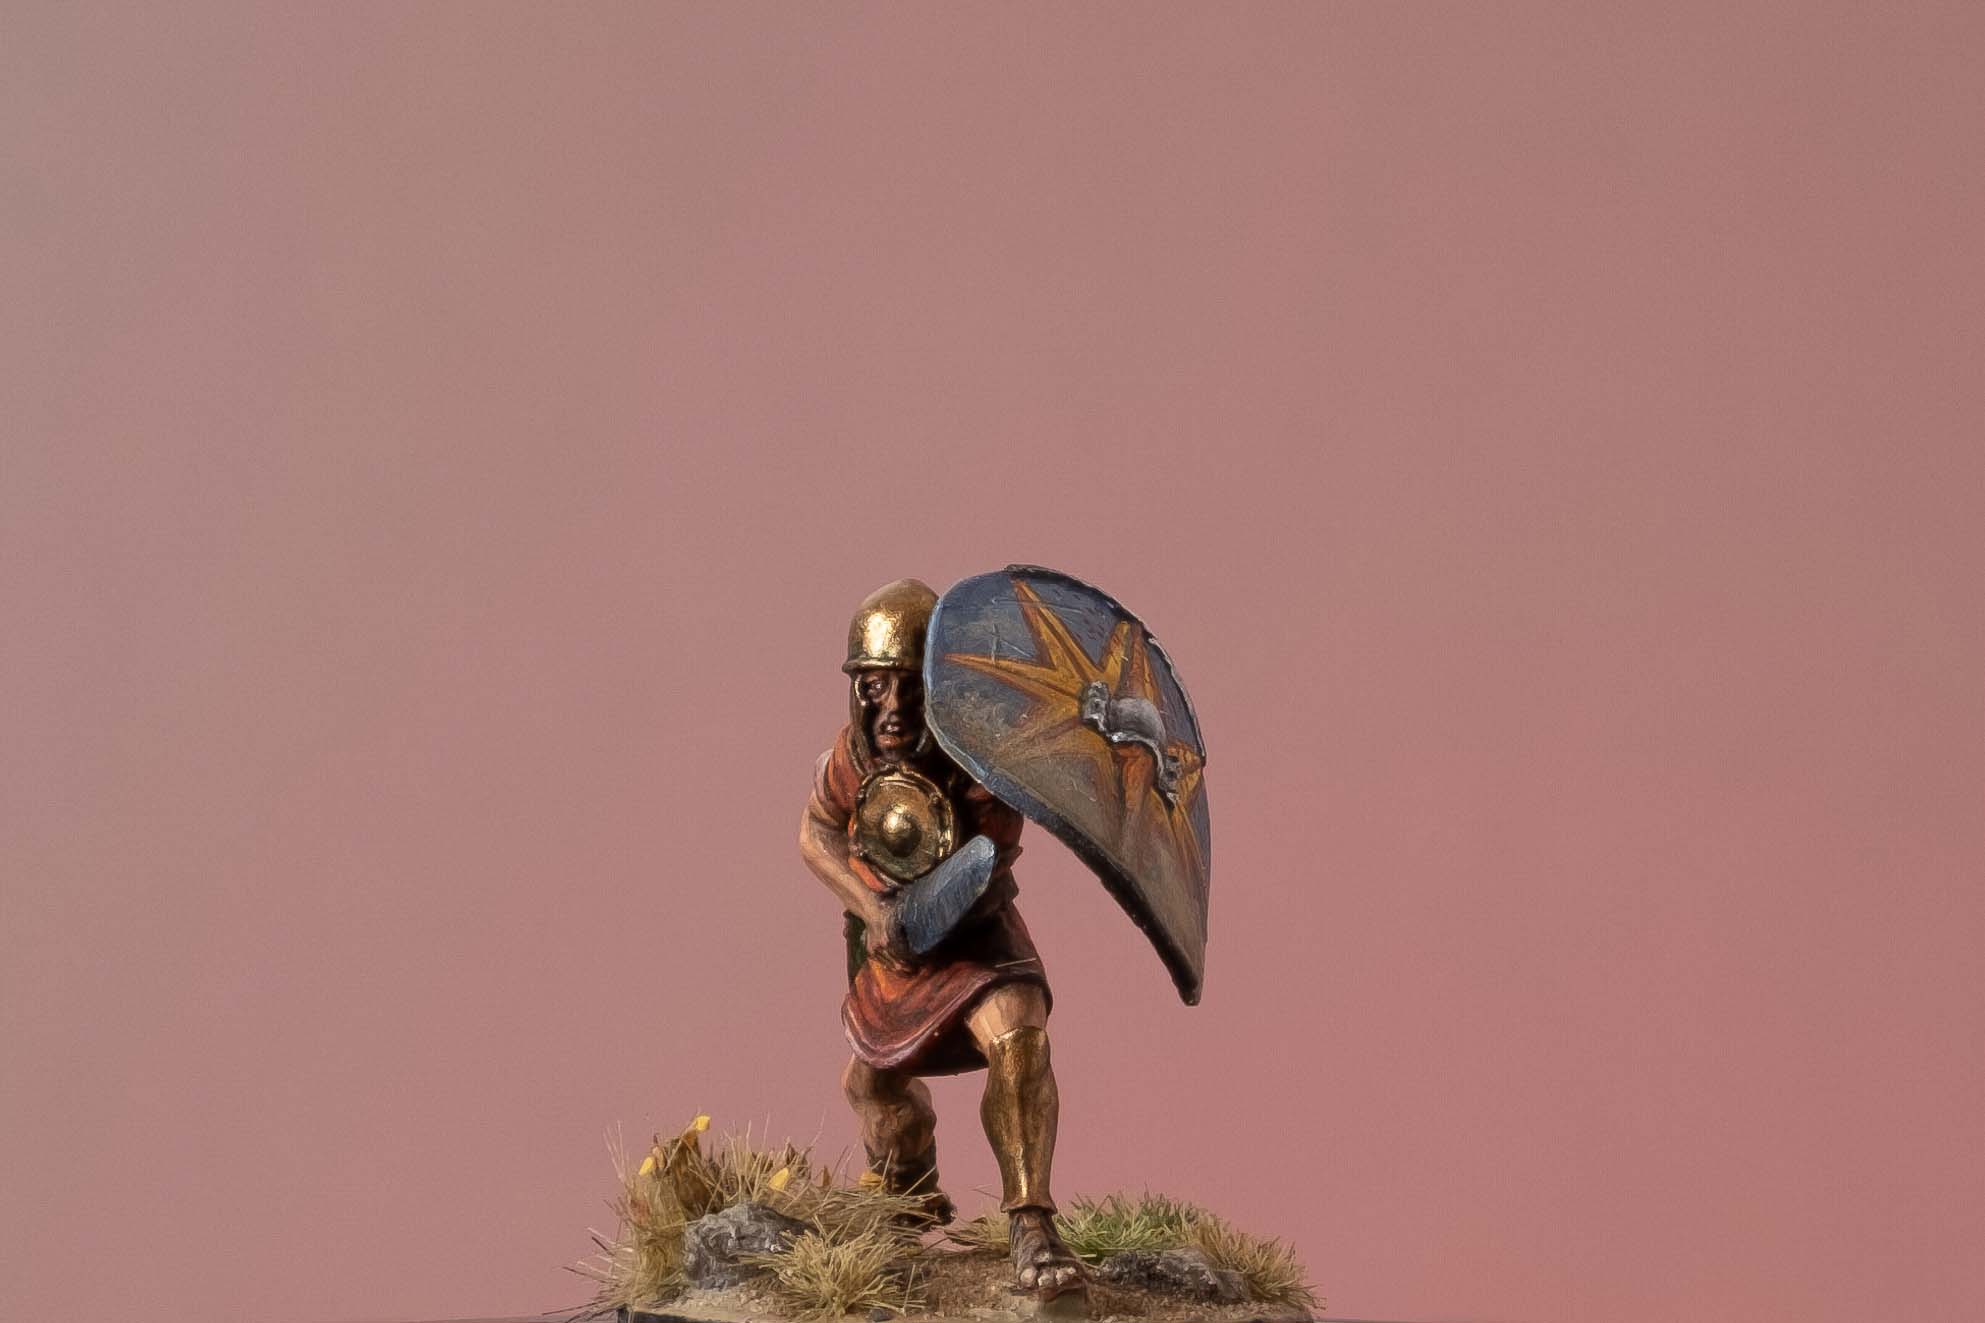
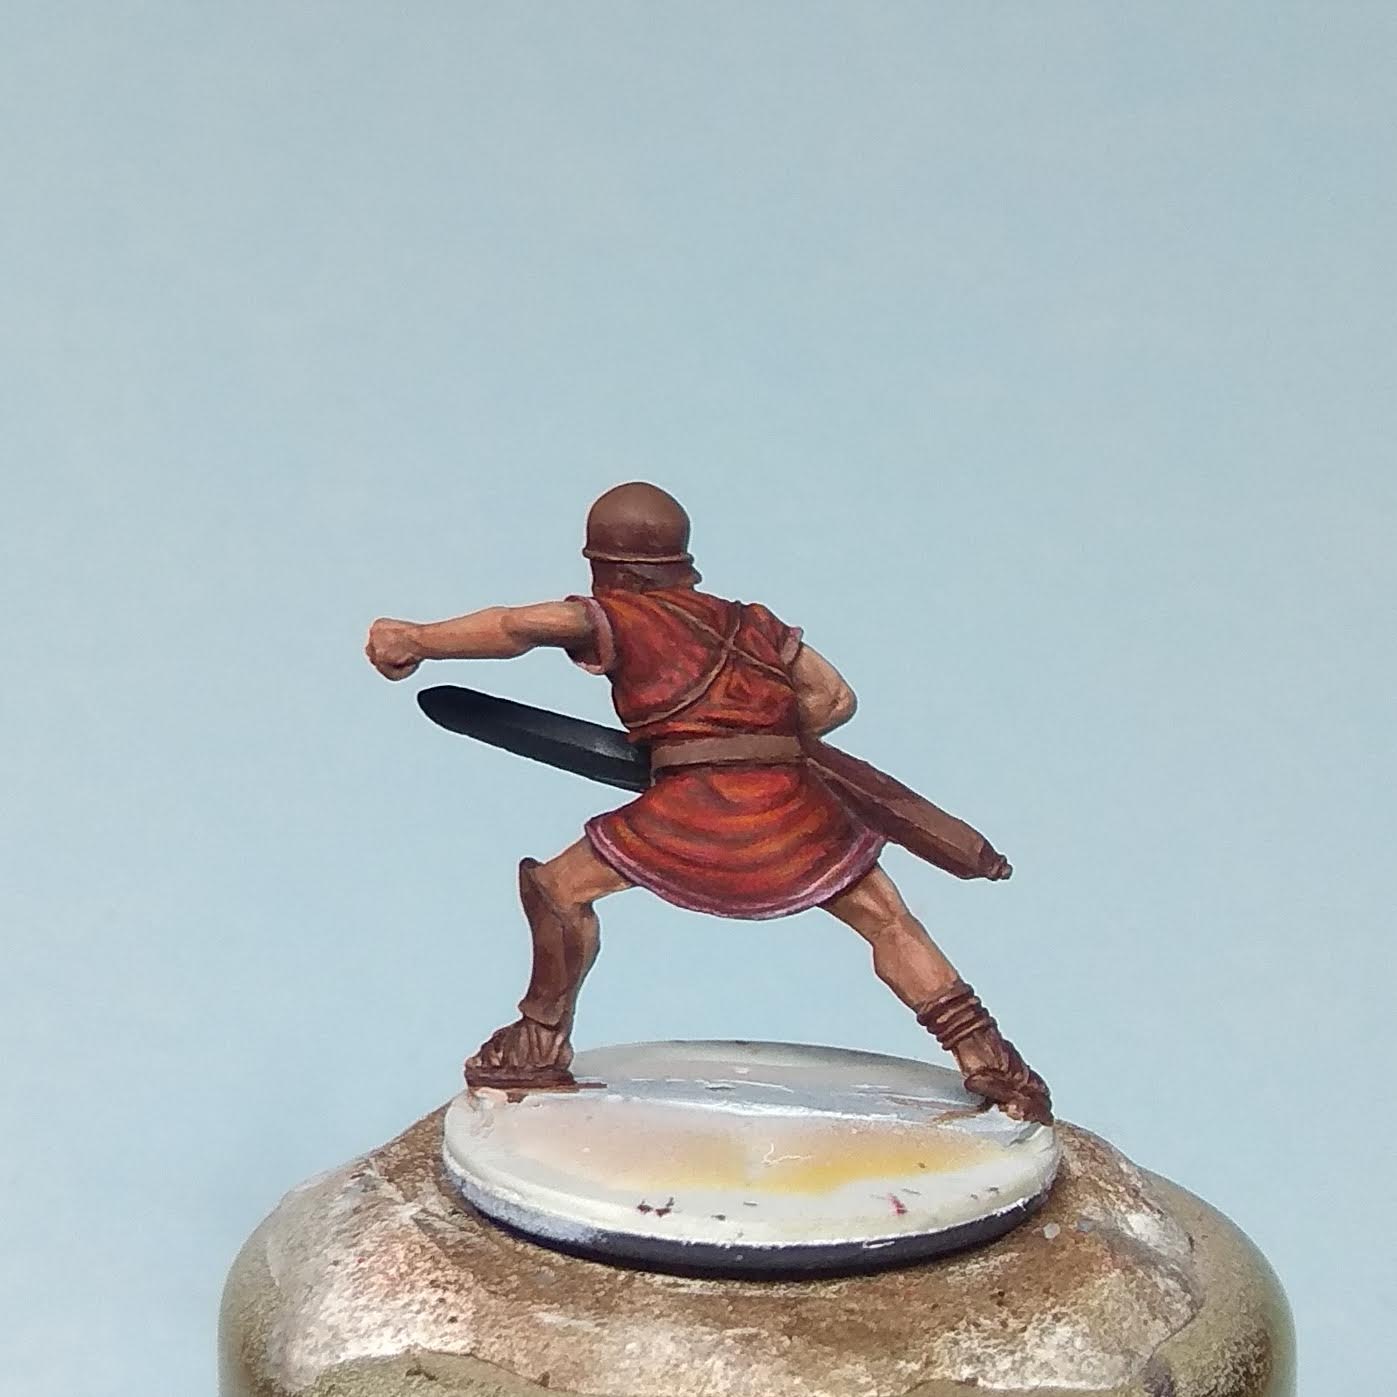
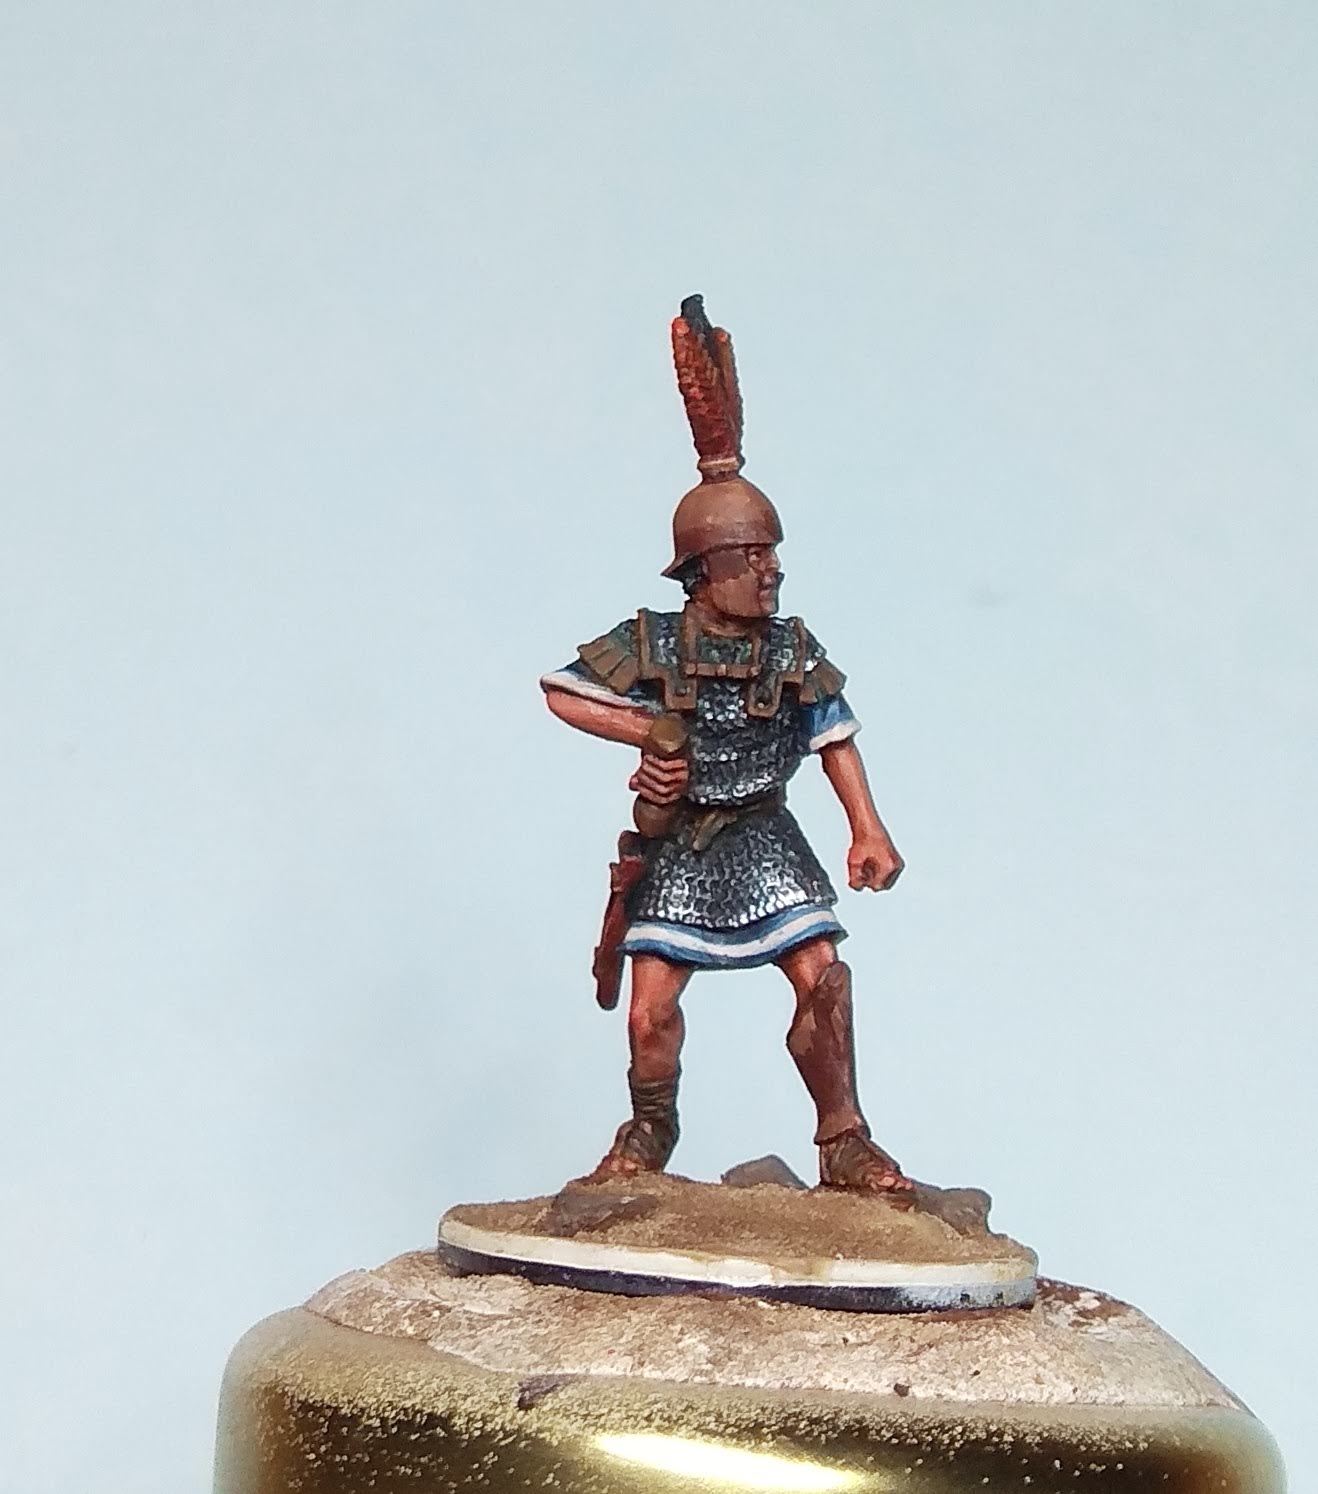
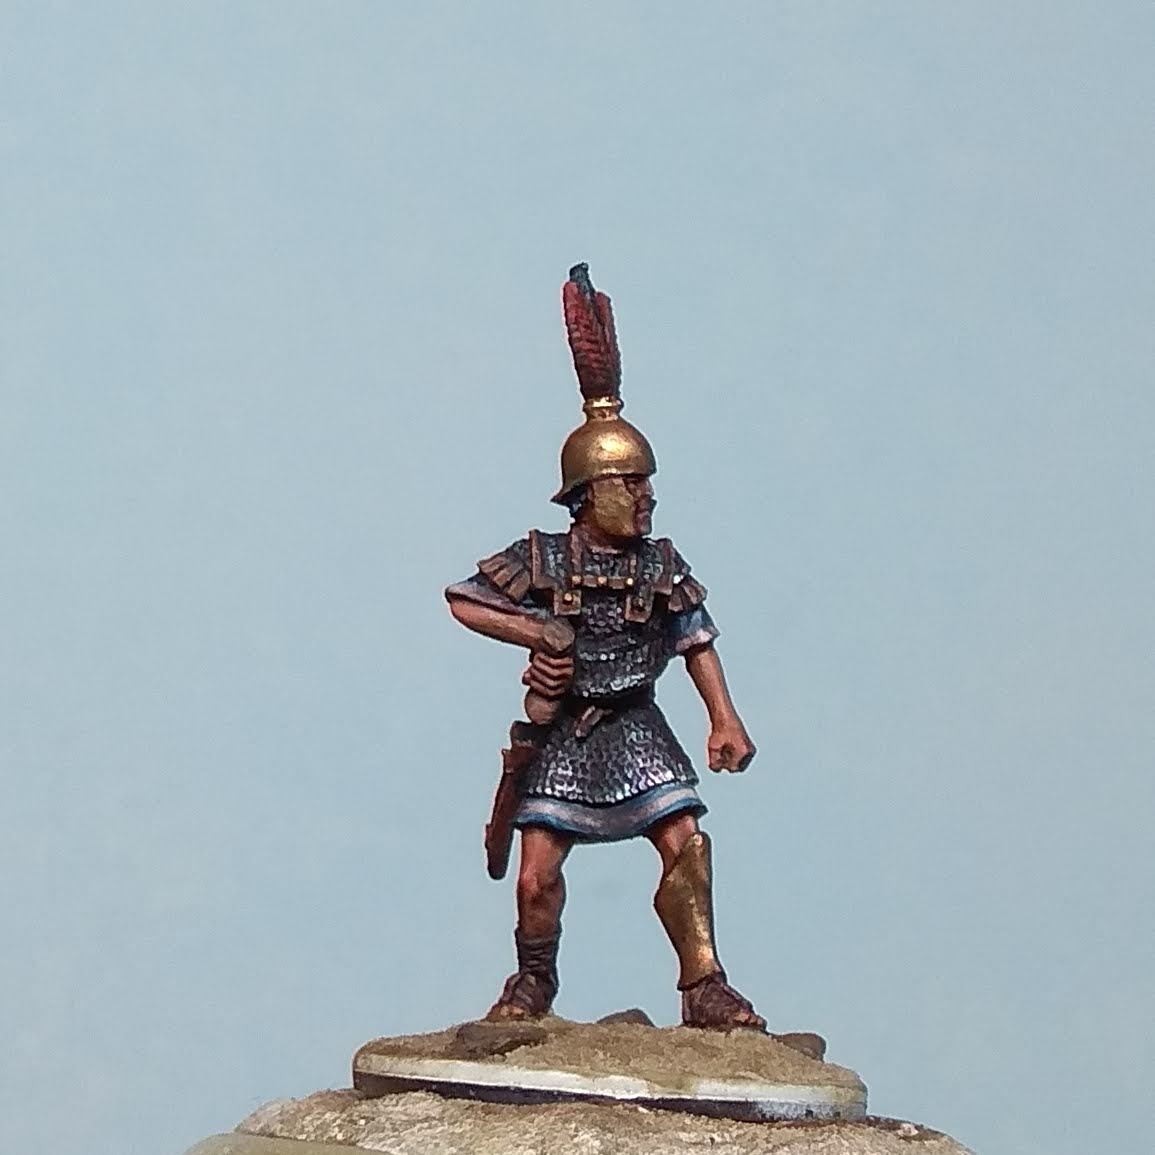
The Velites and Triarii do not concern us in this post. However, Appius and Cornelius sport the complete panoply of the Hastati: A large shield, the scutum; the gladius hispaniensis, which, according to Polybios, “has an excellent point, and can deal a formidable blow with either edge, because its blade is stout and unbending” (Plb. 6.23); a Montefortino helmet, single greave and mail. Appius wields a pilum, basically a throwing spear with a barbed iron head, while Cornelius is drawing his gladius. Both are better equipped than their compatriot Fabianus, who instead of mail wears a pectoral, a square piece of metal to protect the heart. As you might assume, he represents a Princeps.


Faces of War
On a more serious note, behind the equipment and pretty shield designs there is so much more to learn about the human condition – and its failings – if you concern yourself with ancient history. The Punic Wars were a brutal conflict that enveloped the entire Mediterranean, and did cost hundreds of thousands of lives. While Scipio Africanus and Hannibal Barcas are well-known leaders, which are – even today – glorified to some extend, the sources don’t reveal much about the common soldier who had to live through deprivation, illness and injury. Naturally, Roman sources stress the valour and dedication of their soldiers, but the darker aspects of this world shaped by war, cruelty and warring empires are seldom a focus.
What I like about the Agema characters, is their propensity to show aspects of war that are not often featured in the miniature world: a fearful expression, a face suggesting uncertainty or resolution and so on. Definitely something I would like to see more often. This leads me to some ruminations about painting the three soldiers, as I wanted them to look rugged, showing the tribulations of campaign life.
Painting the Agema Romans
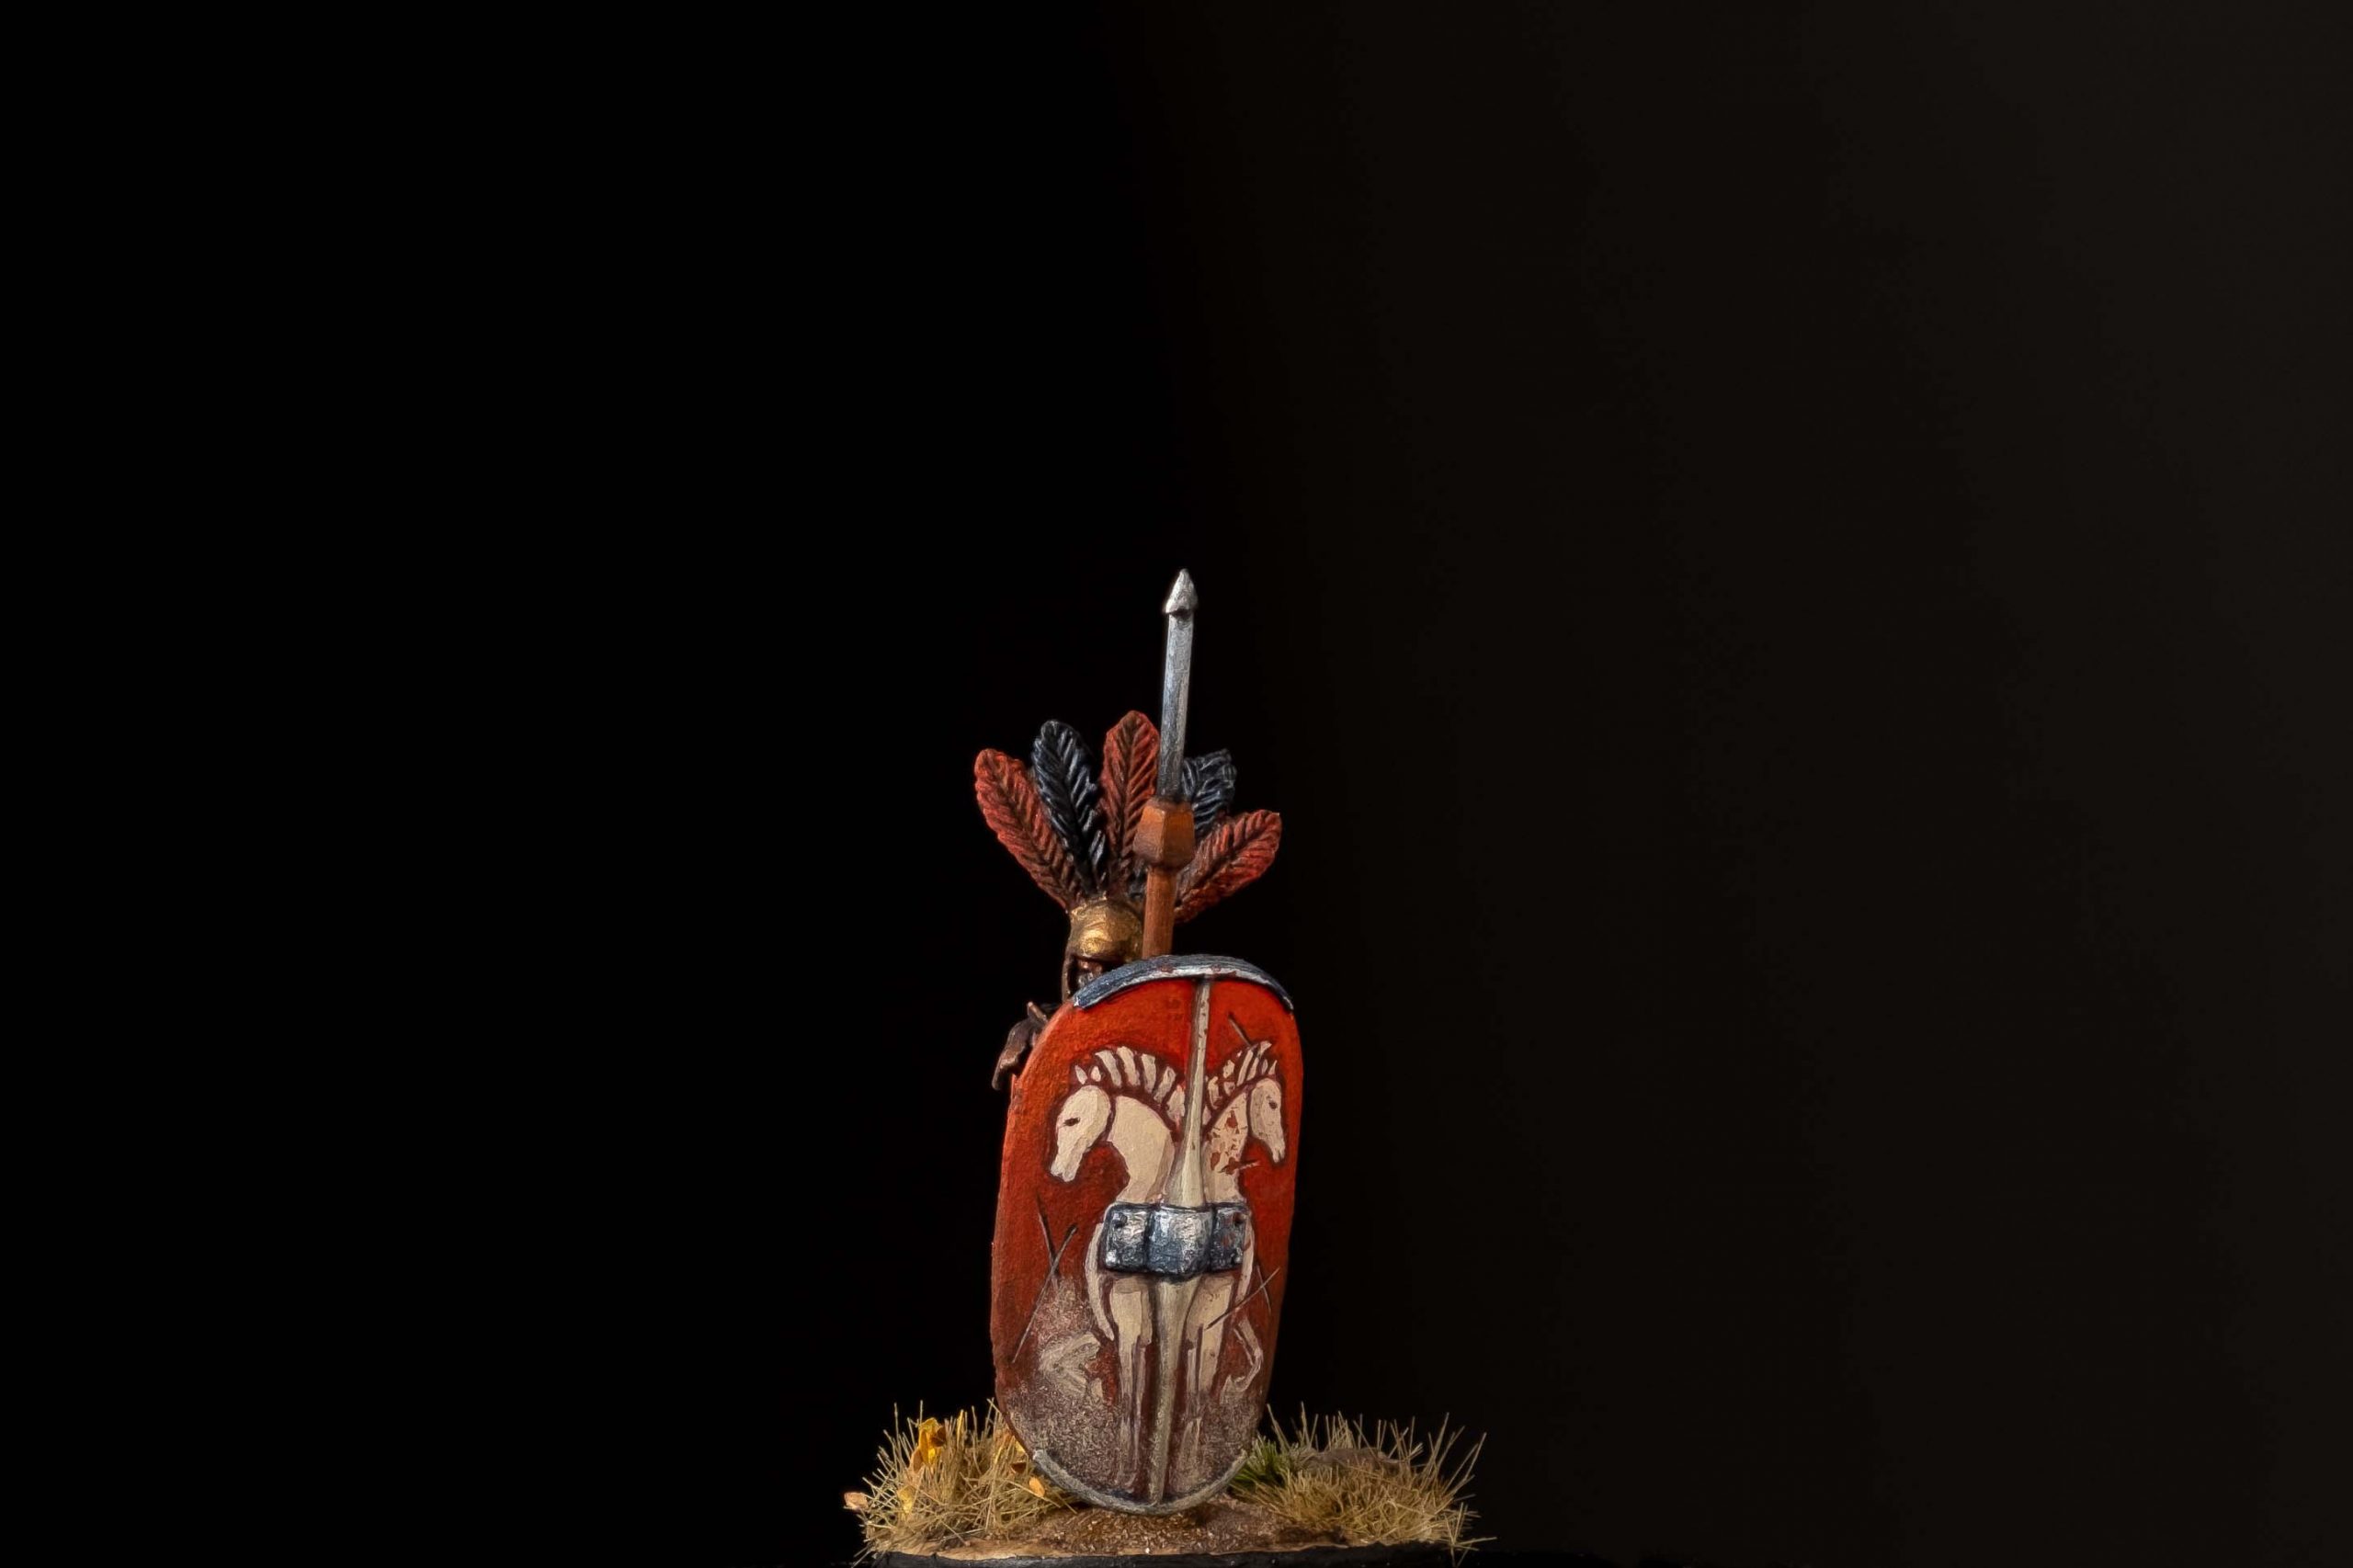
The focal points of the paint jobs are – in my opinion – the feathers and shields. The former draw you in to the facial features, the latter provide ample visual interest. Both Appius and Cornelius decorate their helmets with plumes of crimson and black feathers (πτεροῖς φοινικοῖς ἢ μέλασιν). Common among the hastati, to “give the man the appearance of being twice his real height, and to give him a noble aspect calculated to strike terror into the enemy” (Plb. 6.23). This aspect works in favour of the miniatures, too, as the red and black provide a nice contrast and indeed tower over the scuta. As you can see, the colour schemes of all three feature blue, red, black and green, resulting in visual cohesiveness, yet distinct combinations.
Red grows my dread
I mentioned before, that it can be daunting to paint red. To avoid a pink or orange result in the highlights, the solution is simple: start with a dark red. In my case Red Oxide with a hint of The Red by Kimera colours. Mix a chromatic black – that is a single pigment red and green – and shade the dark red. Highlights are now added with a bright red. I did push the highlights with a smidgen of Warm Yellow added, but otherwise you don’t need to add white or copious amounts of yellow. I wanted a bit of a faded look, so the yellow helped in combination with the Red Oxide, as this results in a skin tone. My initial red tone was also not super dark. If you go really dark, you can get great red silk effects and push the contrast to high heavens.


True Metal
I remember my early miniature painting days and the frustration using metallics. Somehow I thought just applying a thick coat of metallic paint would immediately turn an armour in a realistic rendition of metal. As you know, metallic paints need some shading and highlights, too, just like any other paint. The difficulty lies in selecting the right tone for shading.
With the Romans I tried something new: a dark blue for the steel parts and a green and red glaze for bronze parts. A great starting point are the Vallejo Model Air metallics. I used Bright Brass and Steel. Now you only need to mix a fairly thin dark blue – for instance Carbon Black and Phtalo Blue (Green Shade) by Kimera – and apply it to the areas that would not reflect light. A glaze medium comes in handy and you have to make sure to feather the edges a tad. This is the hard part, but you can work with reference pictures.
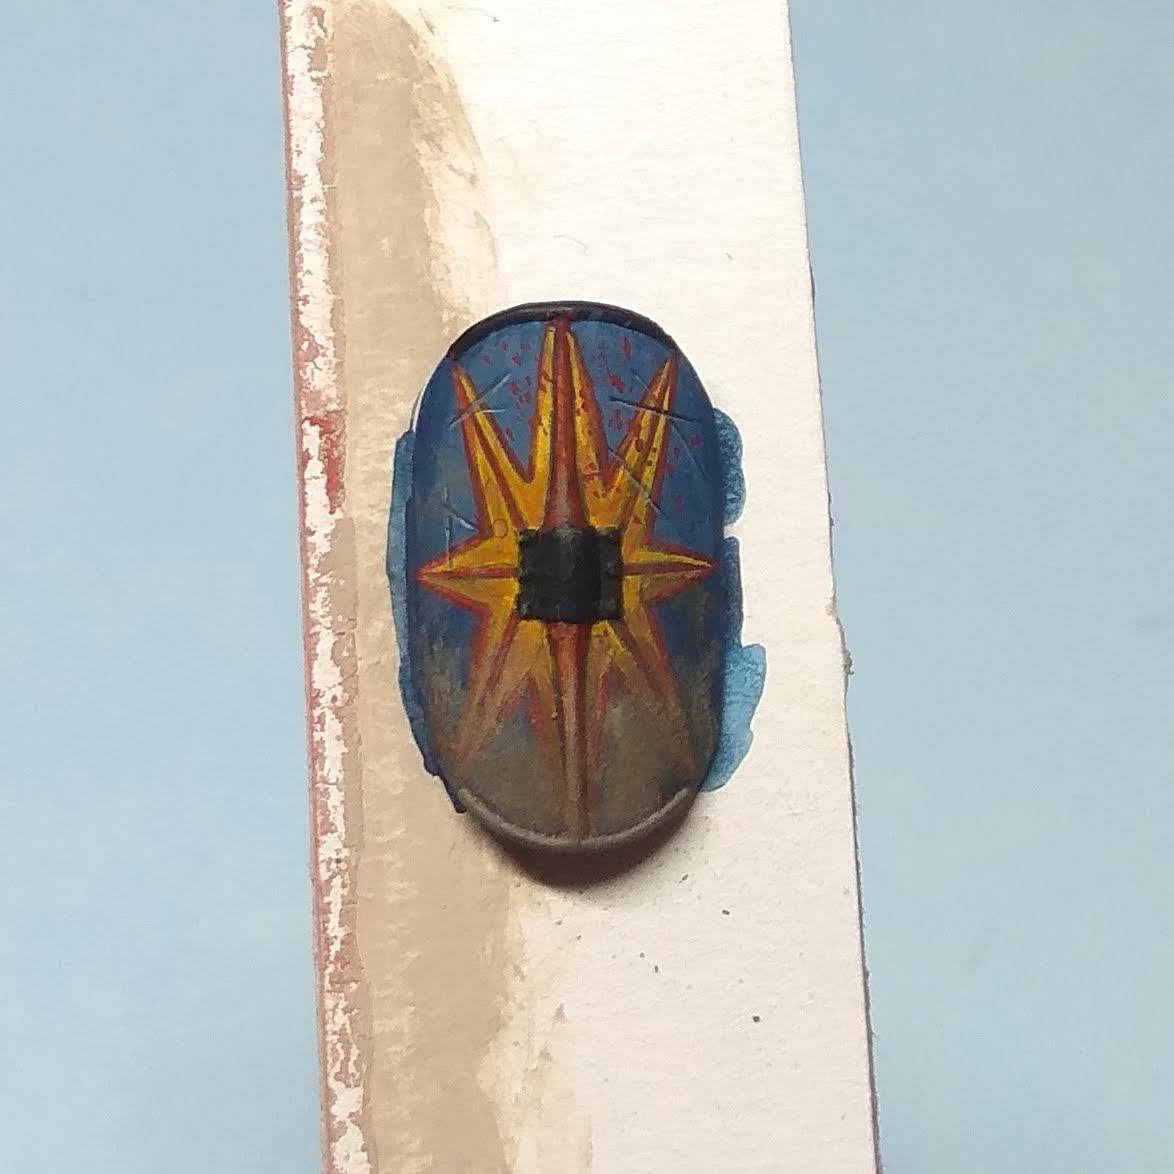
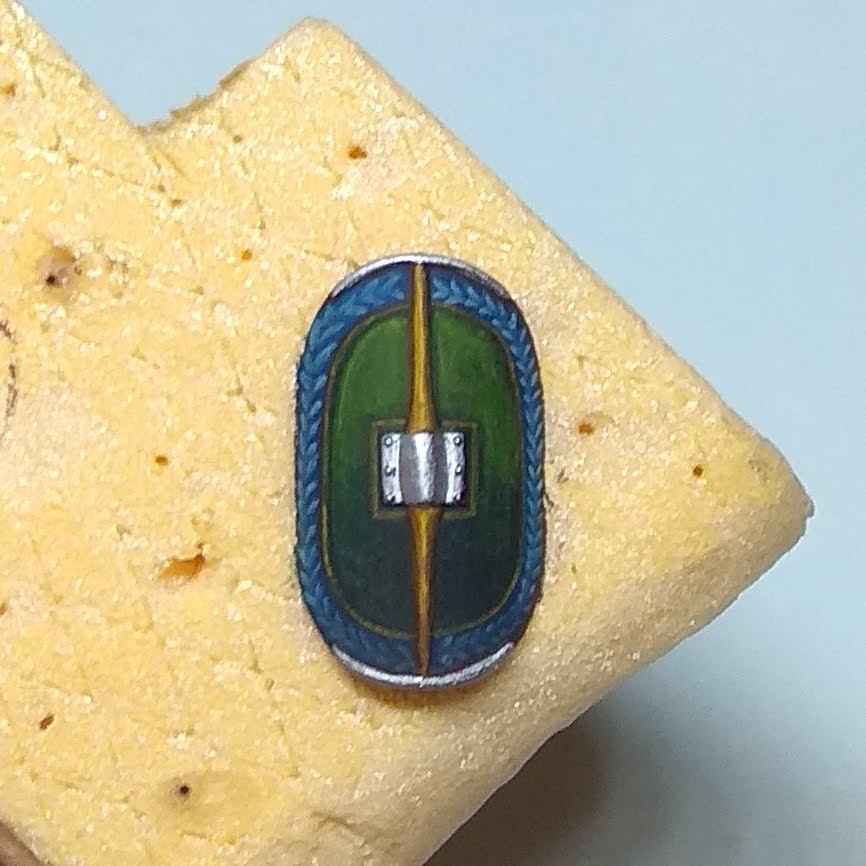
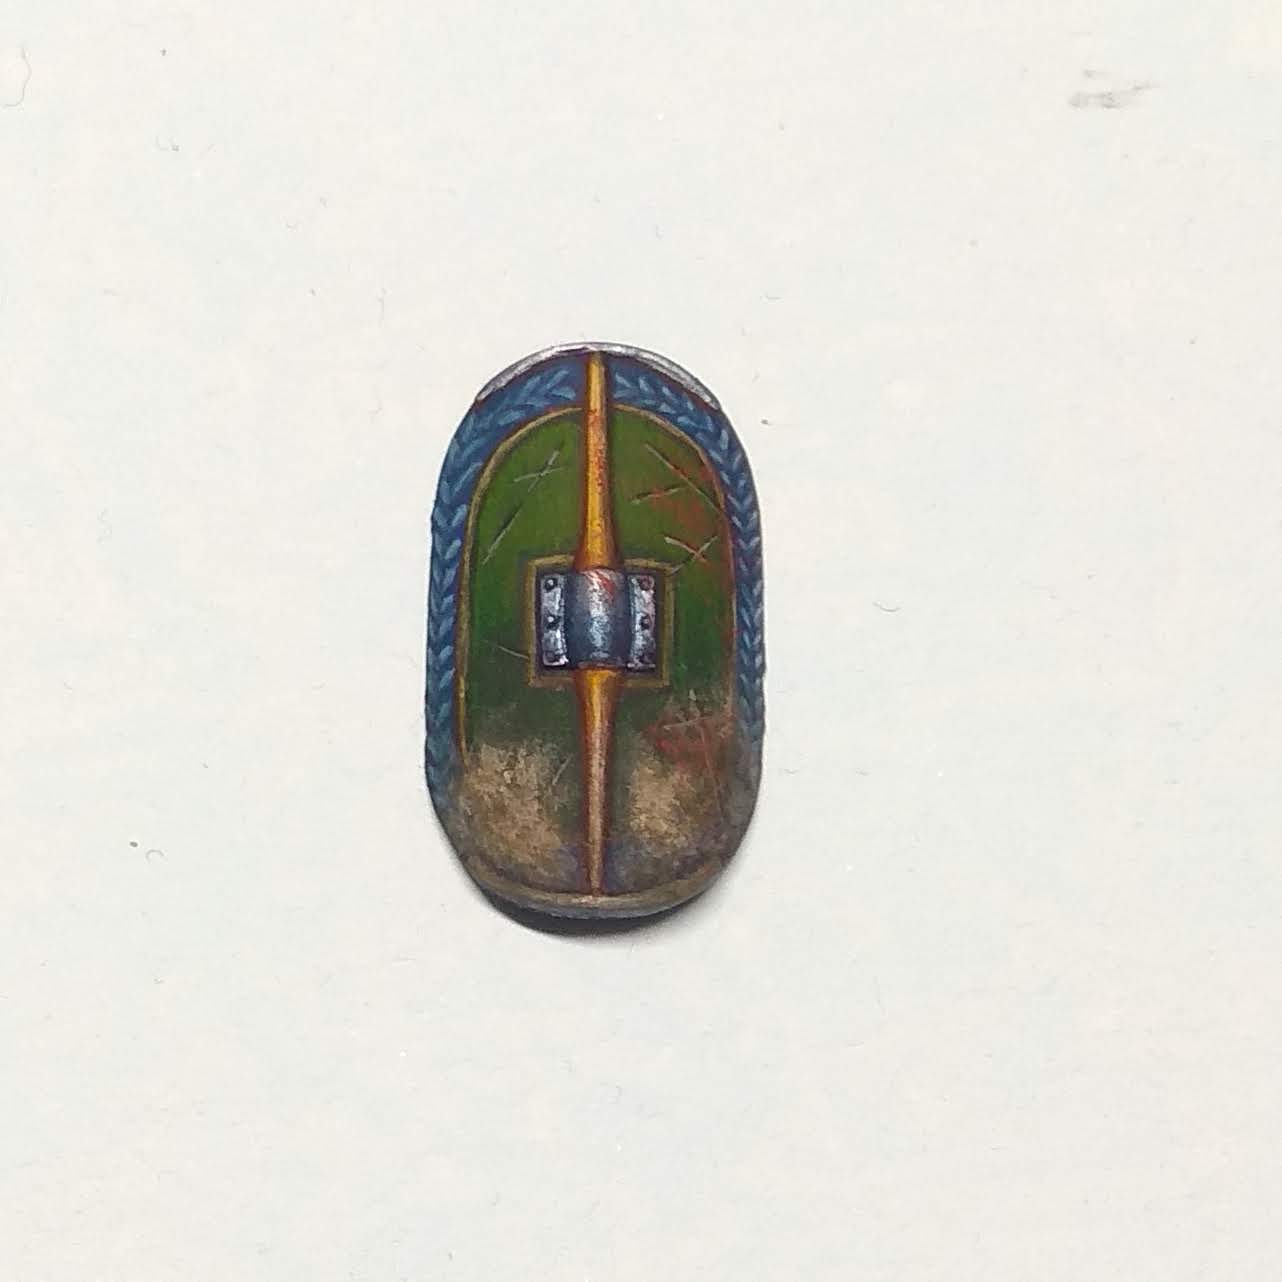
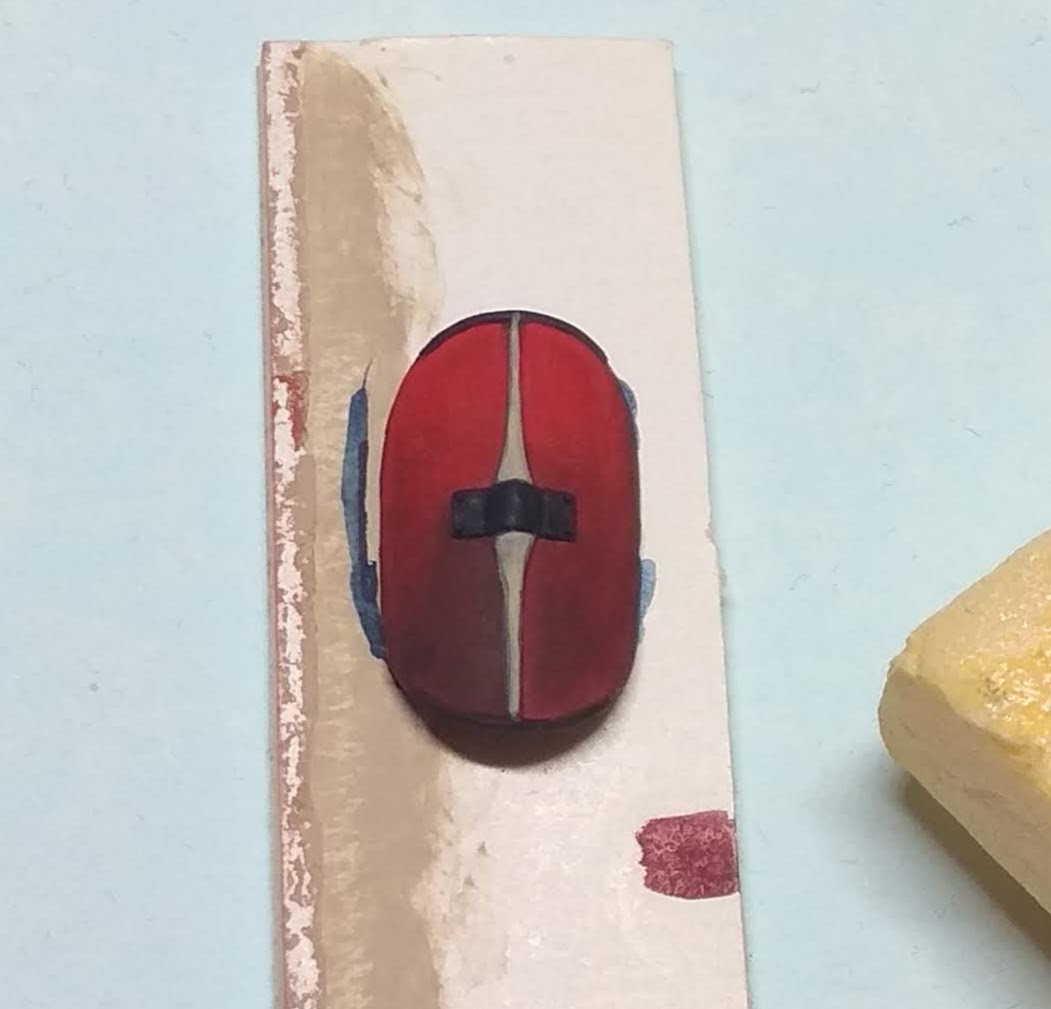
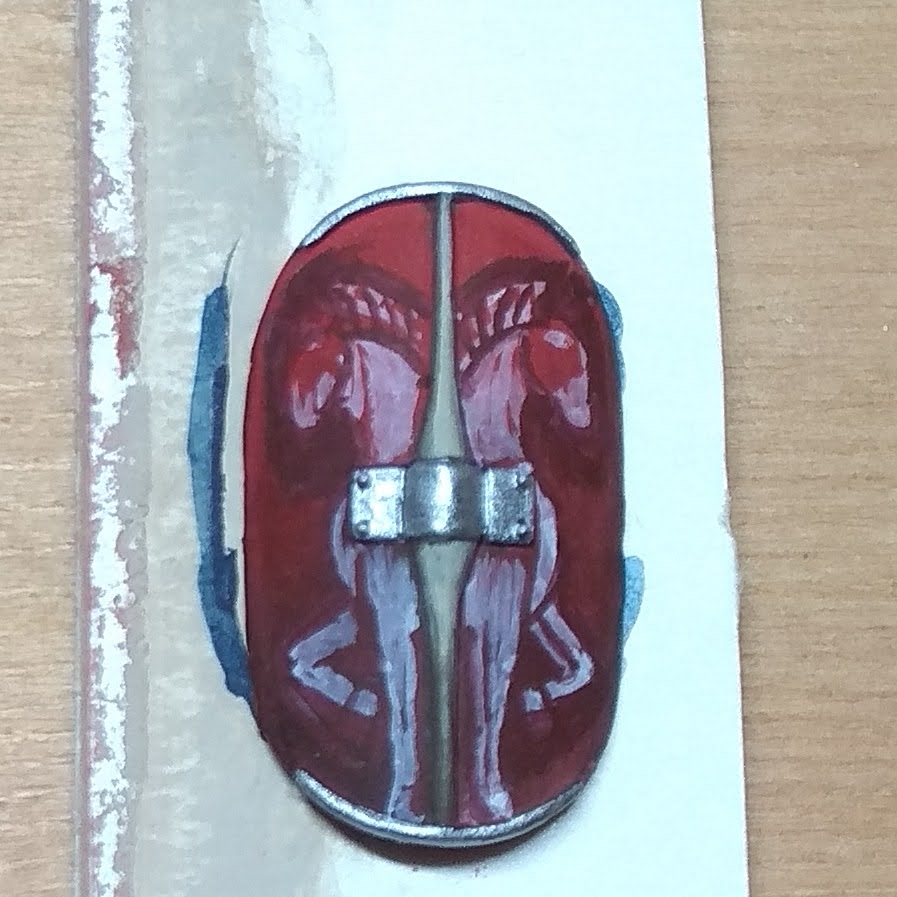
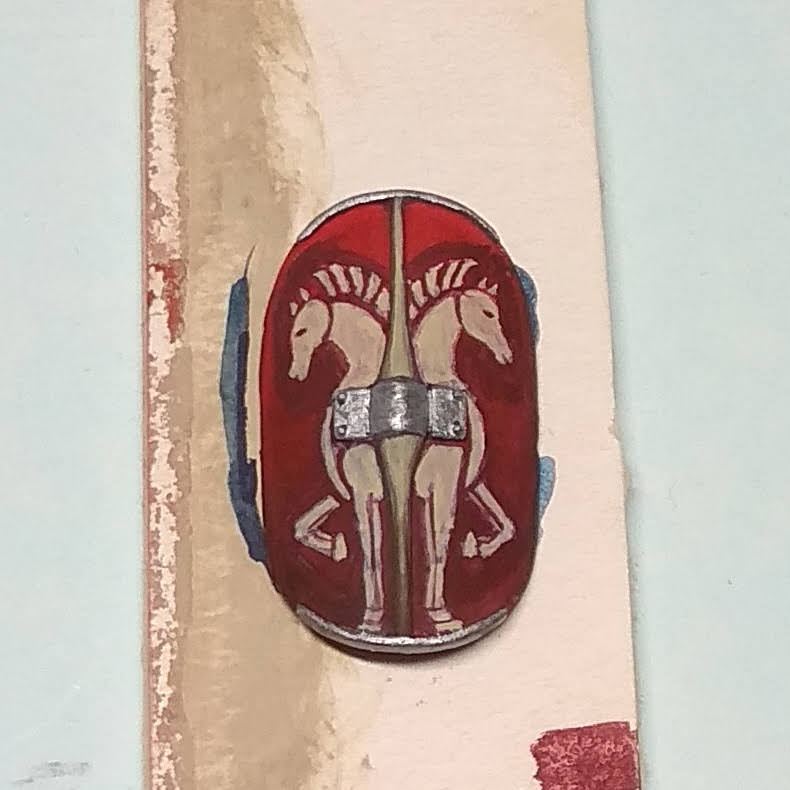
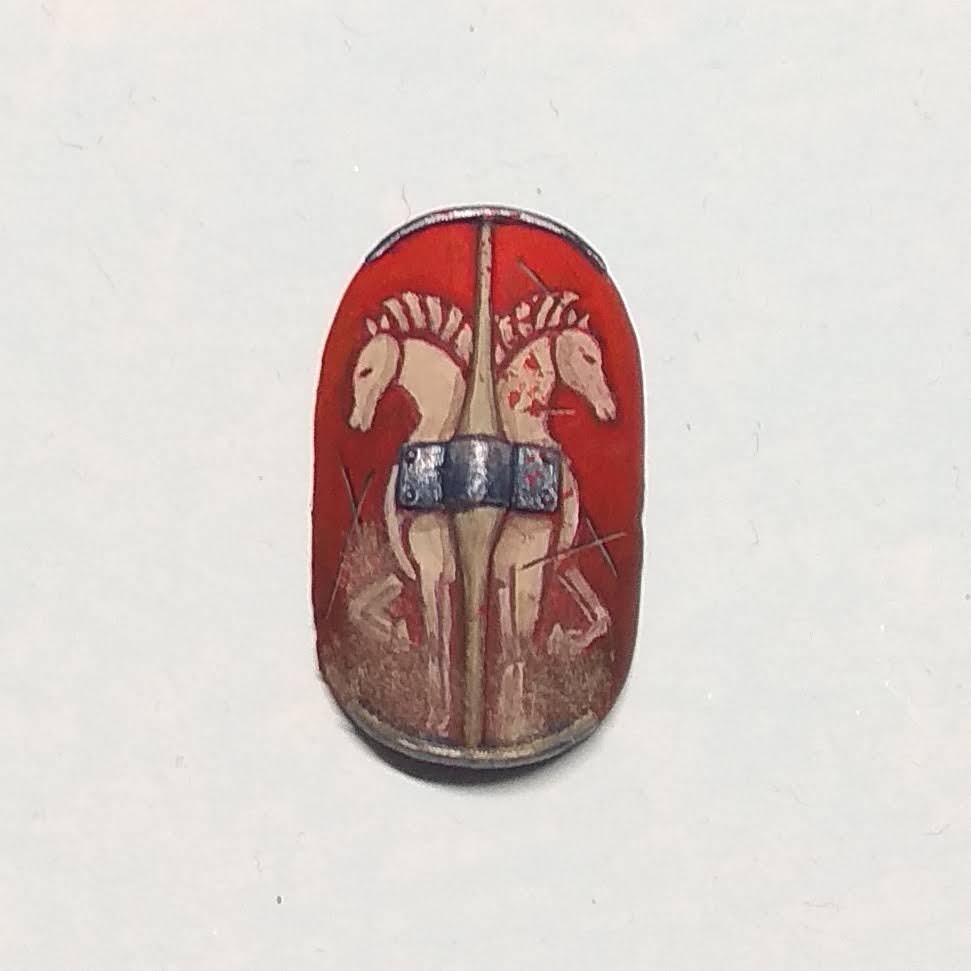
Shield designs – a steady hand and patience
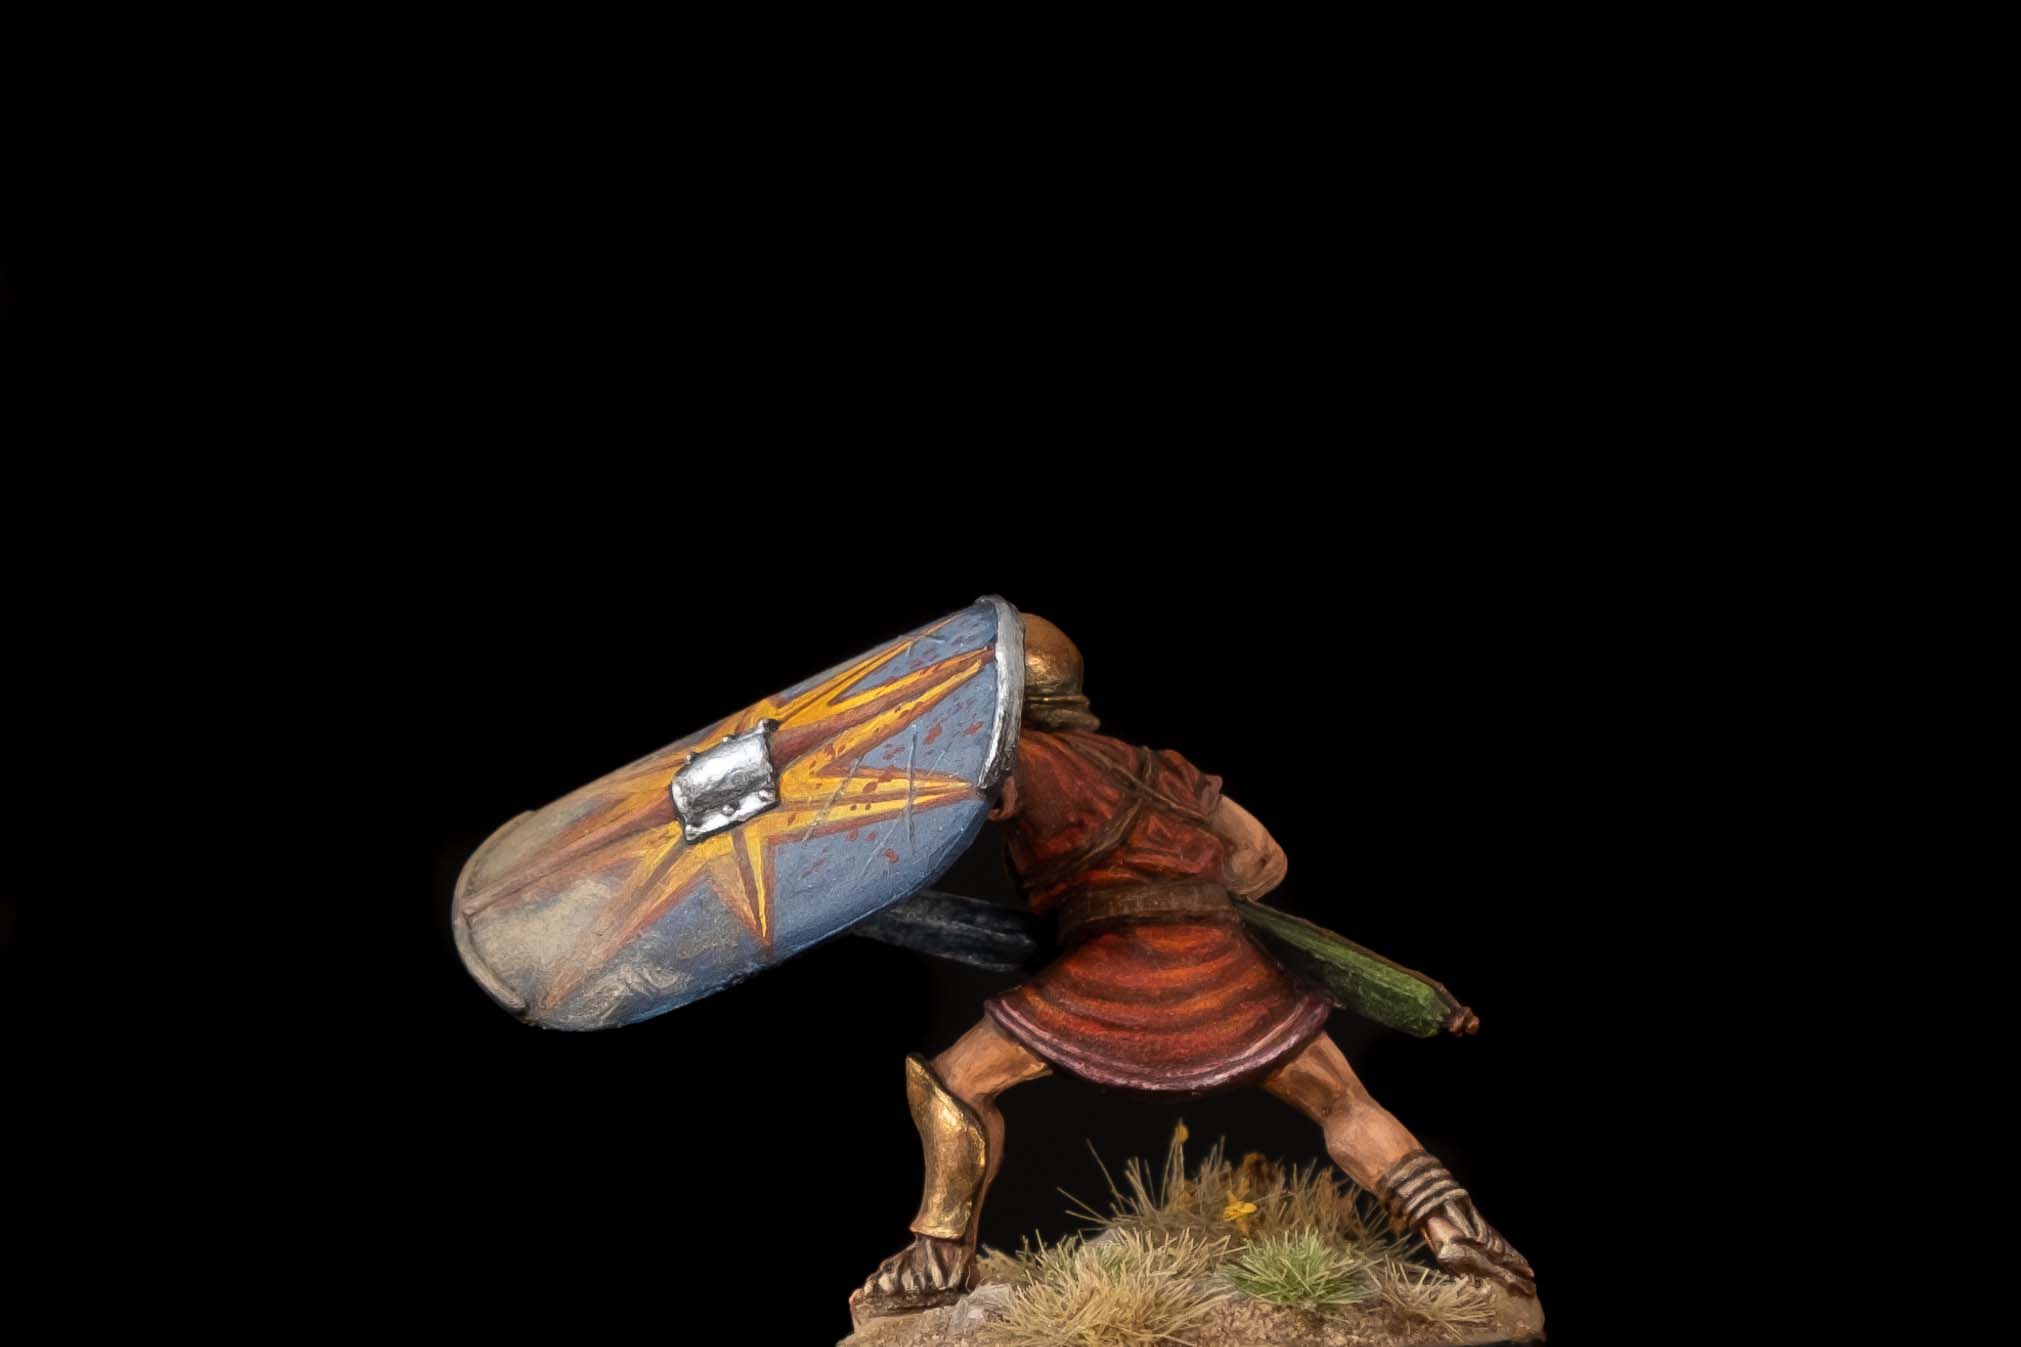
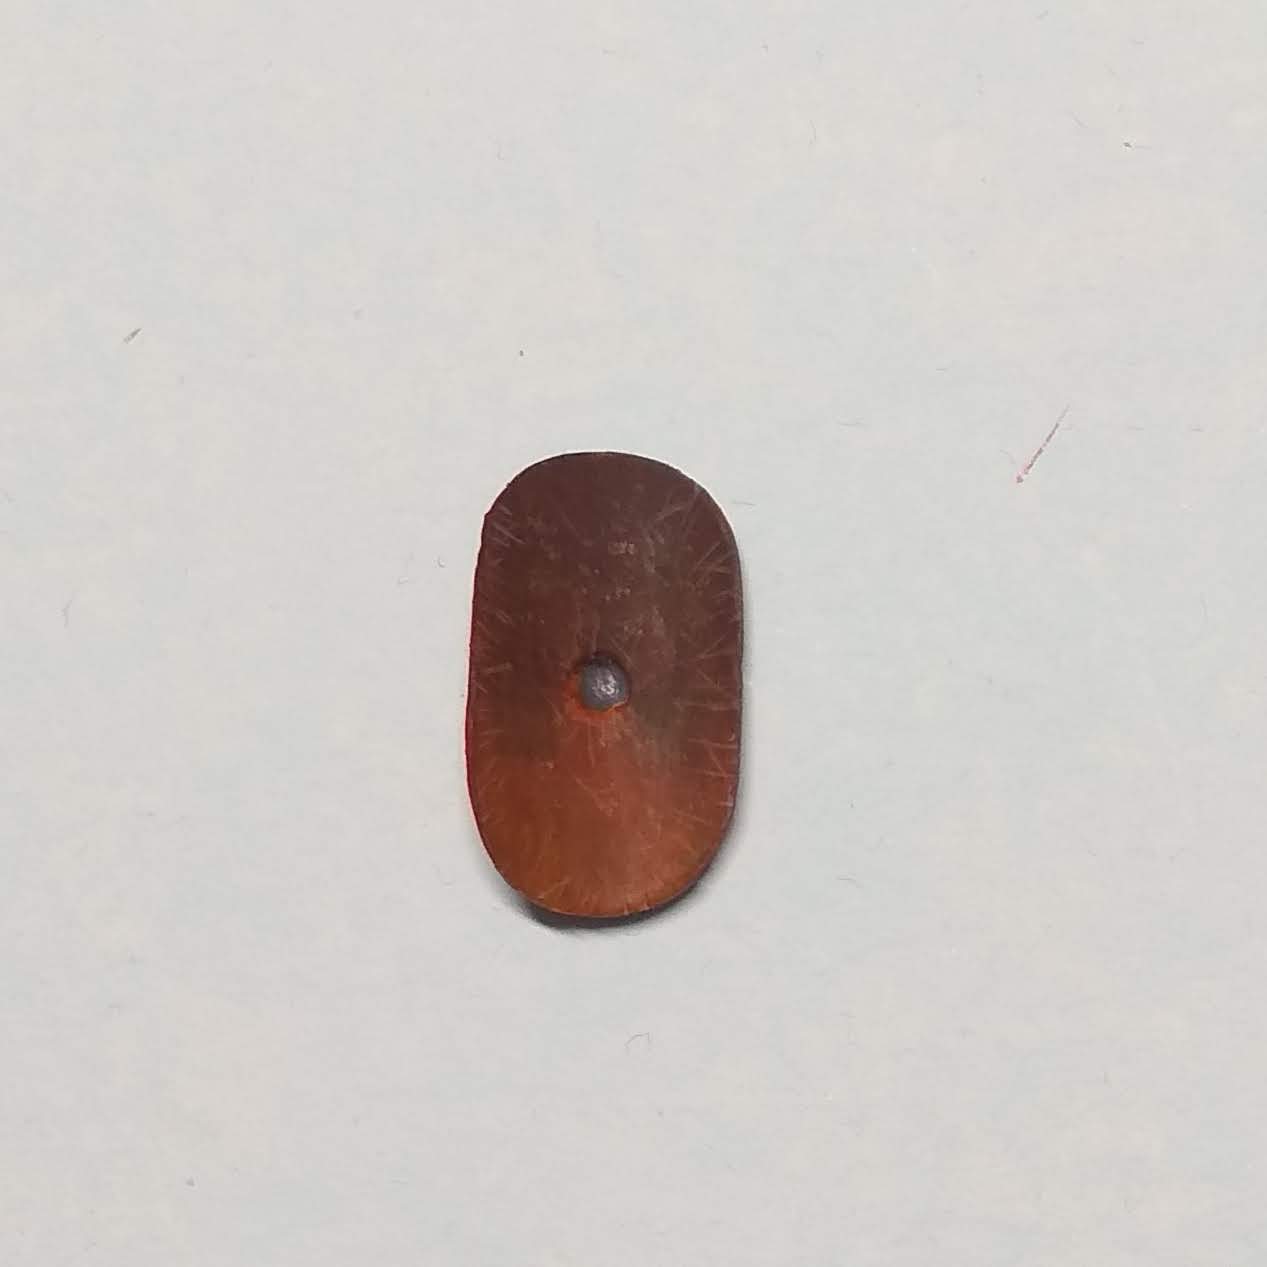
The shield designs were – no surprises here – the part that took most of the time. I didn’t want to leave it at geometric patterns, so I included symbolic and figurative designs. In the end, I decided to go for a eight-pronged star, two horses and a laurel wreath. I don’t need to remind you of my mantra: always use a reference. So, I used my Google fu and searched for shield transfers, reenactment groups and so on. Obviously none of those designs are historical. We simply don’t know how the soldiers of the Republic decorated their shields. That said, the construction of the shields is described by Polybios:
It consists of two layers of wood fastened together with bull’s-hide glue; the outer surface of which is first covered with canvas, then with calf’s skin, on the upper and lower edges it is bound with iron to resist the downward strokes of the sword, and the wear of resting upon the ground. Upon it also is fixed an iron boss, to resist the more formidable blows of stones and pikes, and of heavy missiles generally.
Plb. 6.23
This suggests an off-white or brown colour for the backside and a resilient substrate for the paint.
Painting the shields step-by-step
After you decided for a design, the first step is to prime and basecoat the shield. I went for a reddish brown on the backside and a medium blue, green and red respectively for the fronts.
First, I established a simple gradient towards a darker version of the base colour, followed by a quick and dirty sketch of the figurative elements. At this stage it is easy to go back in with your base colour and tidy the design up. The main idea is to retain a subtle gradient from top to bottom and highlight and shade the shield and the design accordingly.
The last step is weathering. This is honestly the most relaxed part. The cuts are simply a black line followed by an off-white line directly beneath. The dust effects are made with Tamiya Modelling Masters dry pigments and, finally, the specks of blood are applied with a sponge.
On the backside a simple gradient does the job. If you want some more interest, you can add small abrasions, cuts etc. with some bone-white, followed by a glaze with the base colour.

I hope you learned something of use for your own projects and I invite you to comment below and share your own painting tricks when it comes to shield designs. Roman or not, always wield your brush with honour!
References:
Polybios. Histories. Evelyn S. Shuckburgh (Translator). London: Macmillan 1889/1962.
Hello,
Just ran across your blog and very helpful for my Roman republic and carthigan armies from hail caesar I just recently received
Glad the post was of use to paint your Carthaginians and Romans.
Really nice work on these, mate. I love Roman history although, this part of Roman history is one of my only blind spots in that period. I know Imperial Rome very well (or at least I like to think so!) so its cool to see another side of the Roman military. The shields are really excellent work and you made them look easy! Now if I can persuade you to tackle a war elephant, we’ll really be in business 😀
Thank you Kuribo! I think both periods are highly interesting. The Middle to Late Republic is really when Rome becomes the dominating entity in the Mediterranean and the politics of the time (as much as we can reconstruct them) are equally interesting. It is quite amazing how biased the sources are and how hard it is to really read between the lines. I think it is a great exercise in critical thinking and assessing sources. Something we really need these days. The shields were great fun (and a bit frustrating to be honest). A good reference really helps and a good brush. I would love to paint a war elephant, but so far only own 15mm ones. I may go for an Agema one, but the Victrix offerings are good, too. So definitely something I want to tackle in the future.
That’s some stellar work there! I like to think I’m not too shabby a painter myself, but I’ve never thought about a chromatic red… in actual fact I had to google what it really is/ does. Also very useful tips n both metallics and painting shield patterns. The latter is always something I try to avoid.
Thank you kindly. I learned about chromatic blacks just a few months ago. I was always frustrated that my shadows look washed out or grey. I understand that is due to white or black being a component of most convenience mixes. So if you mix green and red, you may get a true chromatic black or a greyish version, depending on the pigments used. That is why I switched to Kimera – more control and reliable results. I am glad the notes on metallics and shield patterns were of use. Shield designs can be a pain, but I find it quite rewarding to paint them by hand, as opposed to transfers.