
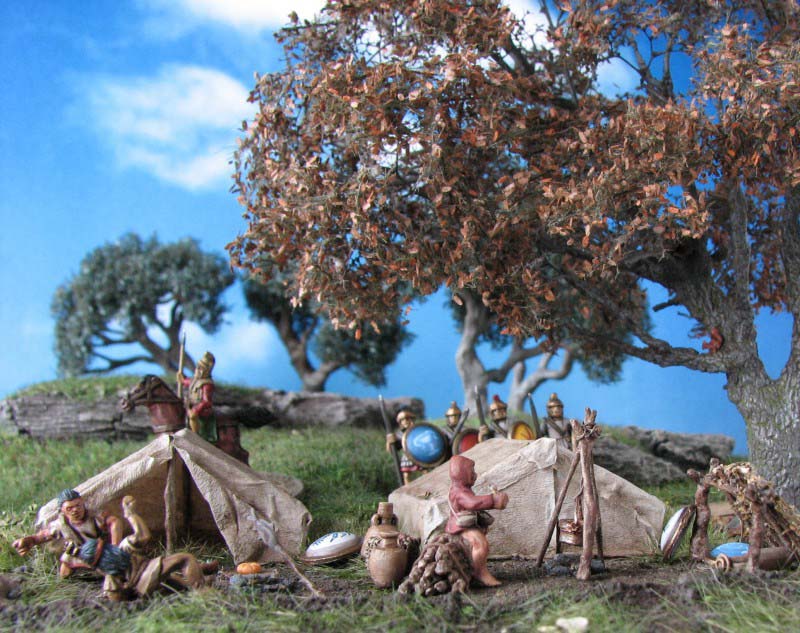
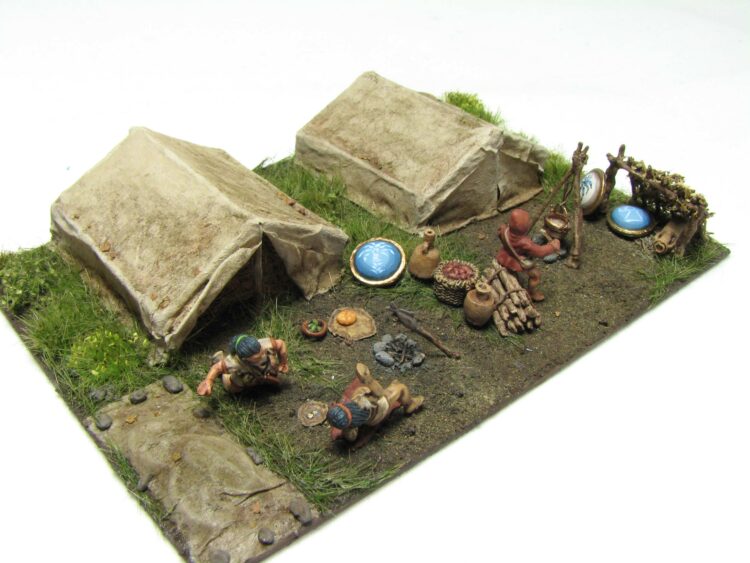
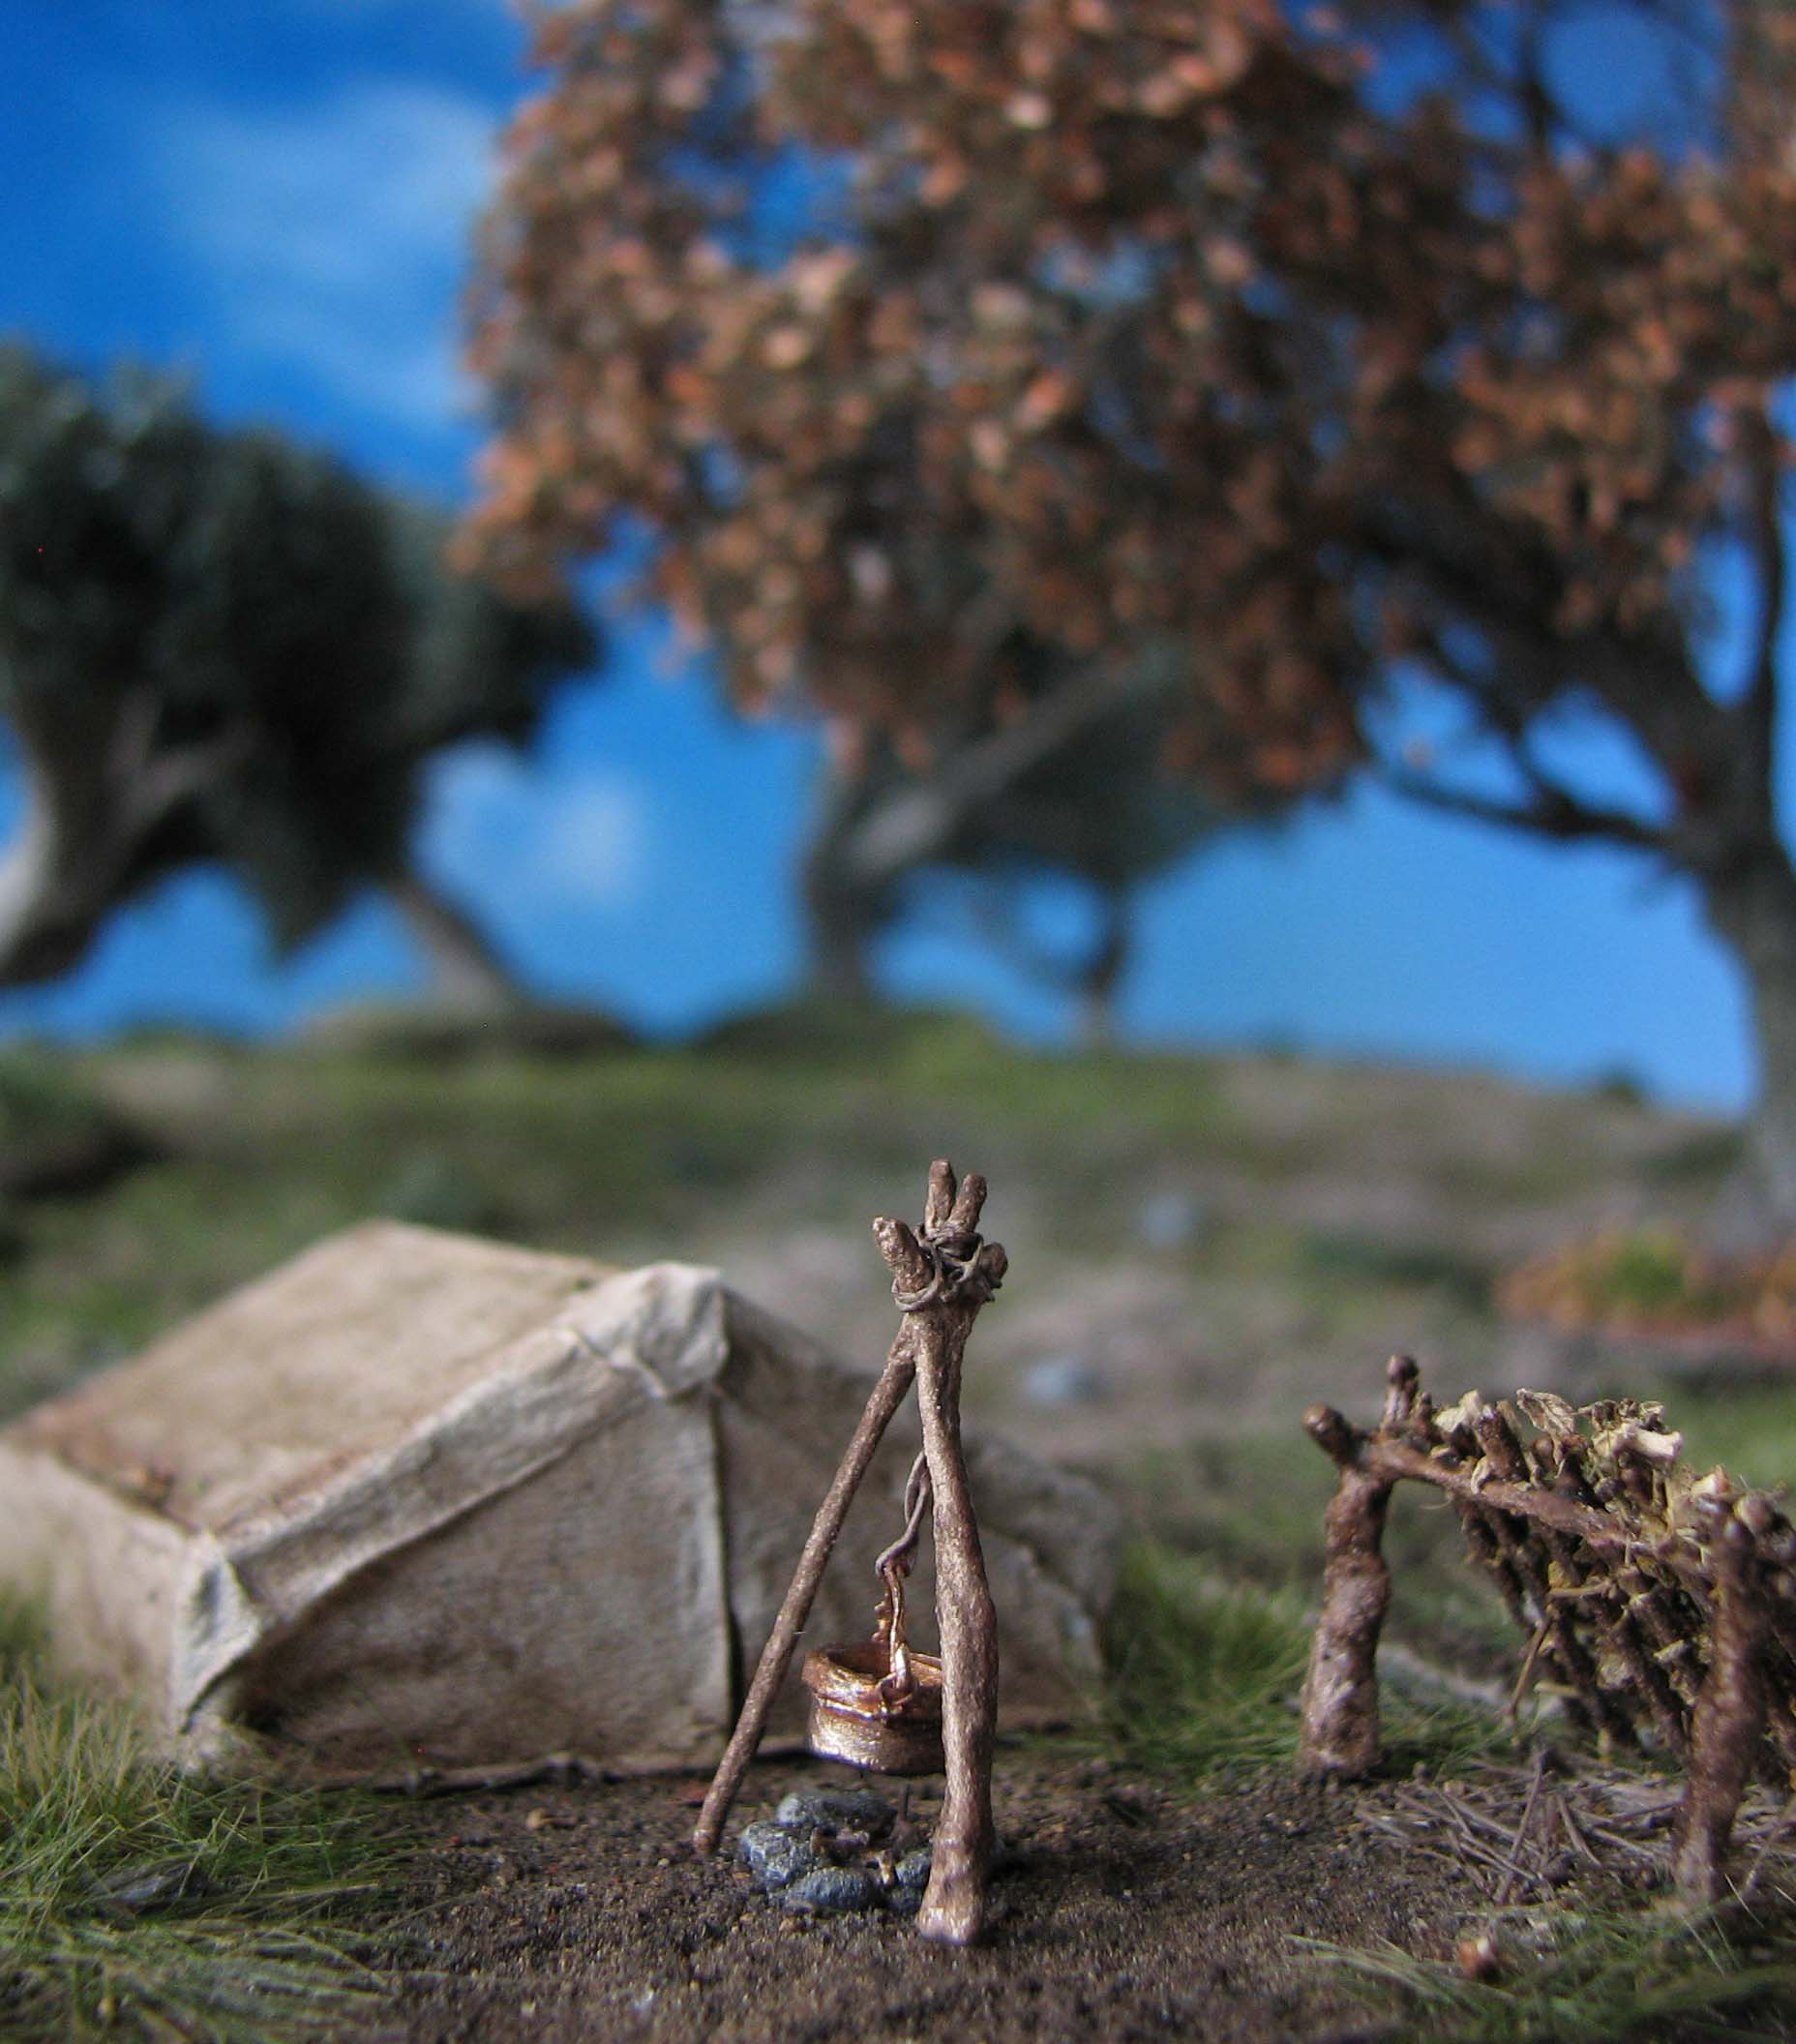
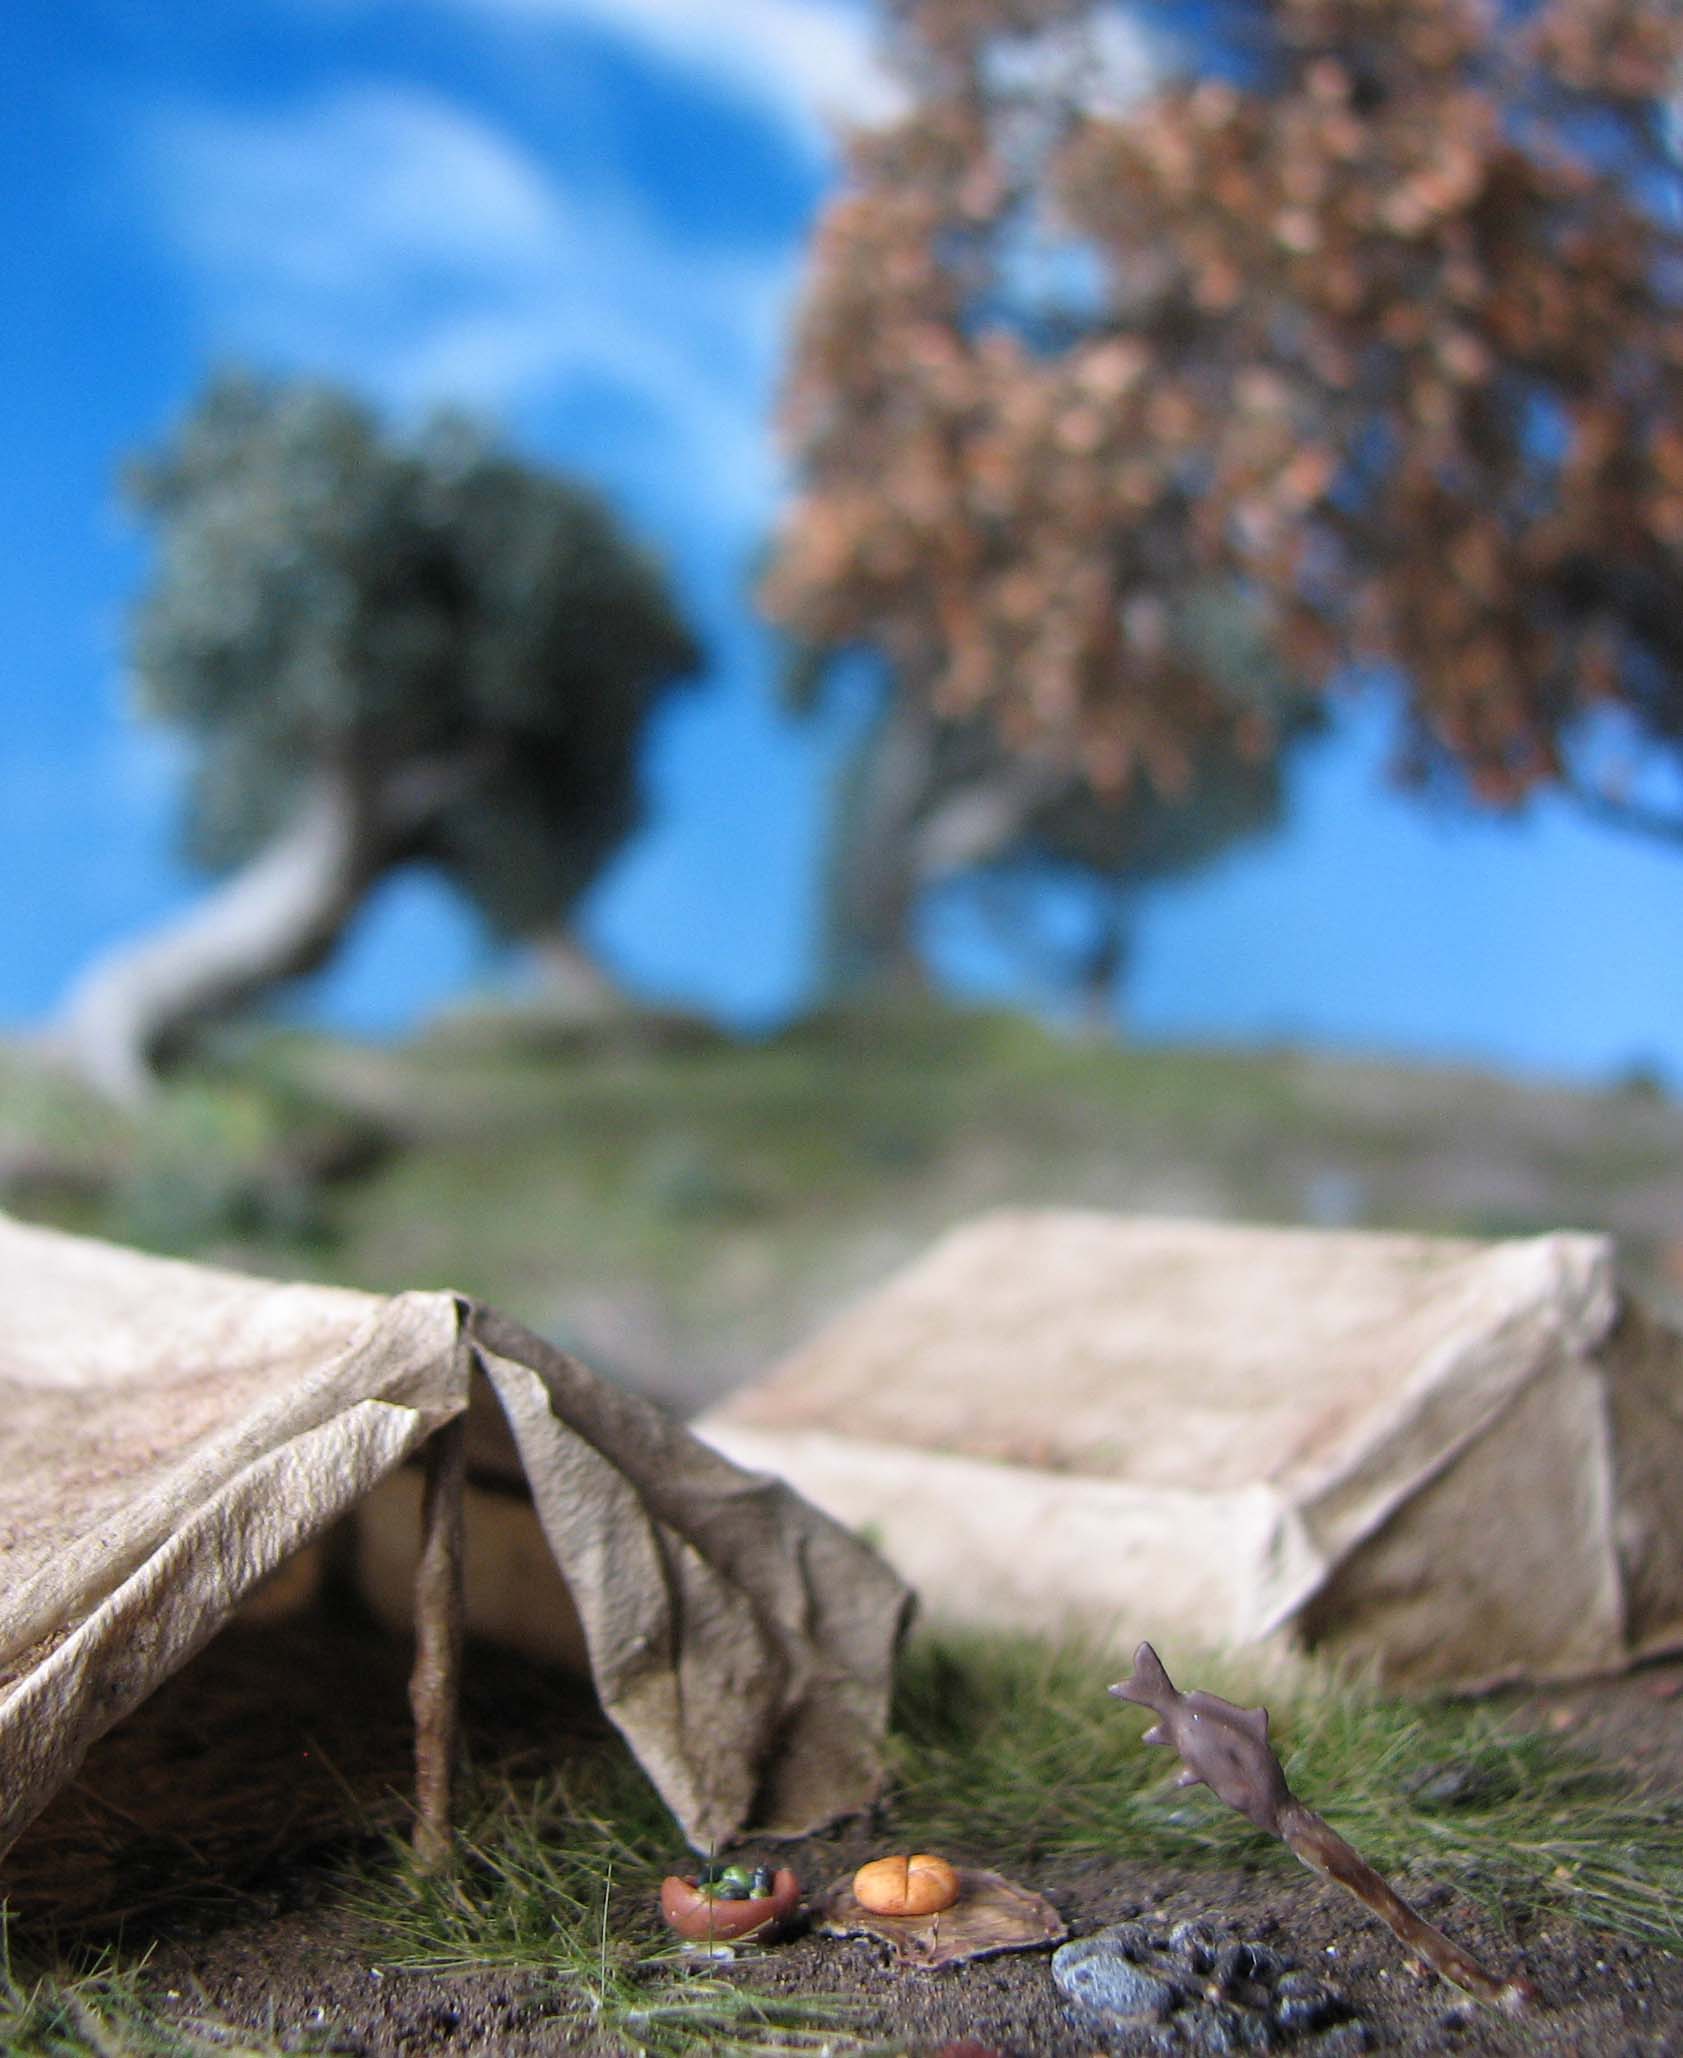
Last time we built up the ground work and vegetation, added the tents and some first details such as fireplaces, the lean-to and shields covered by a tarp.
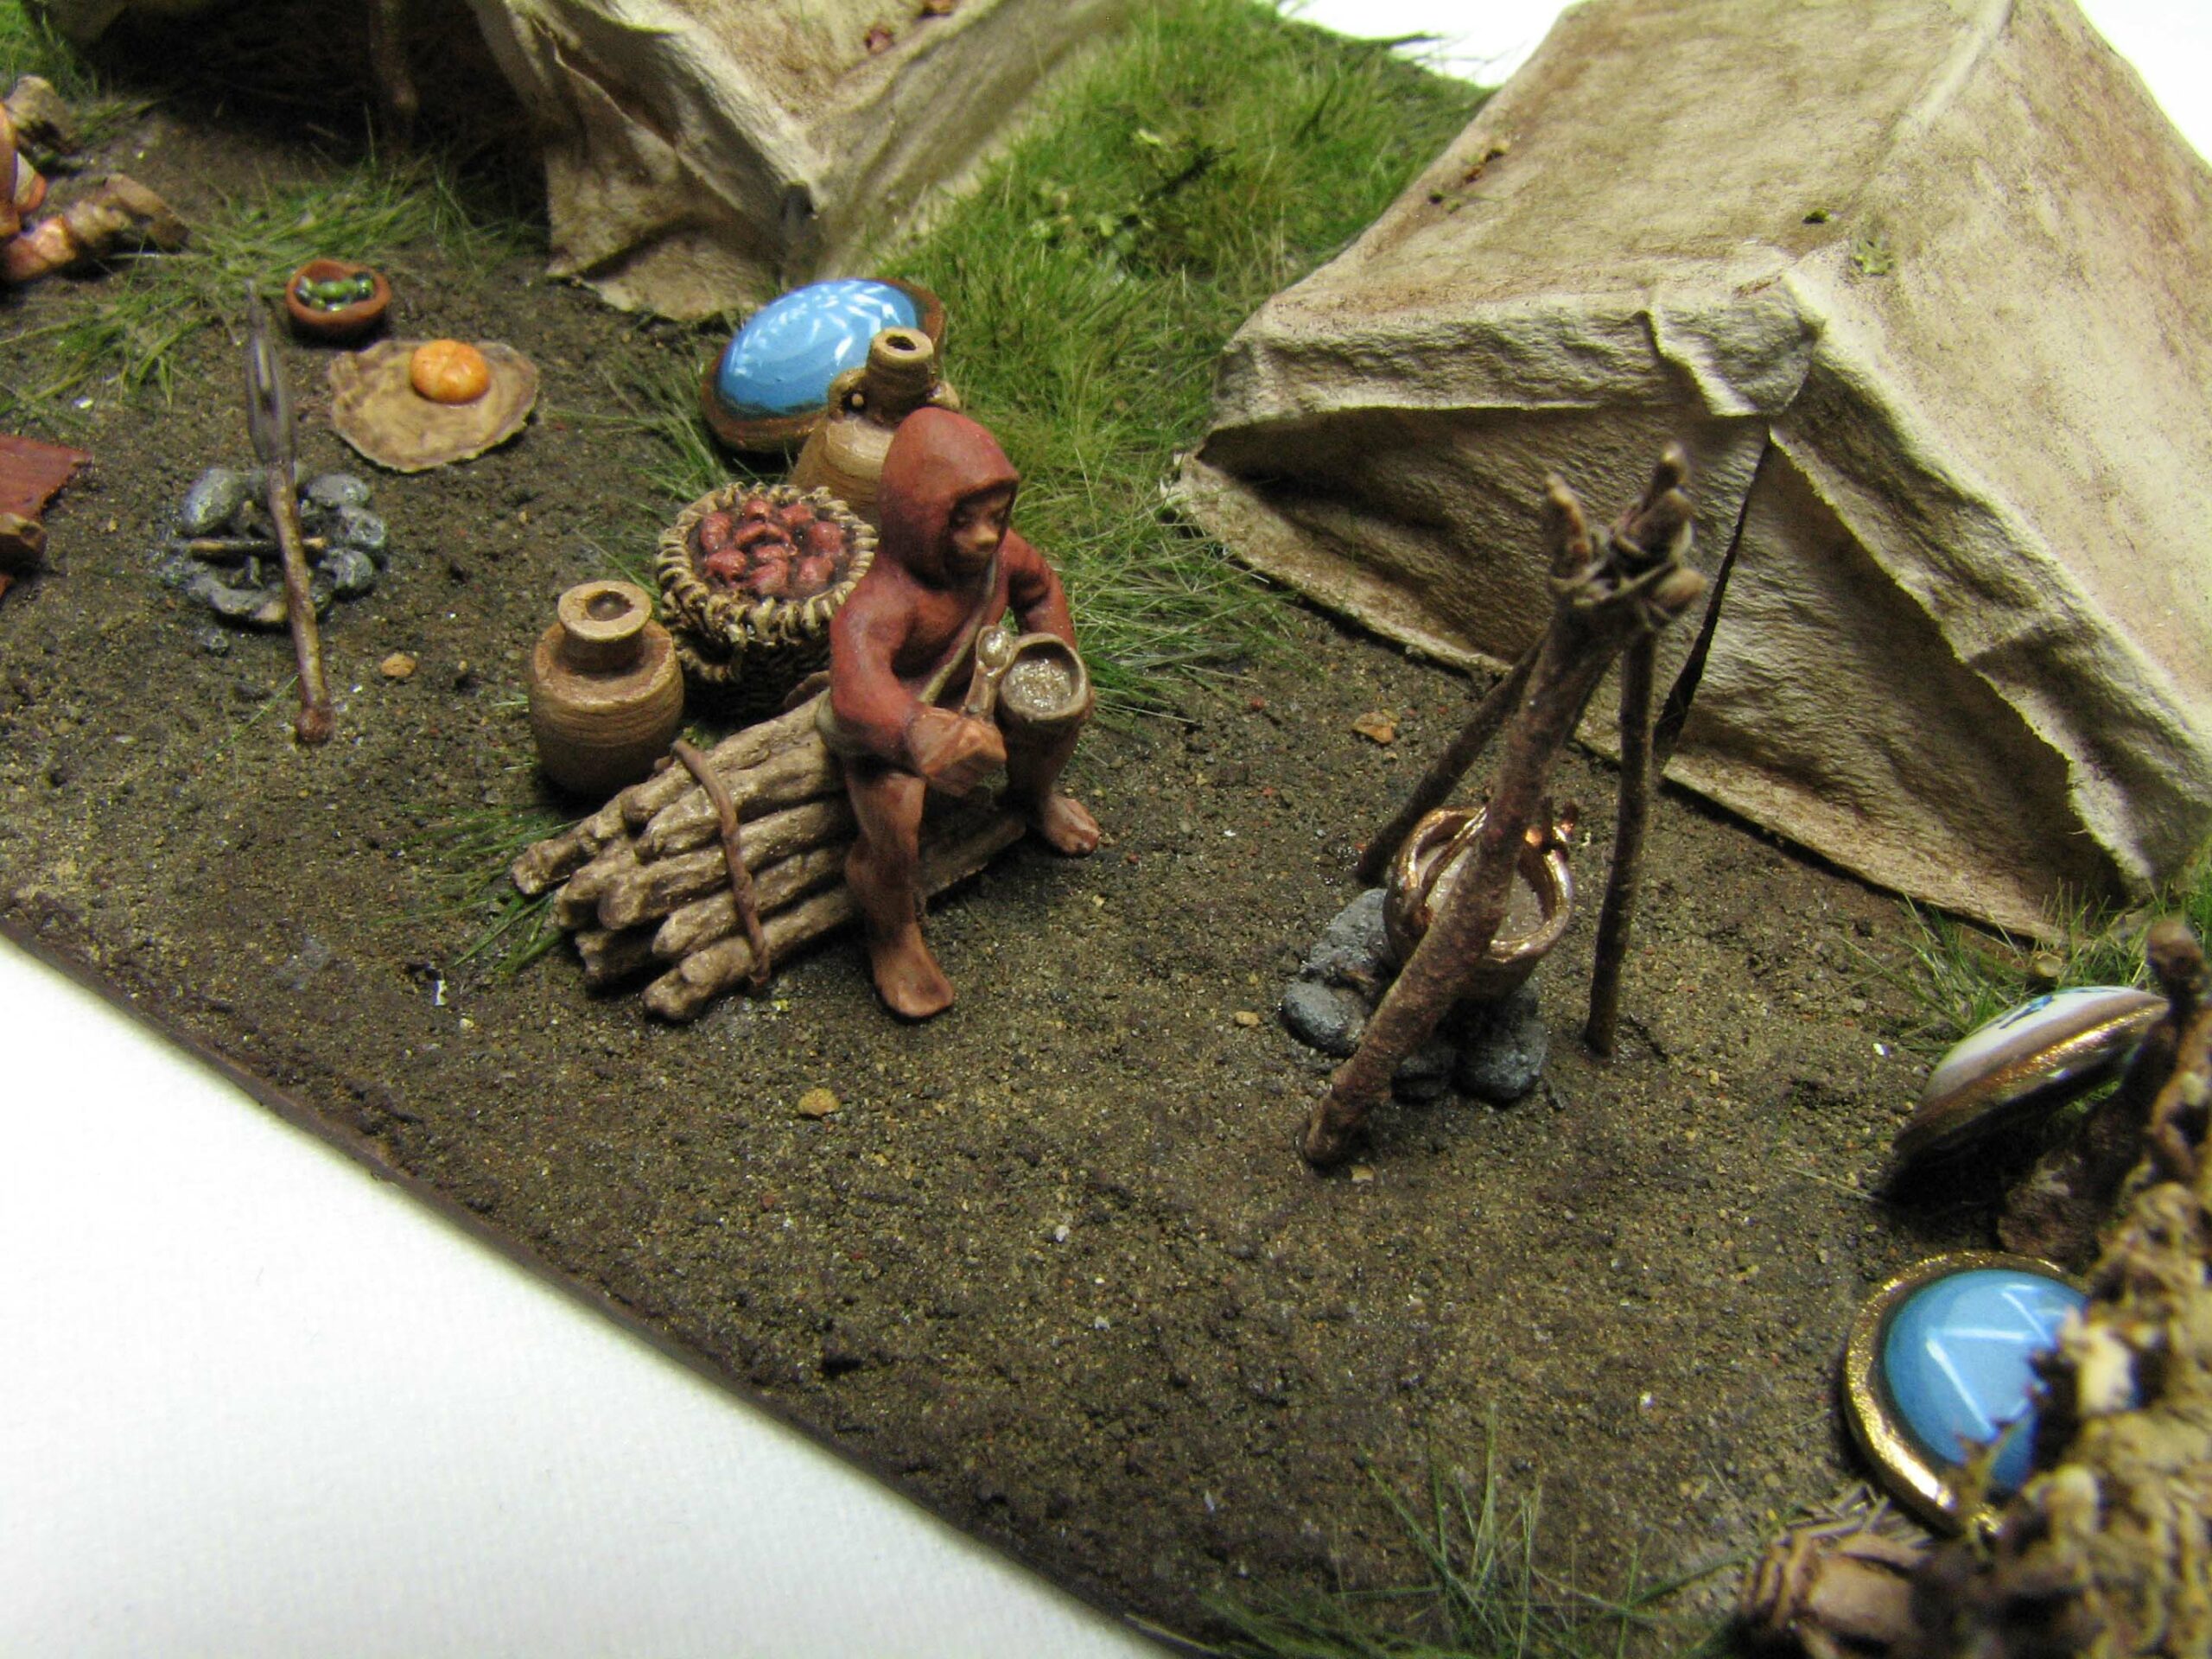
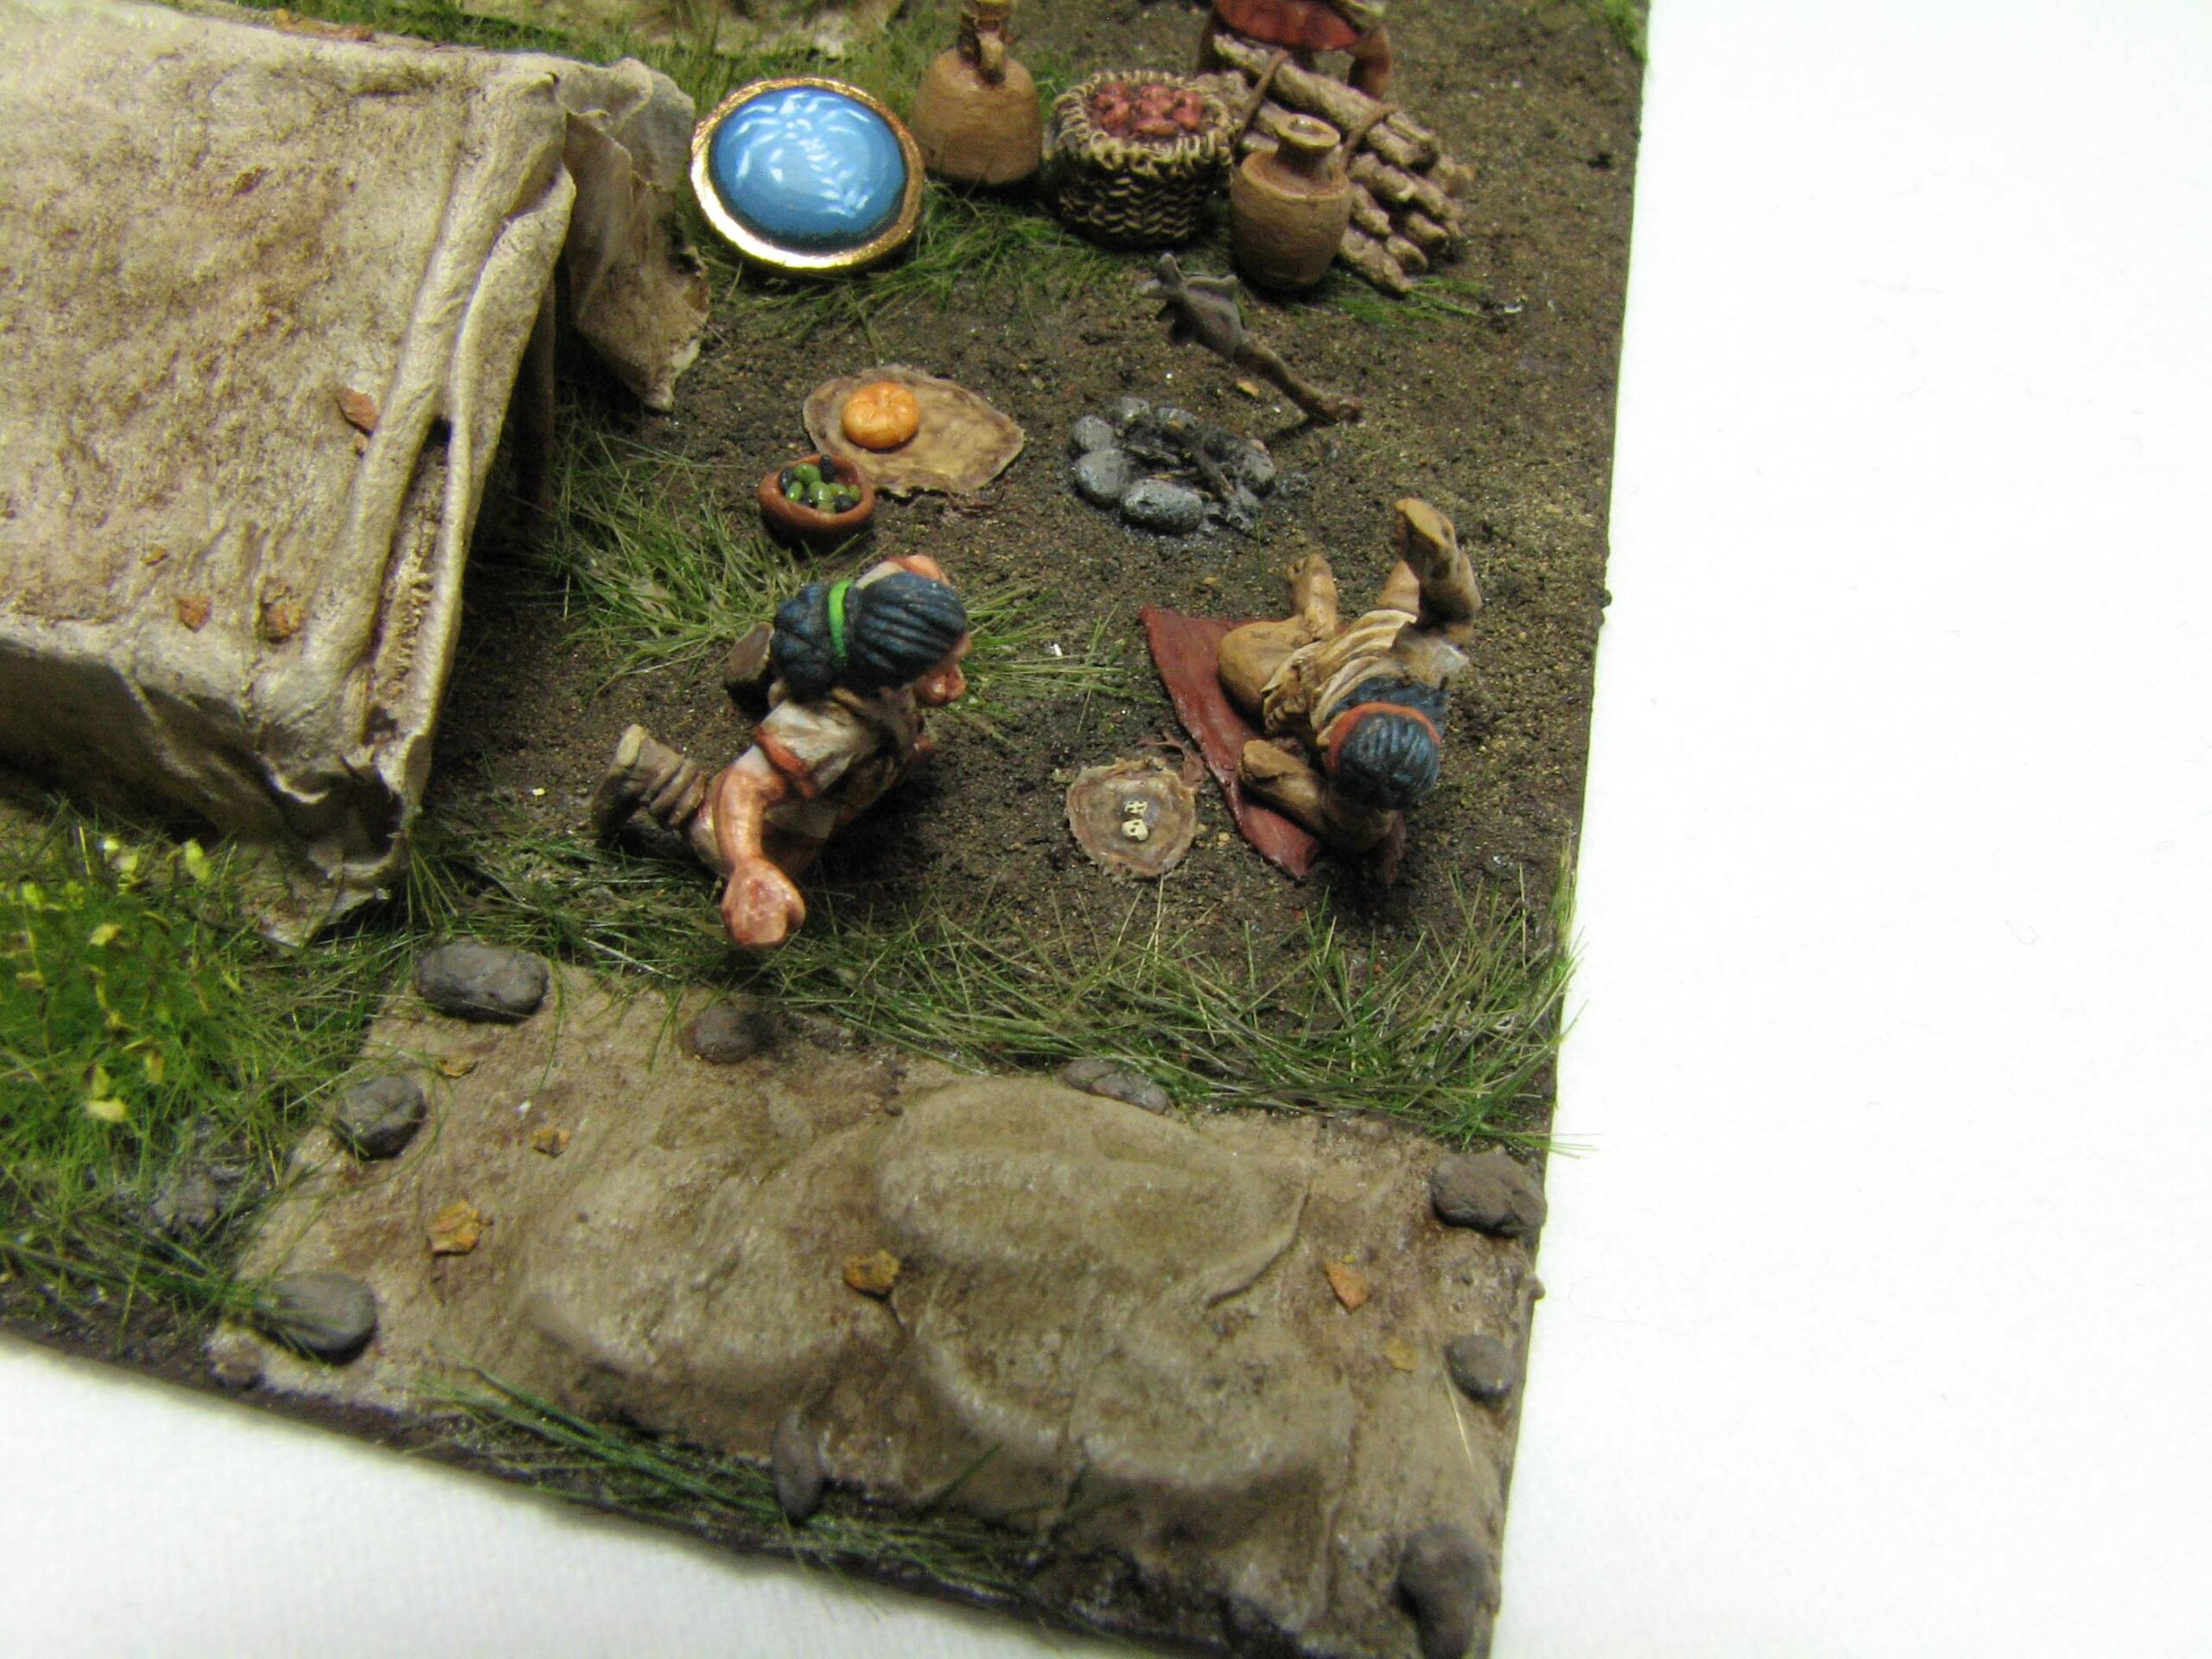
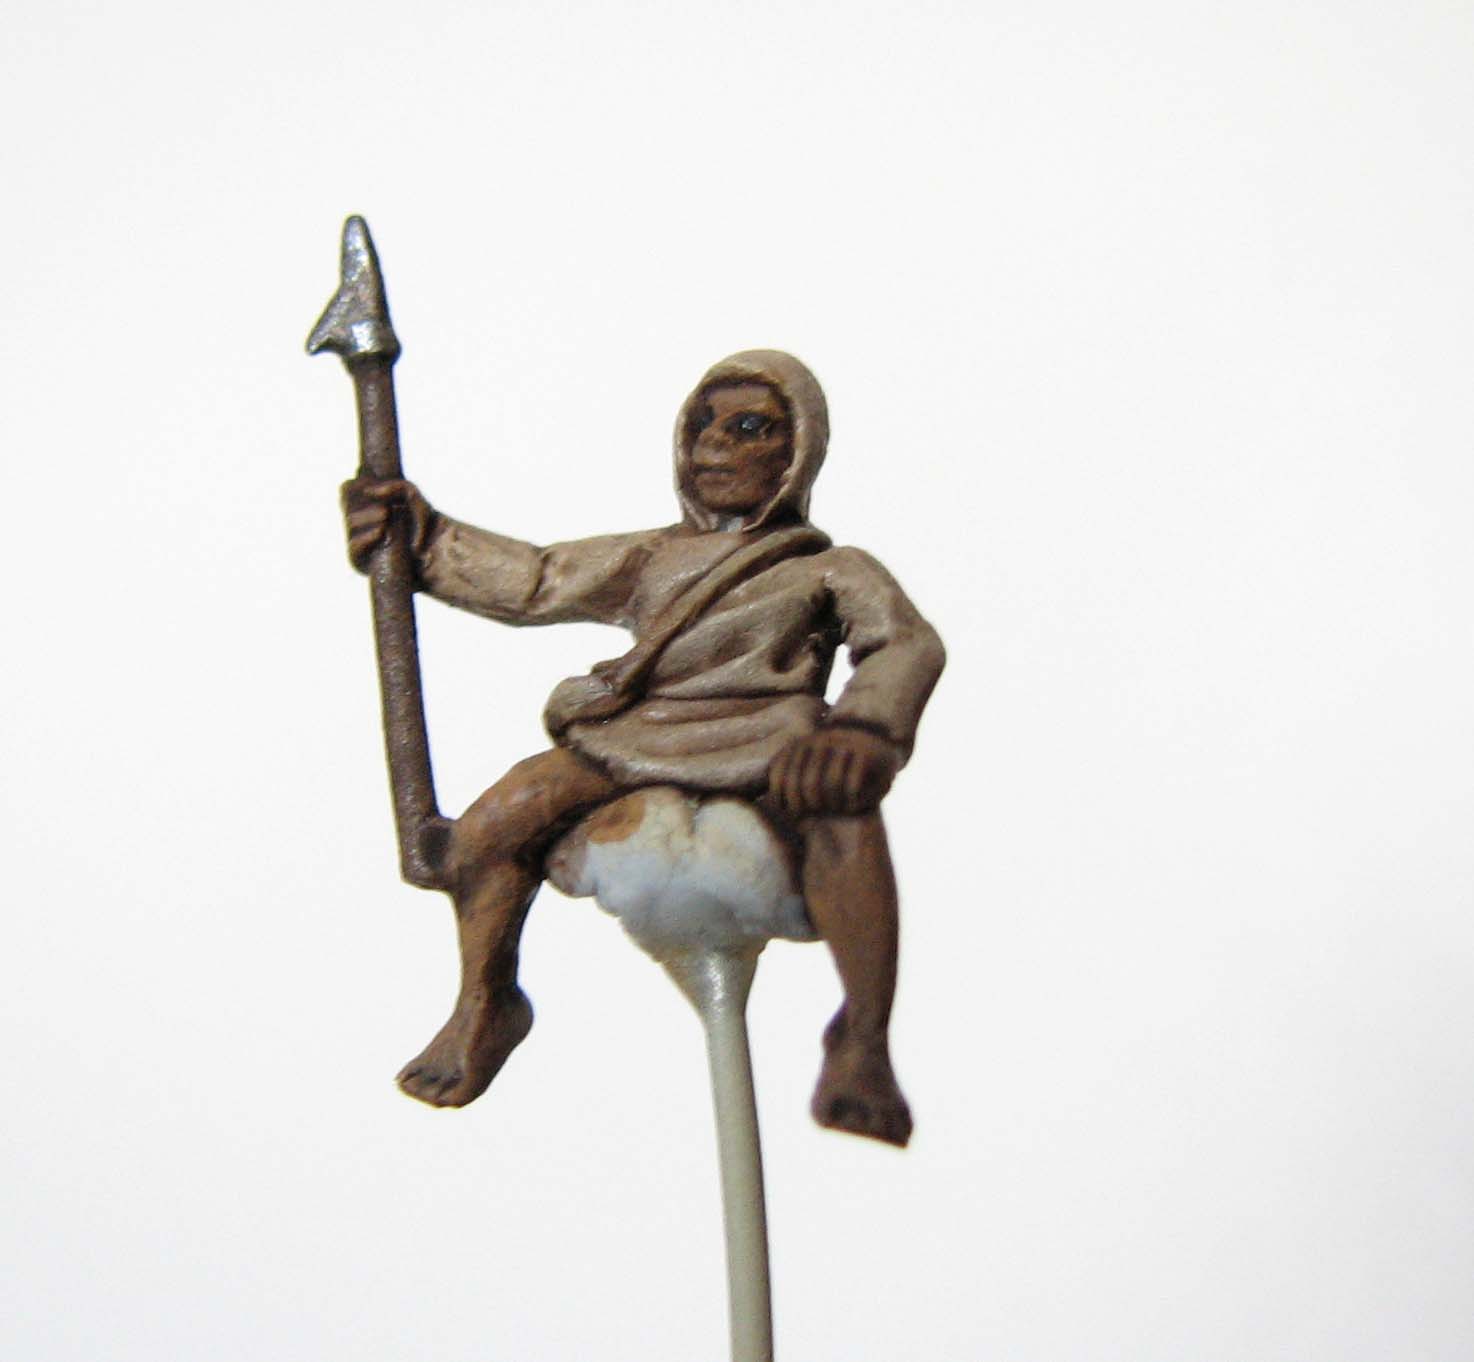
Now it is time to add more details and the miniatures to populate the camp. We will add two scenes: A Numidian and an Iberian playing a game of dice, while the fish their servant caught earlier in a nearby river is sizzling over the wood fire. At the same time a Libyan veteran is eating his porridge / puls seated in front of the fireplace.
We add further food items, such as bread and olives (all made by the talented Syl from ThePaintedRogue), ceramic jars, and a basket. For comfort and entertainment we add a coat for the Numidian to rest on and some leather pouches, where food and dice are contained in. Naturally, we can’t forget the actual dice, nor a stack of firewood and finally a cooking tripod complete with a small situla (cooking pot).
This tutorial and the techniques covered are not only useful for a camp scene, but can be easily adapted for any of your projects and might also prove useful for bigger scales such as 28mm.
Historical considerations
When I was thinking about the details I want to add, the first thing on my mind was a makeshift tripod with a situla. A tripod, while surely not standard among the soldiers on campaign, would have made the preparation of food easier, as it allows to regulate the heat. Wood seemed a reasonable material, as it is easy to procure and can also be replaced easily if need be. The situla was widely used throughout the Mediterranean. Shapes and forms of these pots differed widely, with rich archaeological evidence to guide us in sculpting a pot. I decided to make a very simple rectangular pot with a handle looped through two suspension rings. While very ornate situlae did exist, it is unlikely that simple soldiers would have invested in this. The situla was often made out of bronze.
Military bread
The food items on display should not be too fancy and easy to procure or transport when on campaign. Especially taking into account the supply situation during the invasion of Italy.
Bread was a staple of the mediterranean diet even on campaign. Being issued with a certain amount of wheat (see Plb. 6.39 for the amount of wheat issued to roman soldiers and Liv. 27.1 for the amount of wheat found as booty after a Carthaginian garrison in Italy had been defeated) soldiers were able to eat it as a sort of porridge (puls or pulmentum), mixed with water. If any legume were available onions, carrots or other vegetables could be added to refine what was basically wheat pulp.
The wheat was issued and carried as grain, mainly to preserve it better while on campaign. A small hand-mill would have likely been carried by each contubernium with a servant preparing the flour. We have some examples of carbonised flat breads found in Pompei, so I decided to add one of these.
On campaign one could use a clibanus (pottery in the shape of a bell) or a similar device to make bread. It is put on top of the shaped dough, which is then placed over a fire. With the help of the developing steam the bread rises slightly while being baked (see the website of the AERA of a reconstruction of roman bread making). Given these resources refer to the imperial roman army, we cannot transfer this without allowing for some differences. Nevertheless, if it comes to simple fare like bread and wheat pulp it is likely that Carthaginians ate similar than their Roman contemporaries on campaign. Especially so in Italy, when they foraged the same areas and had access to local merchants.
Preserves and fresh food
Beef or fish would not have been an often encountered food on campaign, as it is not easy to preserve. Surely in a more permanent camp cattle would have been kept to supplement the daily fare of soldiers. The fish might be a special treat, but if a river was close to the camp a foraging party could have caught some. Iberia, or more precisely Turdetania, was also famous for its salted-fish exports (Strab. 3.2.6) making it also feasible that salted fish was taken on campaign.
Olives were as plentiful in Iberia (Strab. 3.2.6) as they were in Italy. They could be easily preserved and their oil was a staple in the mediterranean world. It is thus not unlikely that some preserved olives were taken on campaign in amphorae and replenished locally.
Dice
The first dice that were handed down to us are thousands of years old and ancient people were quite fond of gambling. They were often made of bone or talus of hoofed animals. It is thus very likely that soldiers took some on campaign to pass time with or without the approval of their superiors.
A good friend of mien is a hobby bone carver. While his speciality is drinking horns and rings, he was kind enough to make me some Roman style bone dice. Sourcing the right bones was difficult, but he succeeded in the end. The eyes are inked. I guess now I can game in style.
Pottery
Finally the pottery for the camp is a mixture of quite different styles. I chose two neck amphorae from the Baueda set: One similar to the narrow types used to store oil or wine, the other with a wider belly which could keep liquids and preserved foodstuff. There is also a version without handles, which could also hold various foodstuff or might just contain water. On campaign a mixing of styles is quite likely, as broken pottery would need to be replaced locally or might have been acquired as booty. I also made use of one of the baskets filled with fruit. It could well be apples, if we assume a nearby orchard was plundered.
What you need
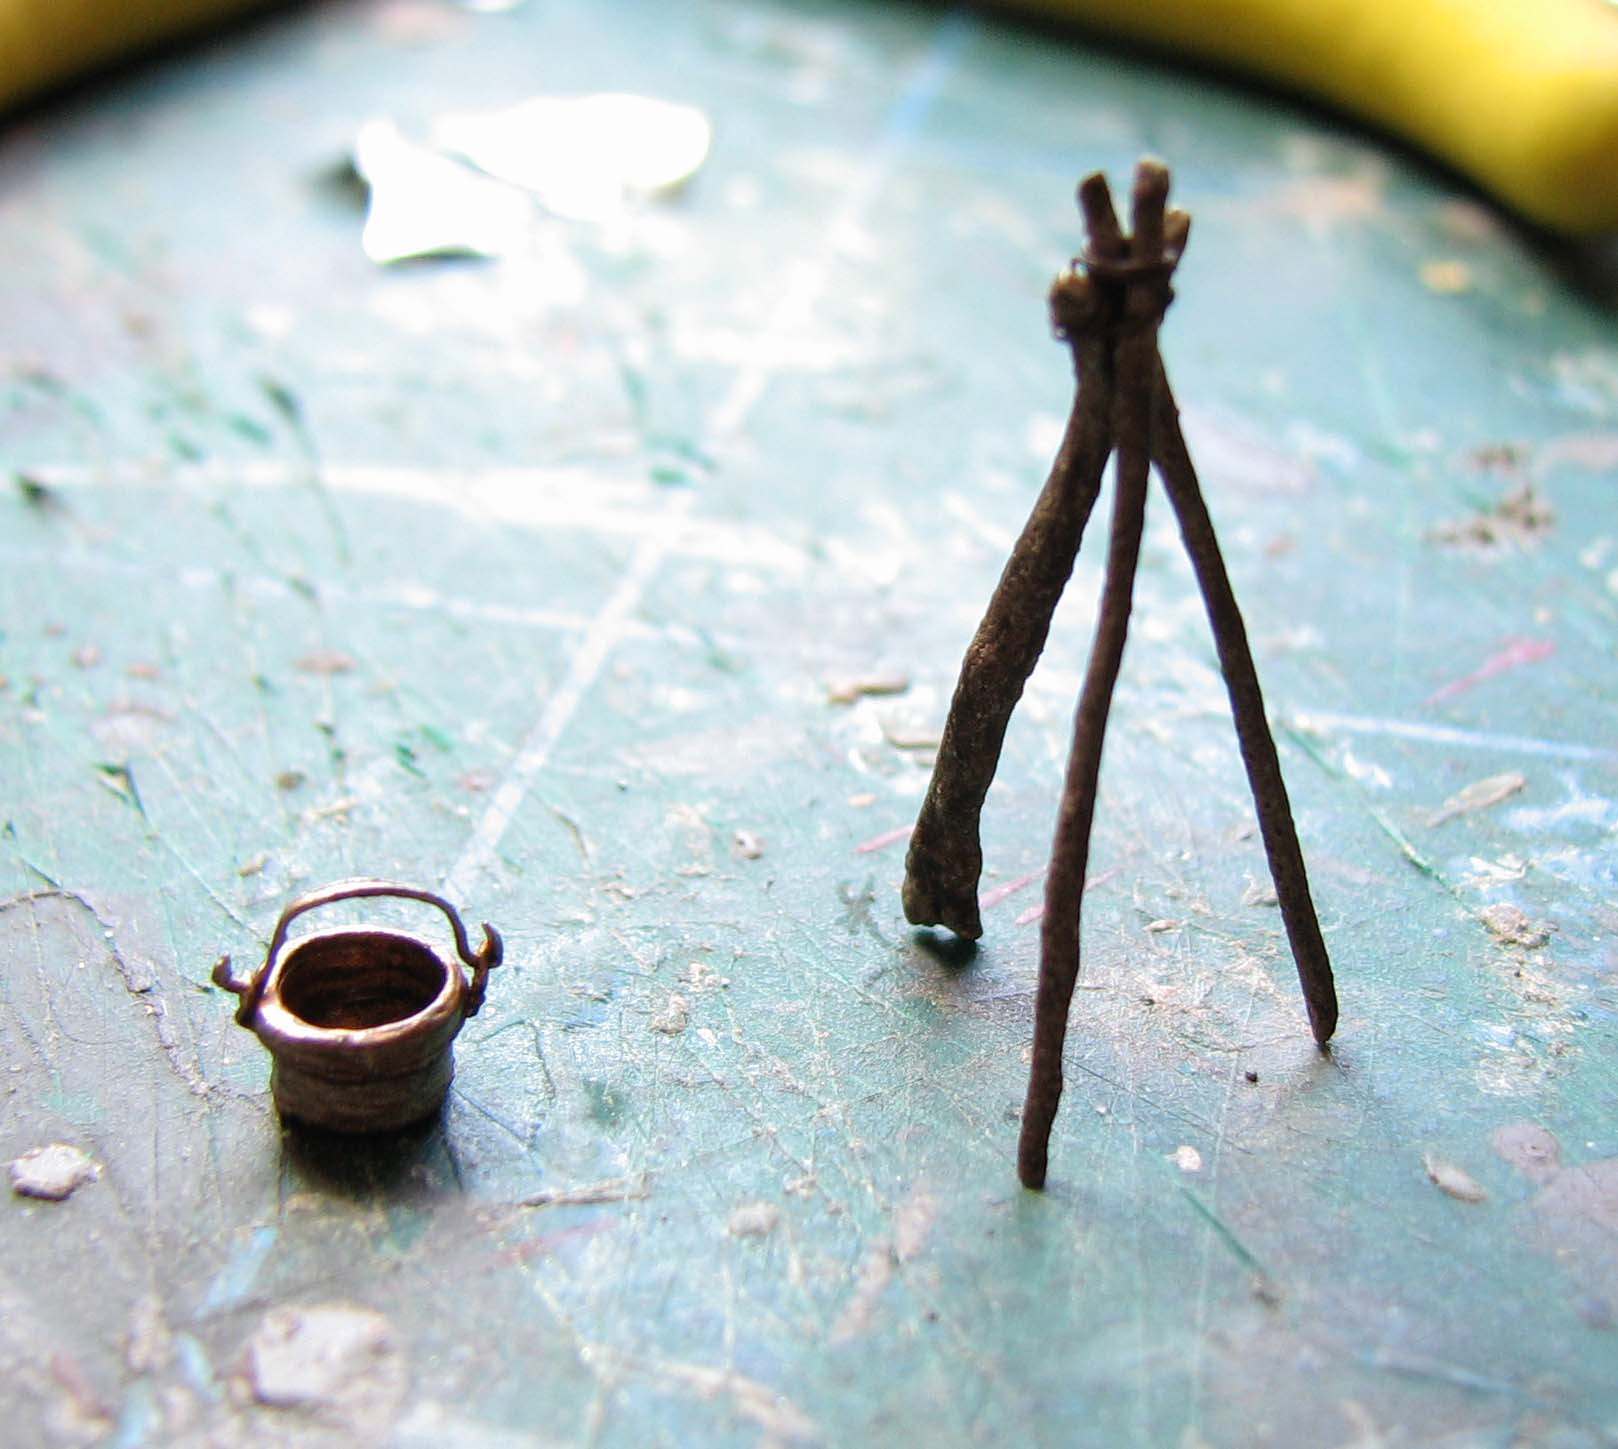
For the tripod
- Thin wire to depict the three legs.
- Copper wire to depict rope.
- Acrylic matte gel to cover the wire.
- Wood filler to give the wire a wood texture.
- Brown acrylic paint and brown wash (e. g. Vallejo Umbra Wash) to paint and weather the frame.
- Super glue.
For the pile of fire wood
- Thin wire to depict the wood logs.
- Copper wire to depict rope holding the logs in place.
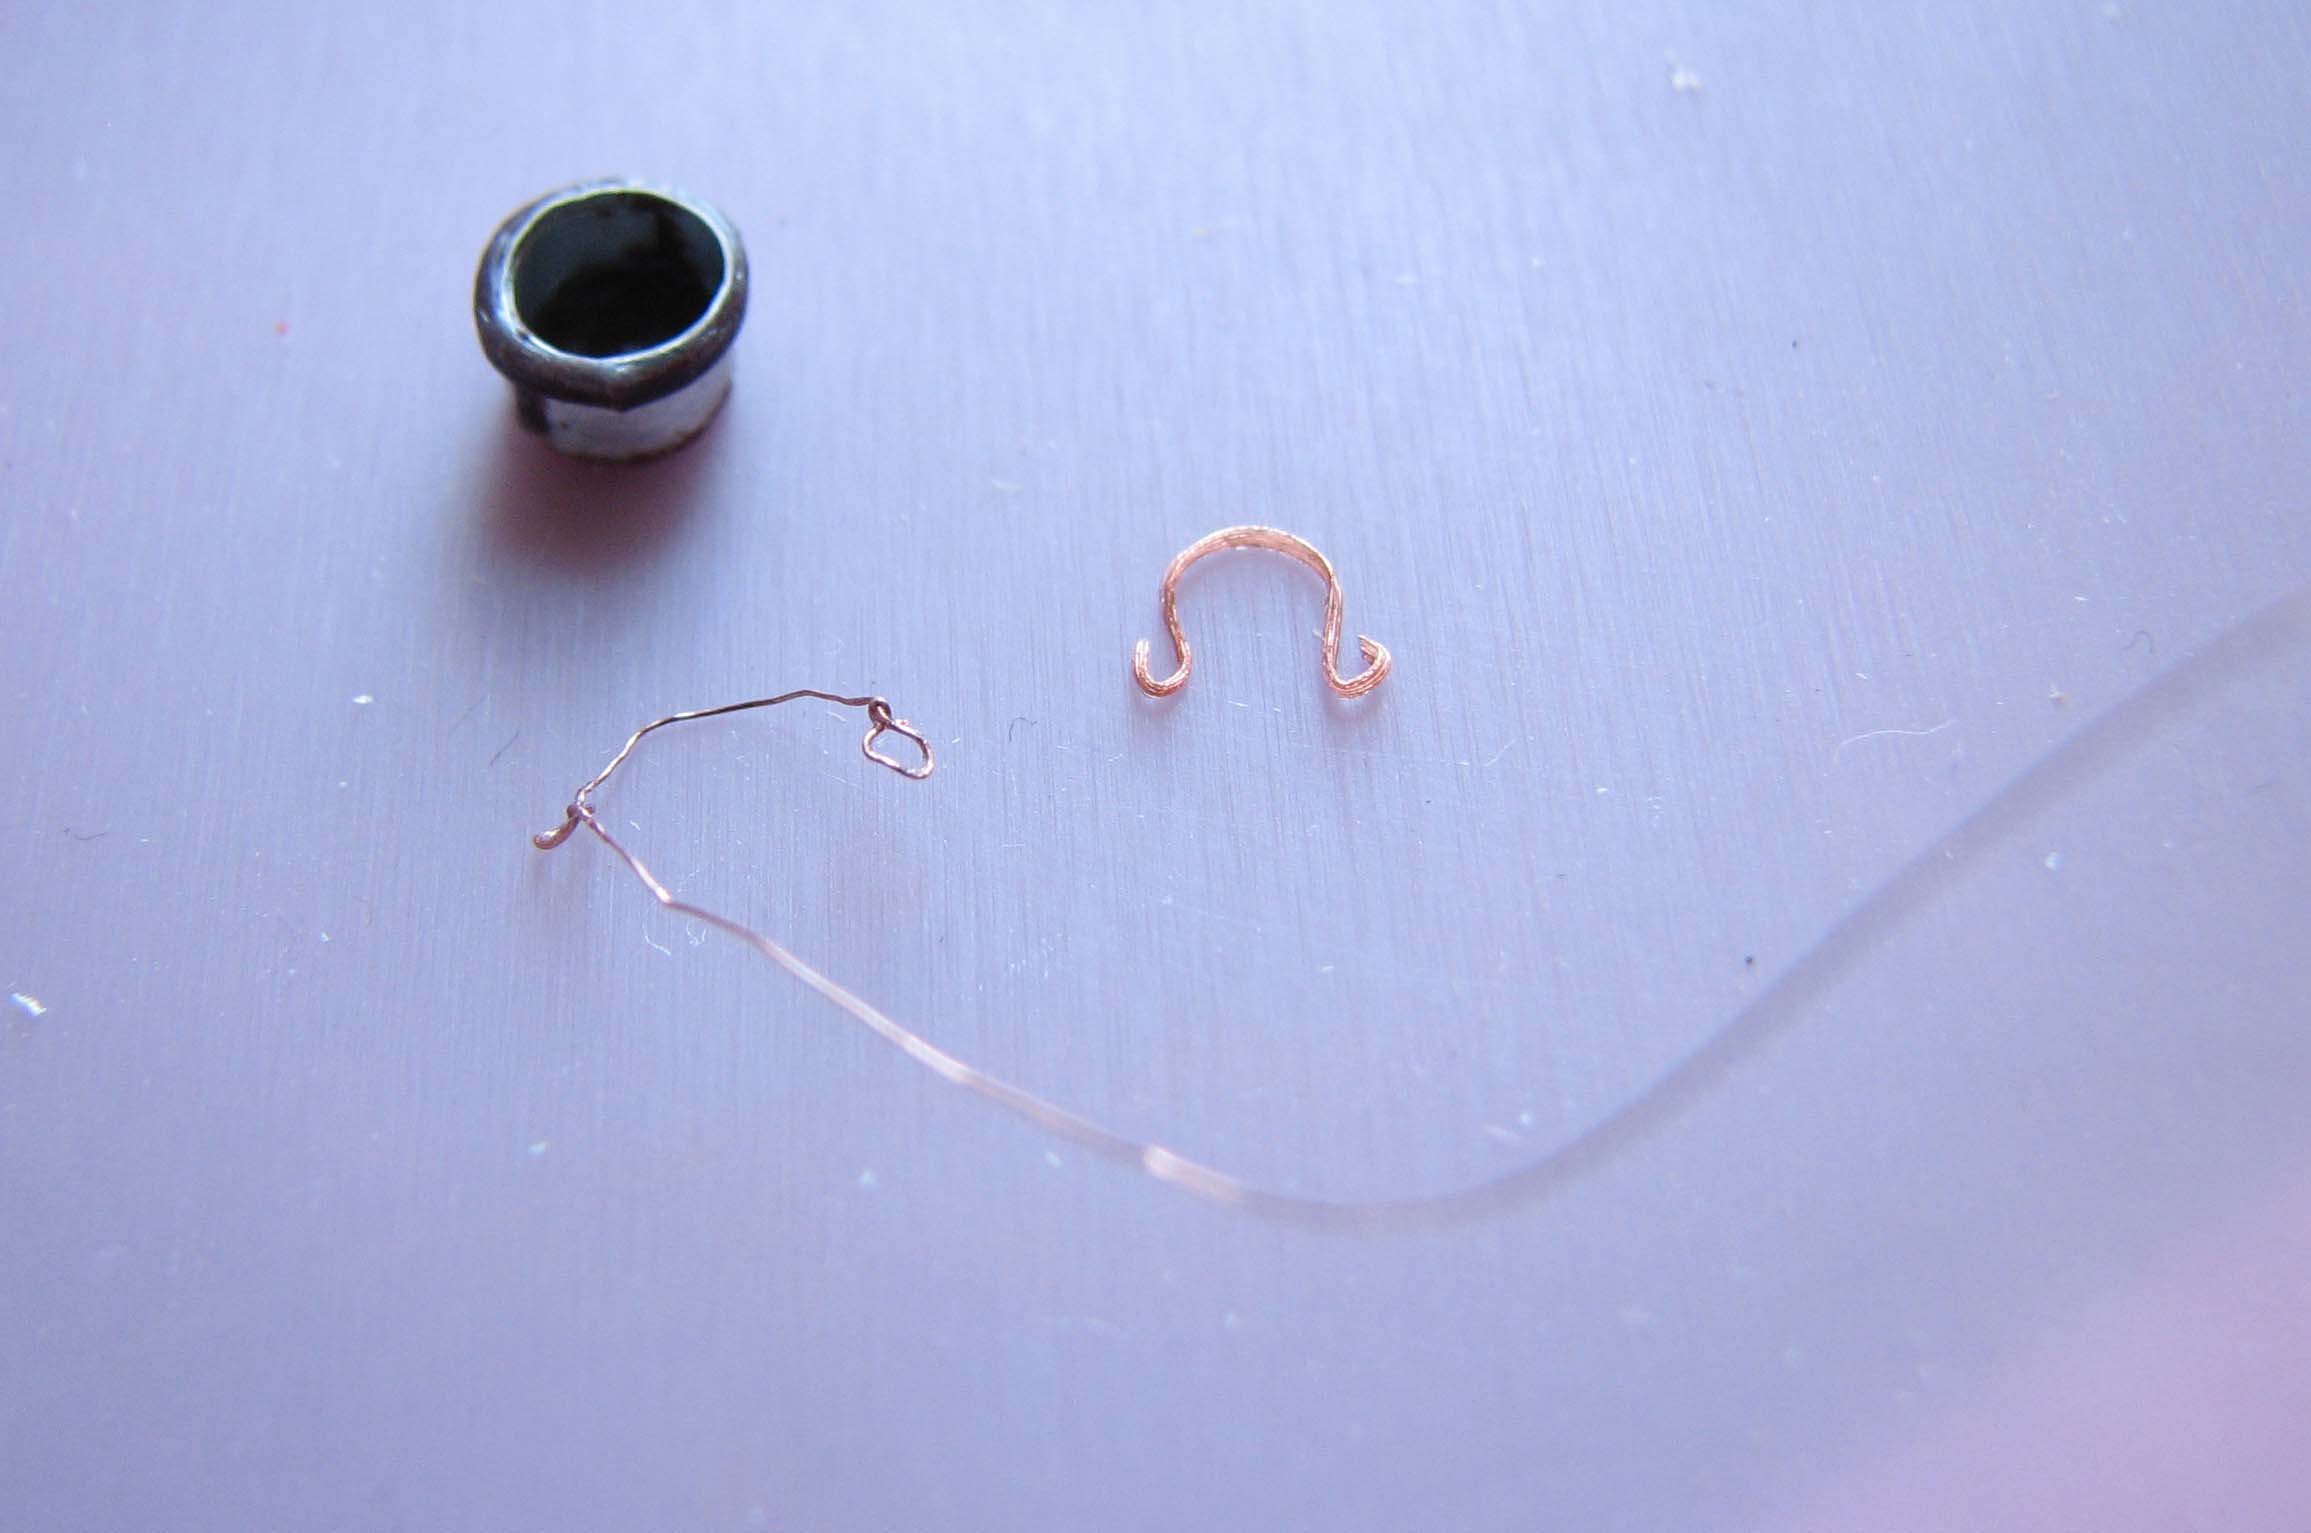
For the situla
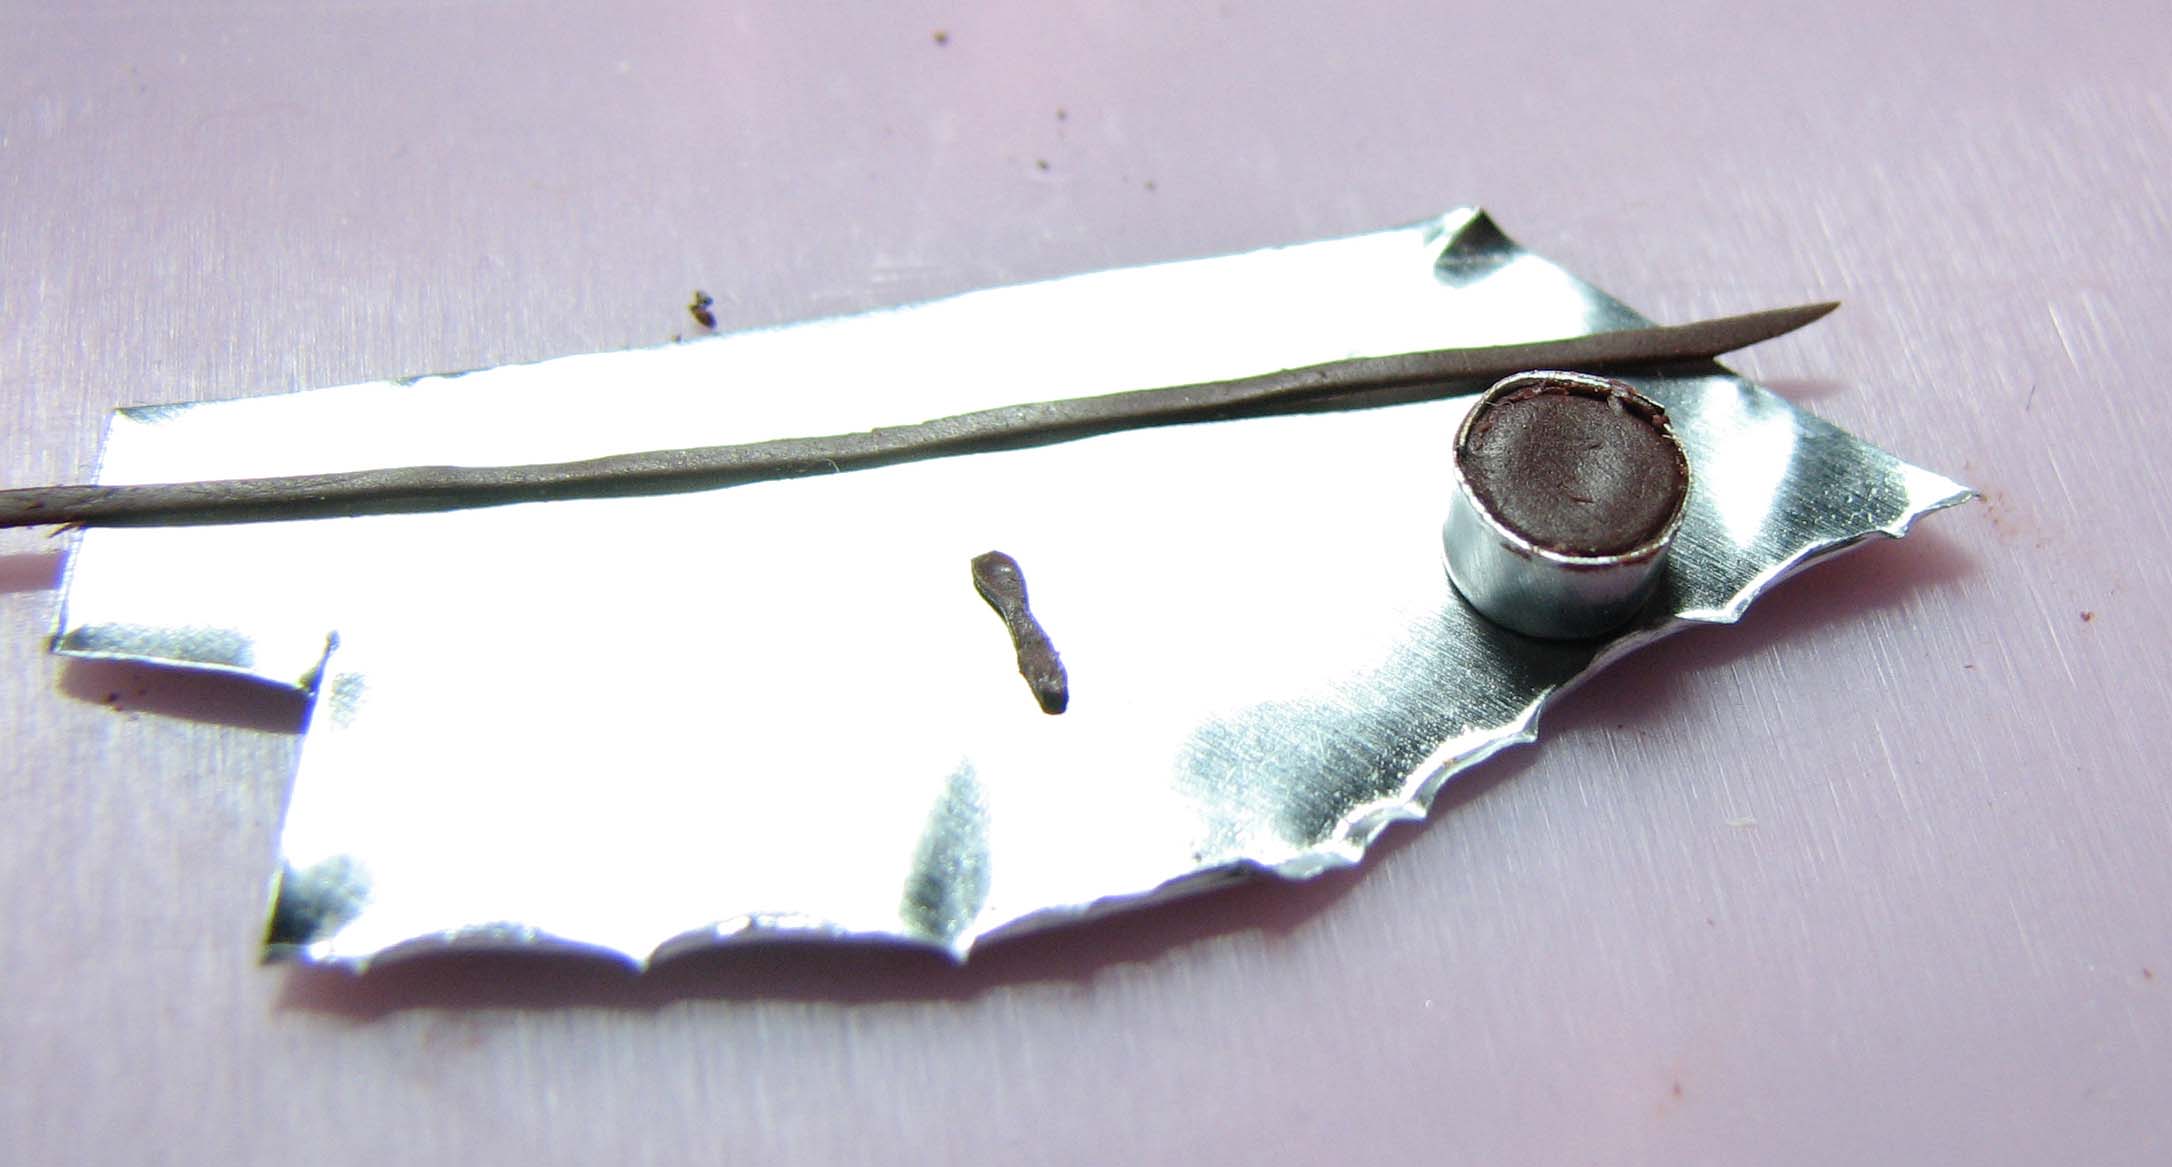
- A piece of thin aluminium foil. I used a piece you can often find sealing a can of instant coffee.
- Fimo of any colour.
- Copper wire to form the suspension rings and handle.
- Bronze acrylic paint and some black pigment to depict sud.
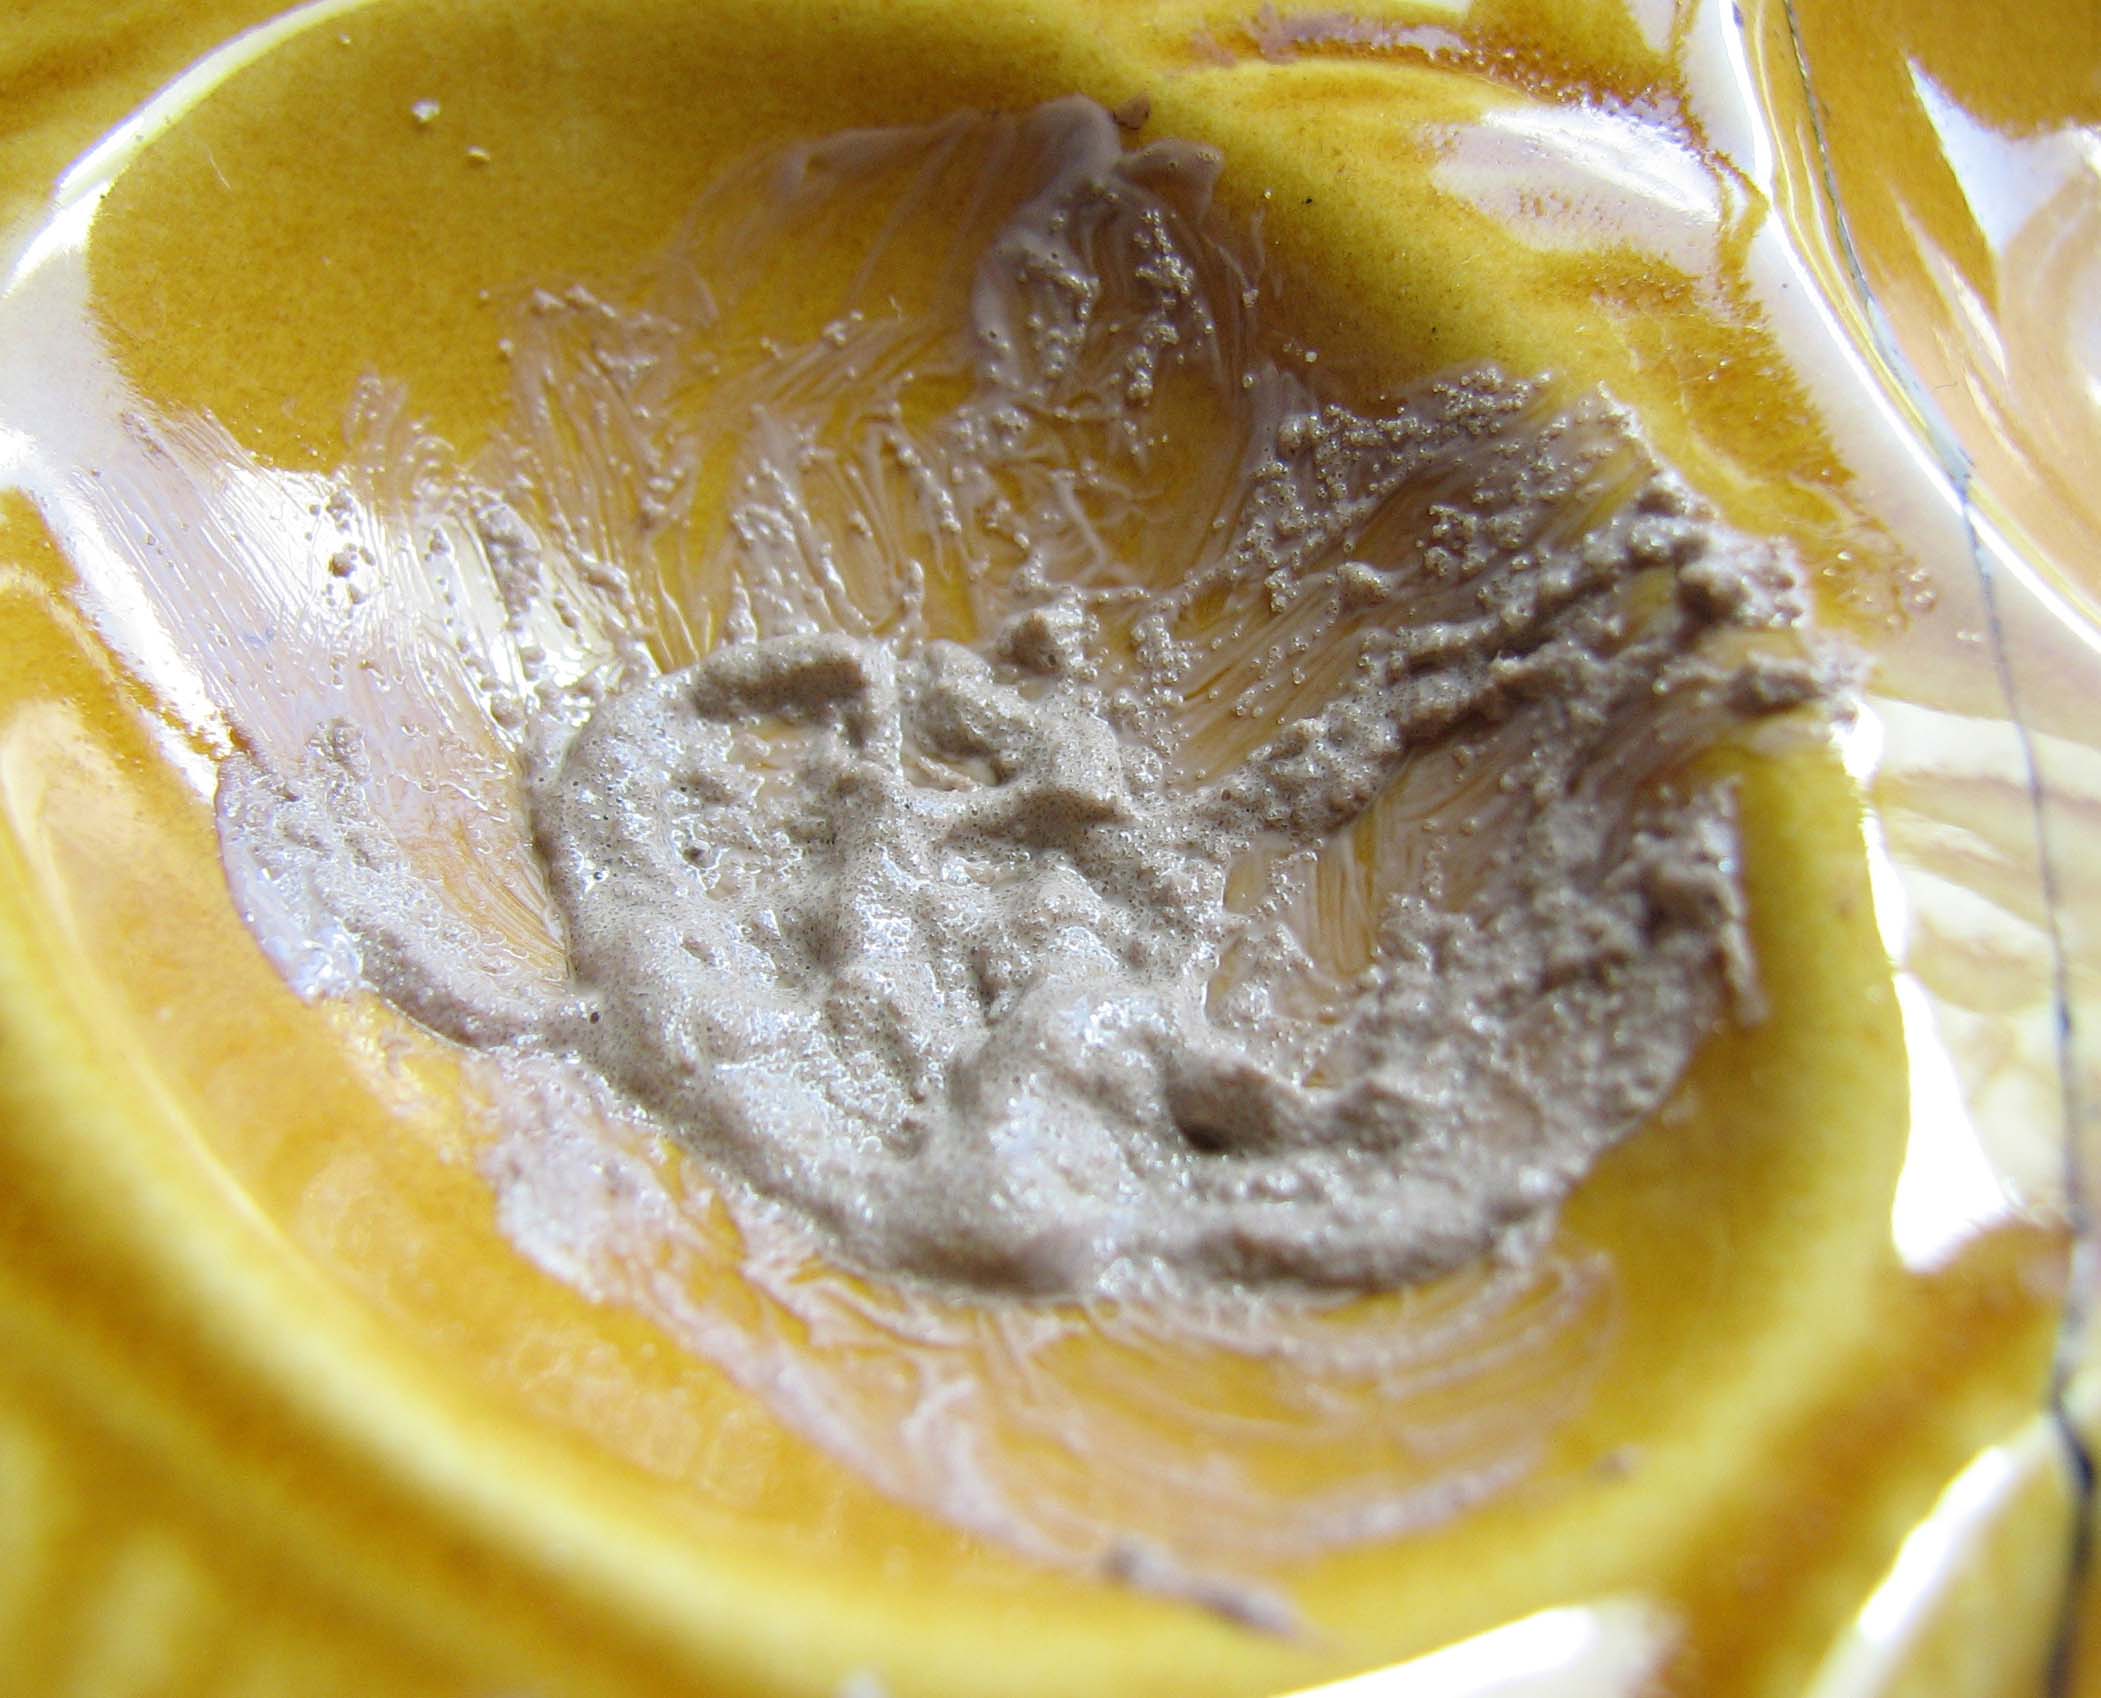
- Acrylic gel gloss mixed with beige acrylic paint and some very fine sand to depict the wheat pulp cooking in the pot.
For further detailing
- A variety of amphorae, baskets, vessels etc. to add interest. You can use the superb 15mm Baudea set of ancient supplies or sculpt these items yourself.
- Shields of various kinds.
- A selection of miniatures, depending on what scenes you would like to depict.
- Some Fimo and a bit of the “wheat pulp” paste to fashion a bowl and a spoon for one of the converted miniatures.
- Some animals from the Busch Kleintierset (optional).
- Greenstuff to depict a blanket.
- Two very small pieces of metal to depict the dice. You can cut those from flash.
- Miniature food items. Either get casts in metal or resin or try your hand at Fimo miniature food. If you sculpt it yourself you need Fimo in different shades (green, brown, off-white) and a set of pastels to shade it before you bake it. In using already coloured Fimo and pastels you not only save some time, but you also achieve a more realistic end result.
How you do it – Finishing touches
The tripod and the pile of fire wood
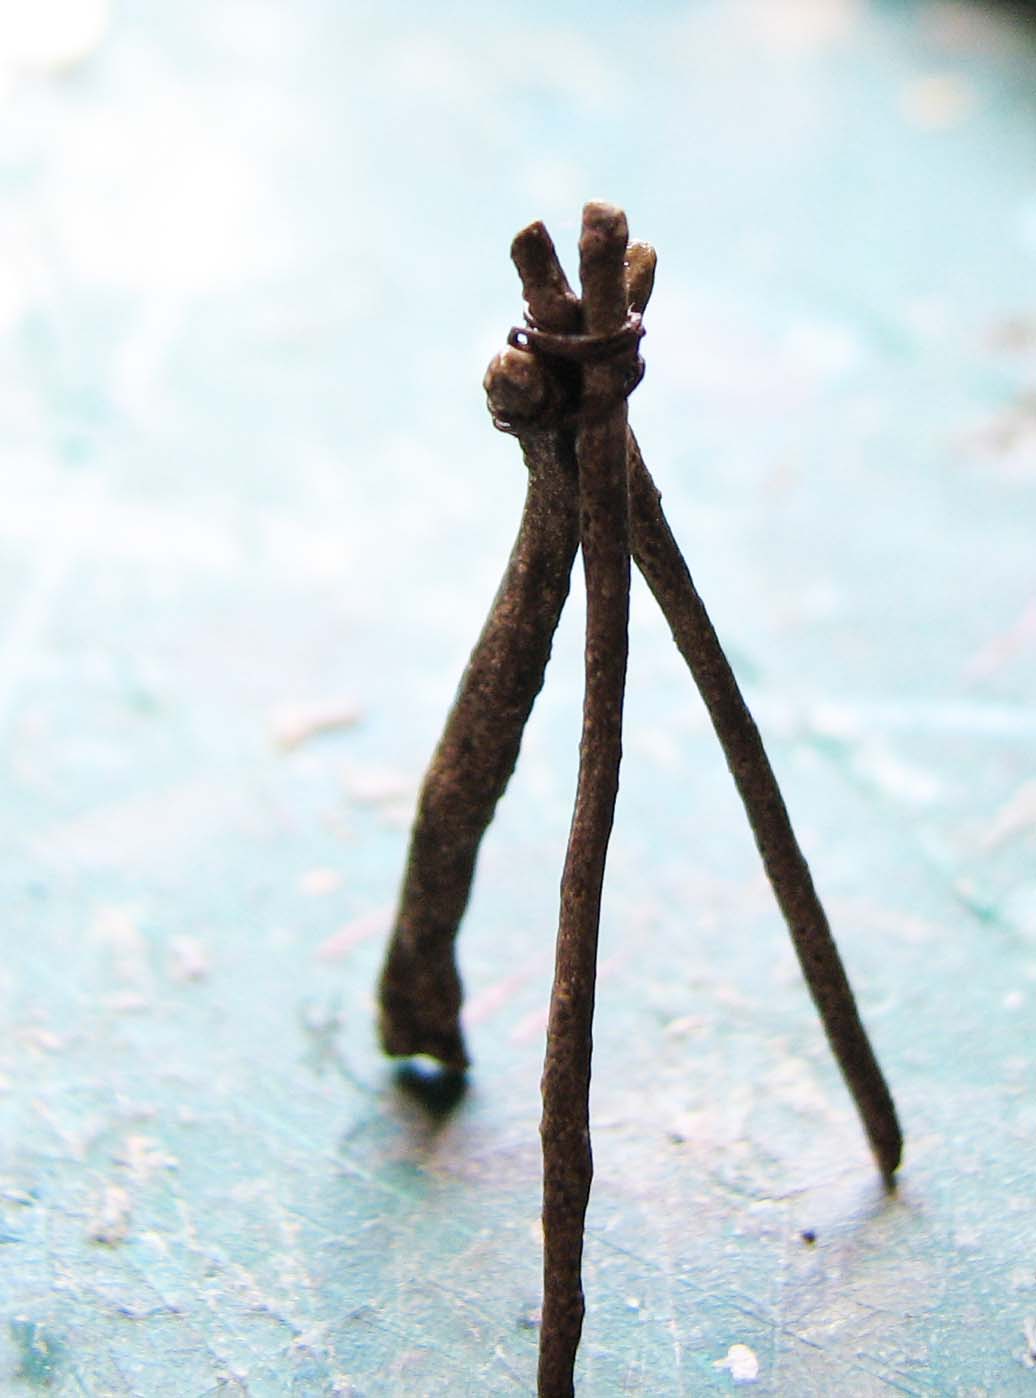
Cut the wire for the logs and tripod to size and shape it until you are happy. I used four pieces for the tripod: Two single strands of wire for two legs and two twisted ones for the third, forming a fork at its top. For the pile of fire wood I used about twelve short pieces. Drill holes in the base where you want the tripod. Make sure the tripod looks convincing when in place.
Apply acrylic gel mat to the wires to increase adhesion of paint and wood filler. It is a good idea to stick one end of the wires in styrofoam, apply the gel and turn them around after it is dry to cover the remaining tip. Apply woodfiller with a bit of PVA and brown paint mixed in just like the acrylic gel. Now add a brown wash to the “wood” parts.
Using some super glue fix the tripod in place over the fireplace. Do not glue the legs to the ground yet, just fixate the top. Wrap one strand of copper wire around the meeting point of all three legs to depict rope. It is advisable to paint the wire before you wrap it around.
Use some more copper wire to depict fastening ropes around the fire wood. I did not make them go all around because it would lift the pile off the ground.
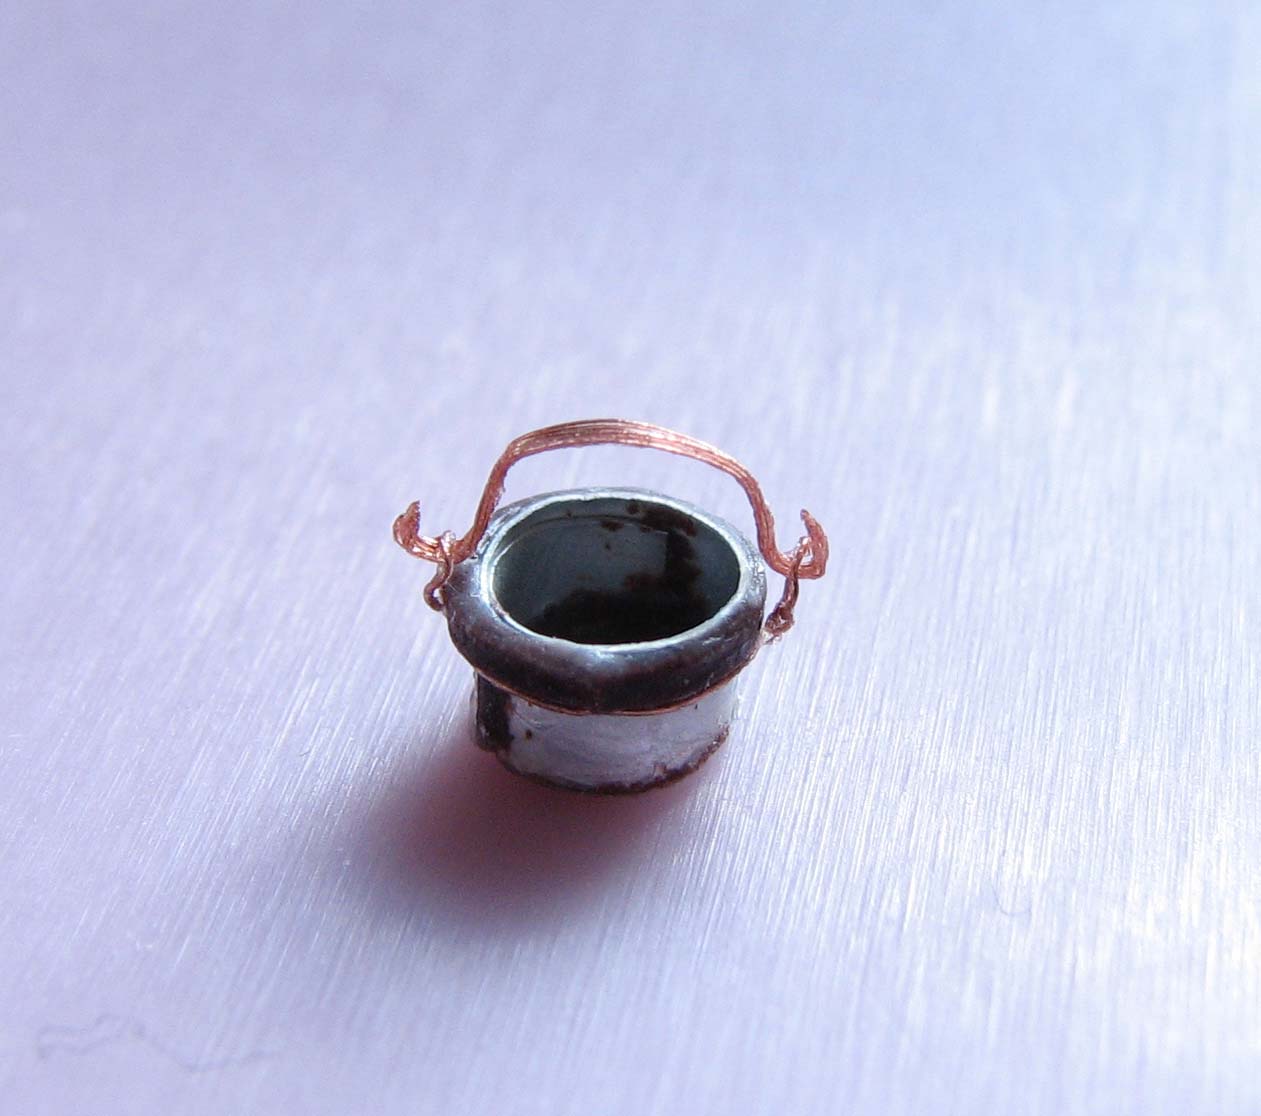
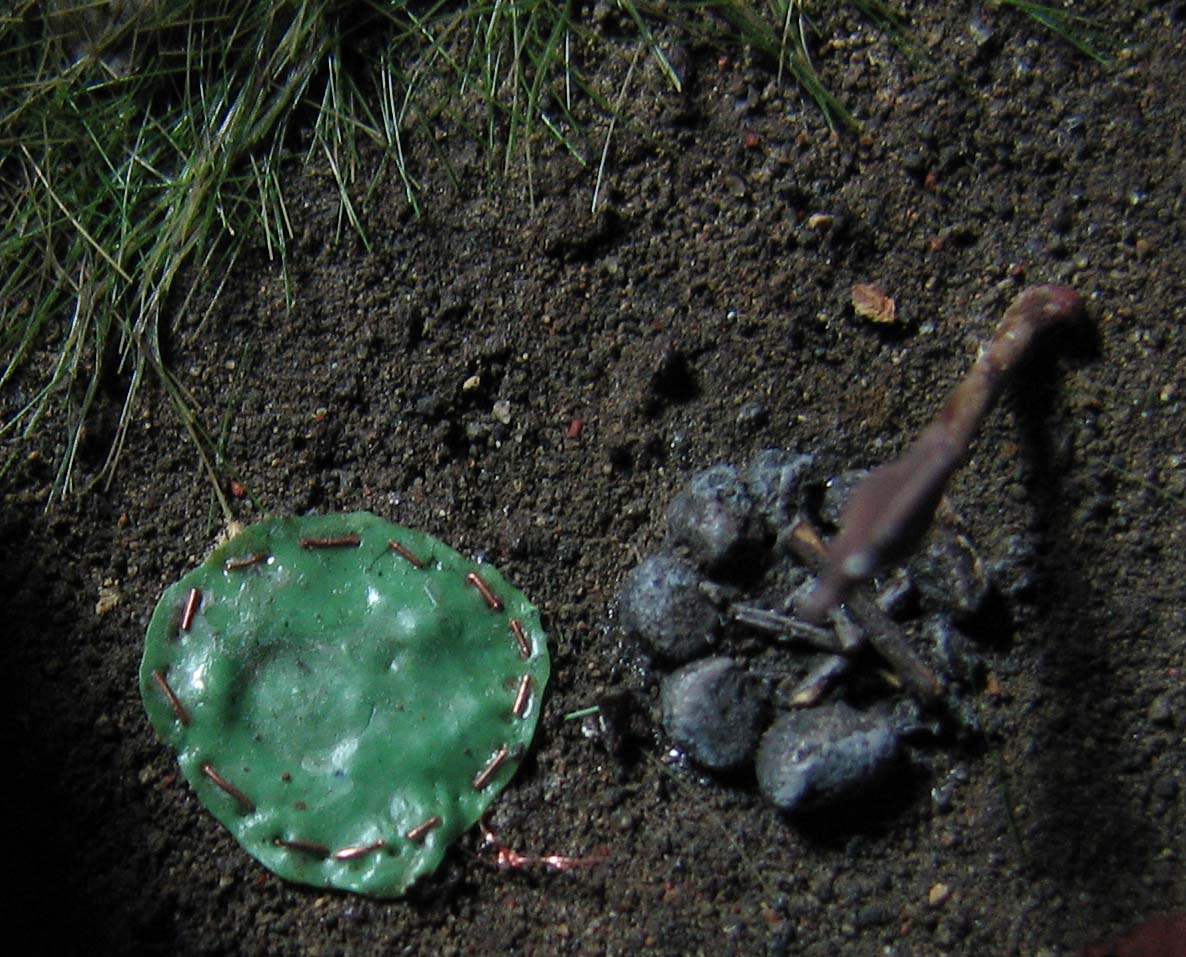
Situla
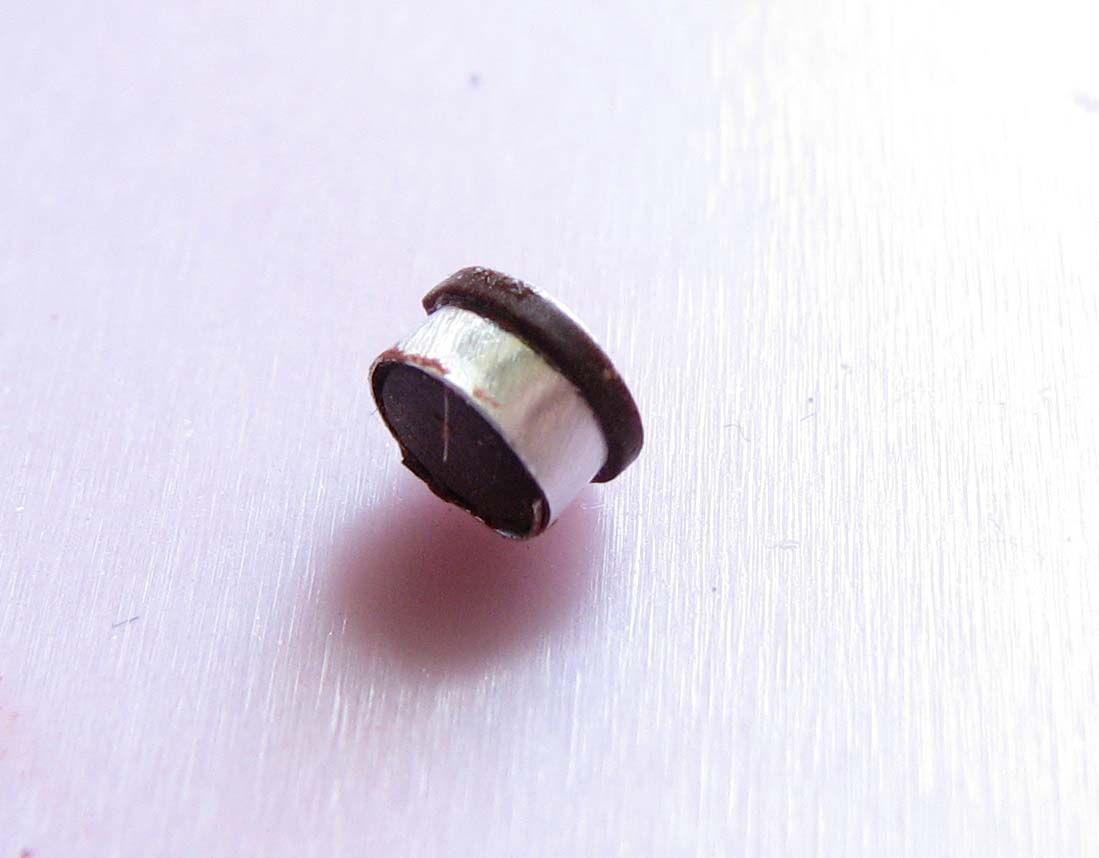
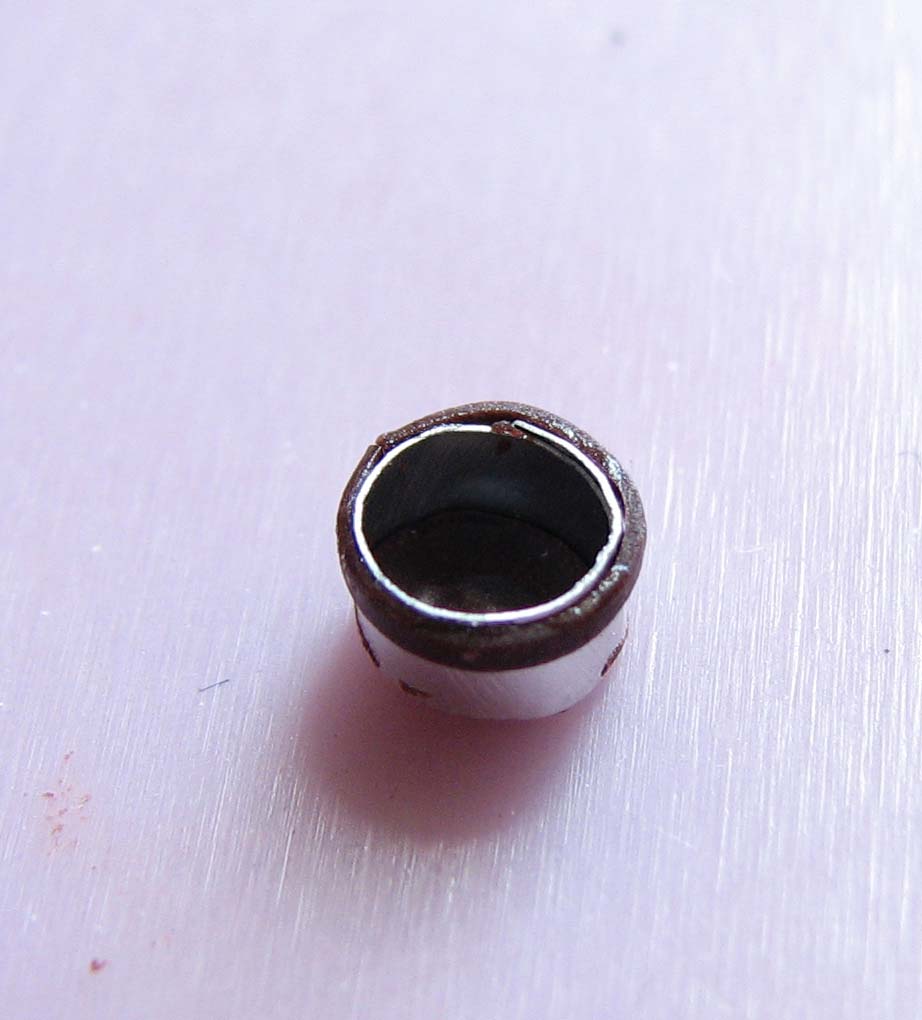
Using a thin rod as a template (the hilt of a needle tool works well) shape the metal into a cylinder and fixate with super glue. Use a straw as a template and cut a round pot bottom out of Fimo. Gently work it into the cylinder’s bottom part. Bake in the oven for about five minutes on 130 degree.
Make a thin stripe out of Fimo and pre-bake. Now cut it to shape and fashion a rim for the pot. Wrap the rim around the upper part of the cylinder and the pot is already taking shape.
Use single strands of copper wire to depict the suspension rings and the wire they are attached to. This is fiddly work and requires some patience. It works best if you have a long strand of wire and make two loops in it. Then wrap it around the pot. You only have to make sure that the loops are opposite each other in the end. Finally add the handle using two intertwined strands of copper wire. This also gives the handle some texture, which looks like simple decorations on this scale.
Now paint the entire situla brown, followed by different shades of bronze. You can also use a brown wash to add shadows. Using some black pigment add a bit of sud to the bottom of the pot. Mix acrylic gel gloss, beige acrylic paint and fine white sand to a paste and apply to the pot. This is our wheat pulp. After this is dry you might want to add more of it to give it volume. You can also slightly drybrush it and add a coat of gloss varnish to give it a wet appearance.
All there is to do now is to make a rope out of copper wire to fasten the pot to the tripod. Again, better paint the wire before you fasten it. Now glue the tripod in place on the base. Make sure the pot is centred over the fireplace.
Roasted fish
To finish the fish we just need to highlight it a bit with thinned down brown-greys and apply a last brown wash over it, picking out the fin and some of the details after this treatment.
Veteran pulp eater
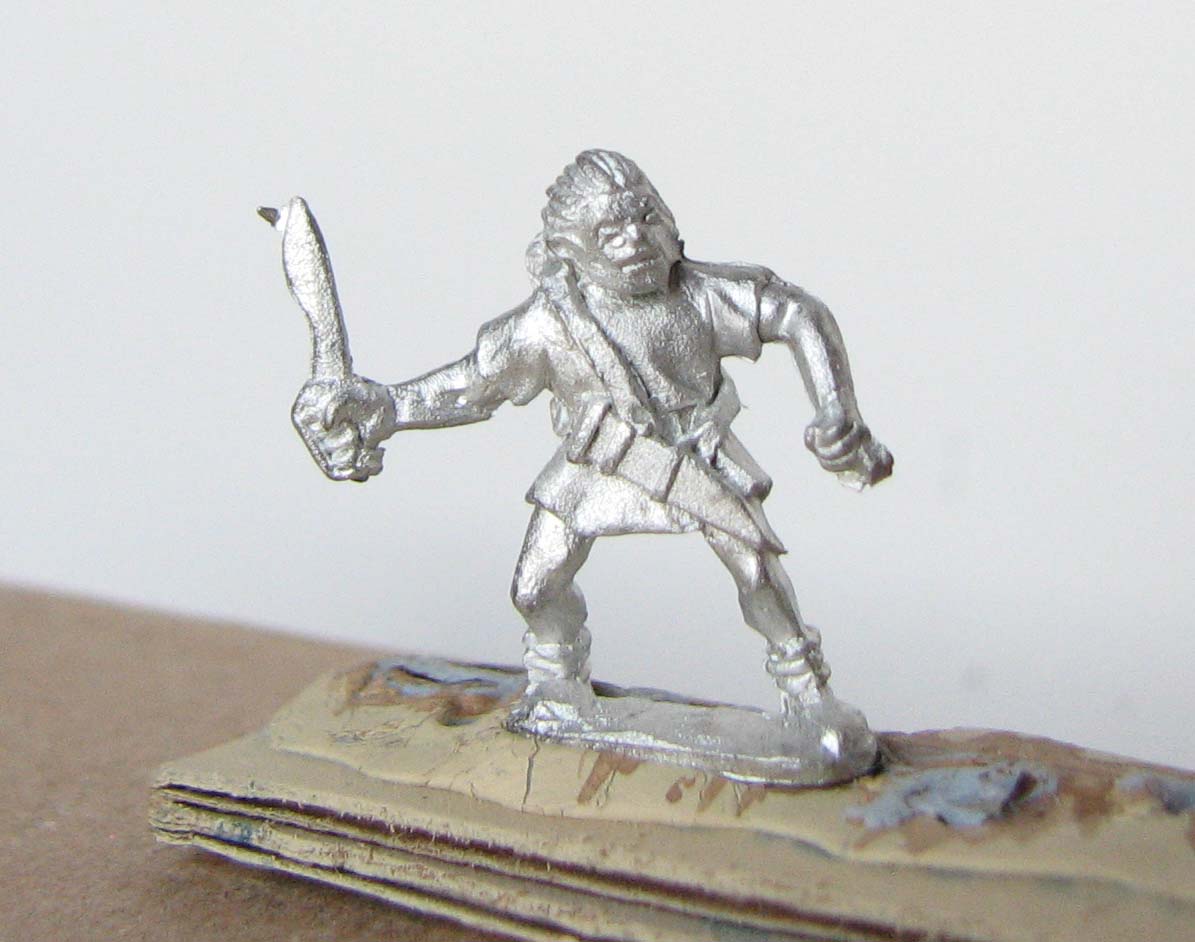
The veteran is a conversion based on a Corvus Belli elephant mahout. Snip off the rod in his right hand and drill a hole in his fist. Don’t drill through, as we won’t need the spoon to protrude on the other side.
Using some pincers gently repose the miniature. Be careful as I managed to break his arm off. You only need to reposition the right arm and his fist. The legs might need some adjustment, depending where you want to seat him. I decided to put him on the edge of the pile of fire wood and made his feet touch the ground, while his upper body remains straight.
The spoon
The spoon is quite easy to sculpt: Roll out some Fimo and cut a thin rectangular piece out. Use a ball tool to intend one side forming one end of the spoon. With a needle tool slightly round off the edges on the handle. Bake and you are done. Glue the spoon in place.
Paint the spoon in a colour resembling bone or metal. Highlight and finally add some “wheat pulp” paste. Drybrush the paste slightly and add some gloss varnish.
Cut out a round piece of Fimo and use a ball tool to form a bowl shape. Bake and fill with “wheat pulp” paste. Glue in place on the Veteran’s lap.
Numidian and Iberian dice players
These two chaps are converted from yet two other Corvus Belli miniatures. A Spanish Scutati and a Numidian Light Horse rider. Both were selected due to their closed hands, making it easy to imagine they roll some dice.
You need to cut off the Iberian’s Falcata and reposition his legs and arms so that it looks like he is kneeling on the ground. Also cut off the Numidians spear. Reposition the legs and arms of the Numidian, so that it looks like he his lying on the ground sideways. His original pose was not too far off.
Paint both miniatures. I used slightly diluted colours to layer the highlights, but did not want to overdo it, as the rest of the environment aimed on a more realistic appearance. It is a good idea to paint the miniatures before gluing them on.
The Numidian’s cloak
The cloak is a fairly simple affair. Prepare a small amount of green stuff and roll it out very flat. Let it cure for around 30 minutes to make it less sticky. Cut out a cloak shape. Next, apply the greenstuff cloak to the ground and form folds and creases with a sculpting tool. Put a bit of plastic wrap on the greenstuff and place the Numidian on it, so that he conforms to the coat and the coat to him. Let fully cure. Paint the cloak however you like and glue the Numidian down.
Dice bag and food bag
Both the dice bag and food bag are basically smaller versions of the cloak. I use a straw to get a nice round shape.
If you want to make it more realistic you can add a leather cord around the rim of the pouches. Indent the rim in a regular fashion to depict the holes the cord would run through. Next cut very tiny pieces of copper wire and glue them between every second pair of holes with PVA or acrylic gel. You can also add an end piece with a knot in it. Just form one out of wire and glue it to an appropriate place.
Paint both the dice bag and the food bag, picking out the leather cord. You can place the dice before you paint it all, but the food is better placed later.
Dice
Cut two very small rectangular pieces out of some metal flash. Glue them in place and apply an off-white base coat. Highlight the dices and finally use a brush with a very fine tip to paint the eyes on.


Bread and olives
Sculpt a bowl for the olives with brown Fimo. Now take very small pieces of some light and dark green Fimo and roll them in your hands, so that they resemble the shape of olives. Place the olives in the bowl. Bake for five minutes at 130 degree. When cured you can add some highlights to the brown bowl and cover the olives with gloss varnish to depict oil.
Now we shape the bread with some off-white Fimo. We start with a small ball, flatten it, and add six or more incisions on its top. Use some brown pastels to shade the bread and to give the crust a baked appearance. Bake the bread just like the olive bowl. Glue the bowl and the bread in place.
References
Primary sources
Livy. Books XXVIII-XXX With An English Translation. Cambridge, MA: Harvard University Press, 1949.
Polybius. Histories. Evelyn S. Shuckburgh [Trans.]. London, New York: Bloomington 1962.
Wonderful work as always. You’re certainly mastering the fine details that really bring a scene (or scenery, or baggage train, or…) to life!
Thank you very much. The detailing is always the most rewarding work. As you say it is most important to make a piece stand out. Naturally it is also quite meditative to make the details (if it is not the pot, that was fiddly and made me almost bite in the table 😉 ).
Fantastic work as usual and a very nice tutorial. I have been using artists aluminium foil a lot recently which can be shaped really easily into rolls, tarps ,baggage etc etc. Is the foil your using similar ?
I think you should try an olive tree next and get somebody picking off the olives into a bowl. I think your ability is easily up to that.
Thank you! I think the metal foil is a bit stiffer, which is mainly why I used it for the pot only. An early attempt at making a coat looked good, but the miniature did not conform to its shape. Is the stuff you use more flexible?
I already made some olive trees and actually intended to make in some point an entire grove with an olive press. I might, however, update my trees, as they don’t have a realistic bark texture. I like the idea to have such harvest scenes on actual terrain pieces. I might also make an apple tree orchard with farmers collecting some.
It’s very flexible. 😀
Sounds good, I will have a look at the local art supplies store.
Magnificent!
Thank you! I am very glad you like the camp.
Poor Hasdrubal. Snotty pulmetum is the absolute *worst*. :-/
Wonderful details, and awesome tips for converting miniatures! The camp really looks lively, and I have to say, the bread and olives are phenomenal. Whoever sculpted them must be an absolute master 😀
Thanks. I know, some good porrige is better. I might make some pulmentum for science!
The olives and the bread are very well made indeed and I did forget to mention that you made them! Mea culpa! I think you should write a guestpost in some point. 🙂
I would love to! I’ll have to make up some more mini foods though, so the post isn’t too short. You should give me a list of ones you want!
Iberian ham, a roast pig, salami, apples, oranges, cheese… I could see those would come in very handy.
The attention to both detail and historical accuracy is really impressive. Just amazed at all of the little touches you added especially as I know working in 15mm can be challenging.
Thank you very much for your comment. 15mm is a fiddly scale, but I try to get the ebst out of it. It has it’s downsides such as proportions and less detail than bigger scales, but for army sized games it is a good compromise. I might have a go at 28mm ancients at skirmish level with the excellent plastics sets available these days. I might then revisite the camp theme with even more possibilities for detailing.
Absolutely brilliant. You’ve really brought this camp to life. And thanks for the history lesson about culinary habits of the ancients on campaign!
Thank you! Much obliged. I actually thought of making some roman style bread one day and also make some pulmentum 😛 Won’t be nice I guess, but should be interesting.
Fantastic 🙂
Thank you very much! Glad you like it.