
If you are a Game Master it is always exciting to start a new campaign and let your players explore new shores, their peoples, customs and the secrets they hold in ruins old, mountains high and dungeons cold. To make it easier for your players to visualize this unfamiliar environment you may have provided them with a map of these lands. May it be as loot or after some negotiation with a Gnome in the local antique shop. A map may also come in handy for a wargaming campaign to show the position of warbands or armies and natural obstacles.
Often the first iteration of such a map is a simple hand-drawn sketch, but after more and more of the new area is discovered you may want to provide something with more visual appeal, add a background texture or even colorize your map.
I will show you my process of drawing a map by hand, scanning and cleaning it up and finally colorizing it using Photoshop.
INITIAL CONSIDERATIONS – HISTORICAL MAPS AS INSPIRATION
If you just start out drawing maps I would recommend to first have a look at historical maps to get some inspiration for your own work. You can decide what appeals to you visually and stylistically and also make up your mind which style works best for your world. If it is high fantasy both medieval and renaissance style maps could work, if you make a map for a scenario with a historical background you could go so far and emulate a specific style.
Tabula Peutingeriana
The famous Tabula Peutingeriana can serve as an example for a medieval map. It is supposedly a copy of a Roman original, dated anywhere between 250 BCE and 400 BC. Below you see a facsimile version by Konrad Miller, however, an interactive online map viewer by Cambridge University Press allows to examine the original, heavily weathered medieval map, too.

As is apparent this is quite different to modern maps. Instead of accurately depicting geographical features or the shape of land masses, this map’s goal is to aid travelers in assessing how many days worth of travel a journey between cities will take (indicated by the red, segmented lines), and how big a settlement is (indicated by the relative size of a settlement and features depicted).
The cities are drawn using a semi-isometric style that does not attempt to be absolutely spot on if it comes to accurately depicting the perspective. I could see this kind of map in a role-playing context, given that your players are often interested in how long a journey takes. The symbols for cities could be modified to add variation. Naturally this would also work perfectly for a campaign map if you run an ancients campaign.
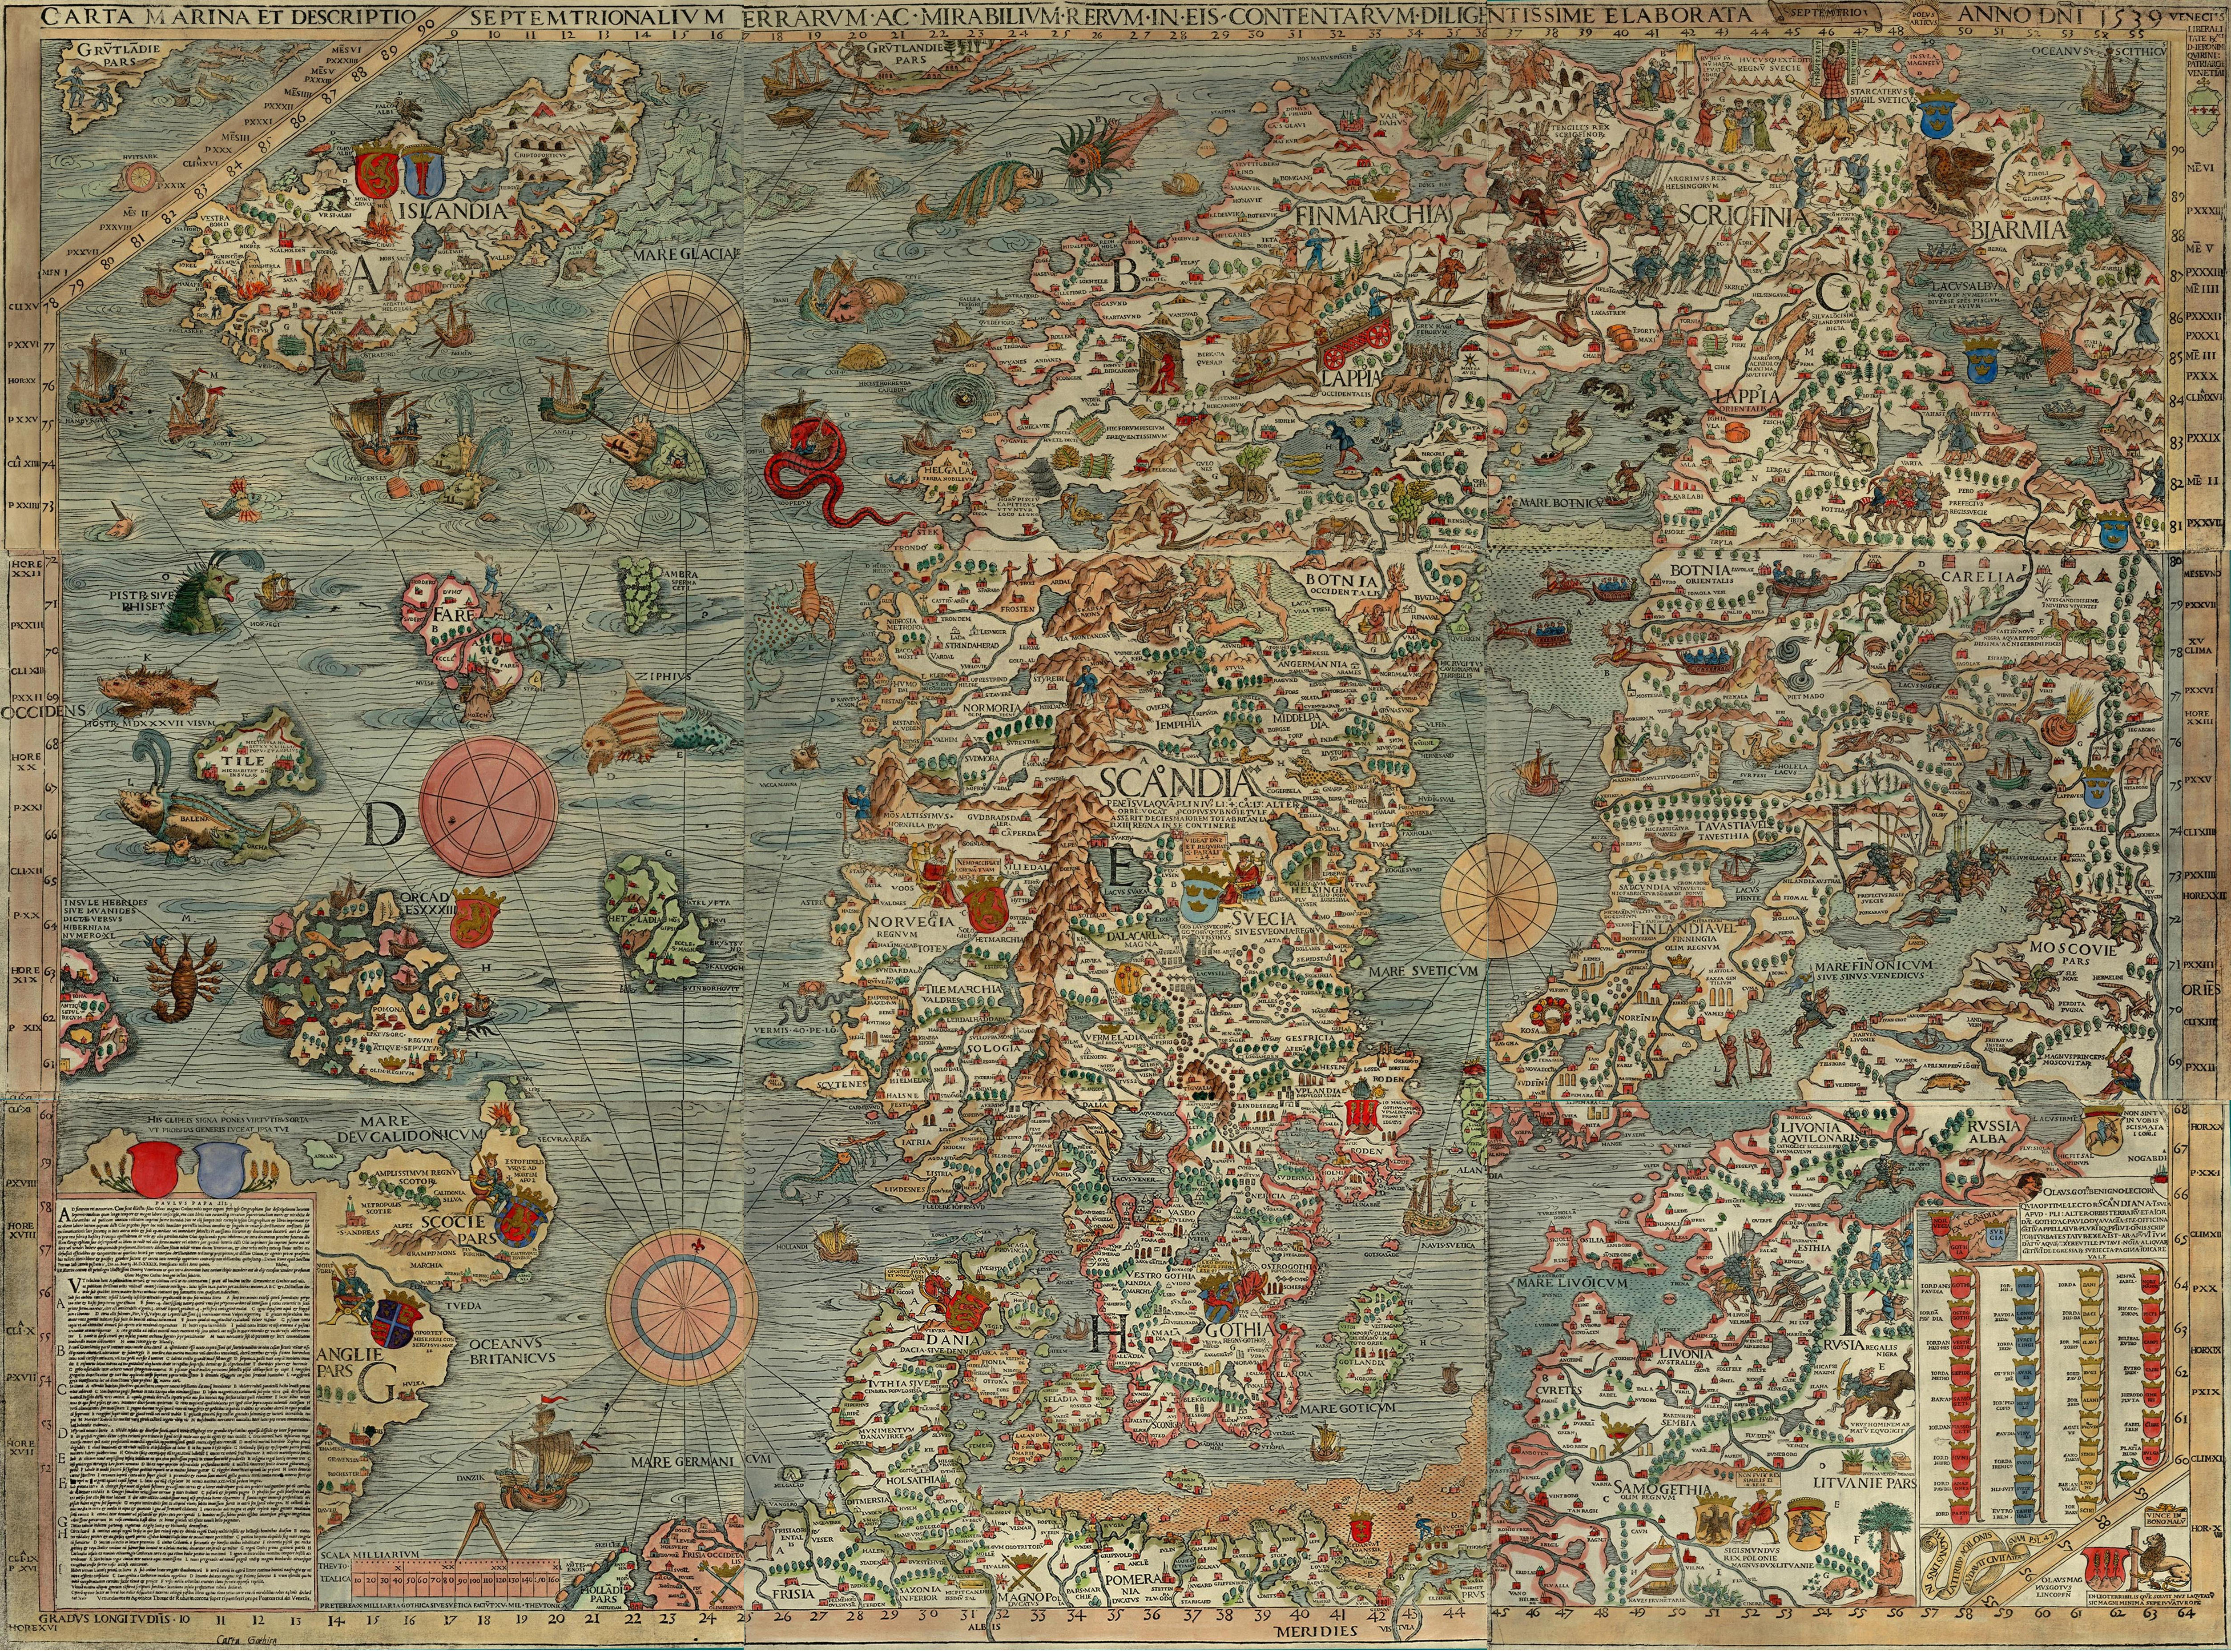
Carta Marina
Another example is the Carta Marina. Fashioned supposedly in 1539 by swedish scholar Olaus Magnus it is one of the earliest maps of the Nordic countries. It is especially noteworthy for its fanciful depictions of fantastical beasts both on land and sea. The James Ford Bell Library offers a website with an online viewer to examine the map close-up.
Inspirational Links
The great interwebs can also be a great inspiration. Check out these resources to really get stuck in the topic:
Fantastic Maps – How to draw a map
The Cartographers Guild – A forum for cartography enthusiasts
Deven Rue’s website offers lots of inspiration for your own work
What makes your map tick? – Developing a background
Before you start sketching your map it stands to reason to develop a rough historical background. Think about the people and creatures who inhabit the land. Geography always influences the inhabitants and shapes their history. A rugged landscape could tend to have only small disjointed settlements or one major city where people convene for protection. A land-locked kingdom may focus on maintaining its borders, while a coastal power aims to extend its reach across the sea to colonise new lands. A war-torn region will be again different to a region that saw peace for a hundred years. Are monsters roaming the wild a common sight or have centuries of adventuring made those beasts almost extinct?
I always thought the most intriguing aspect of historical maps such as the Carta Marina are the fantastic beasts and odd creatures depicted on them: Humanoid figures without heads, sea serpents swallowing ships whole and dragons terrorising villages. Many of these depictions are based on Roman and Greek myth or on tall stories told by sailors over an ale. So apart from geography and history, also think about the myths of the land and the stories its inhabitants tell.
A rugged land
For my map I decided to draw an area map of the Margravate of Greifshold, a setting for a RPG campaign I am currently working on:
About 100 years ago explorers discovered a new continent rich in natural resources. The coastal waters were teeming with fish and soon whalers and missionaries followed the explorers. They established a small outpost and told visiting travelers about the riches and wonders of this uncharted land.
A few years later an expeditionary force landed on this new continent. With little regard to the native tribes they founded the city of Greifshold and subjugate the tribes by force. The newly established Margravate expanded to the northwest and northeast and established footholds.
The disgruntled native tribes banded together and rebelled against the invaders. At first they had some success reclaiming the northern forest, but after some years of guerrilla warfare they were crushed by the Margrave. Ten years later some of the wounds have healed, but there is still tension between the colonisers and the natives.
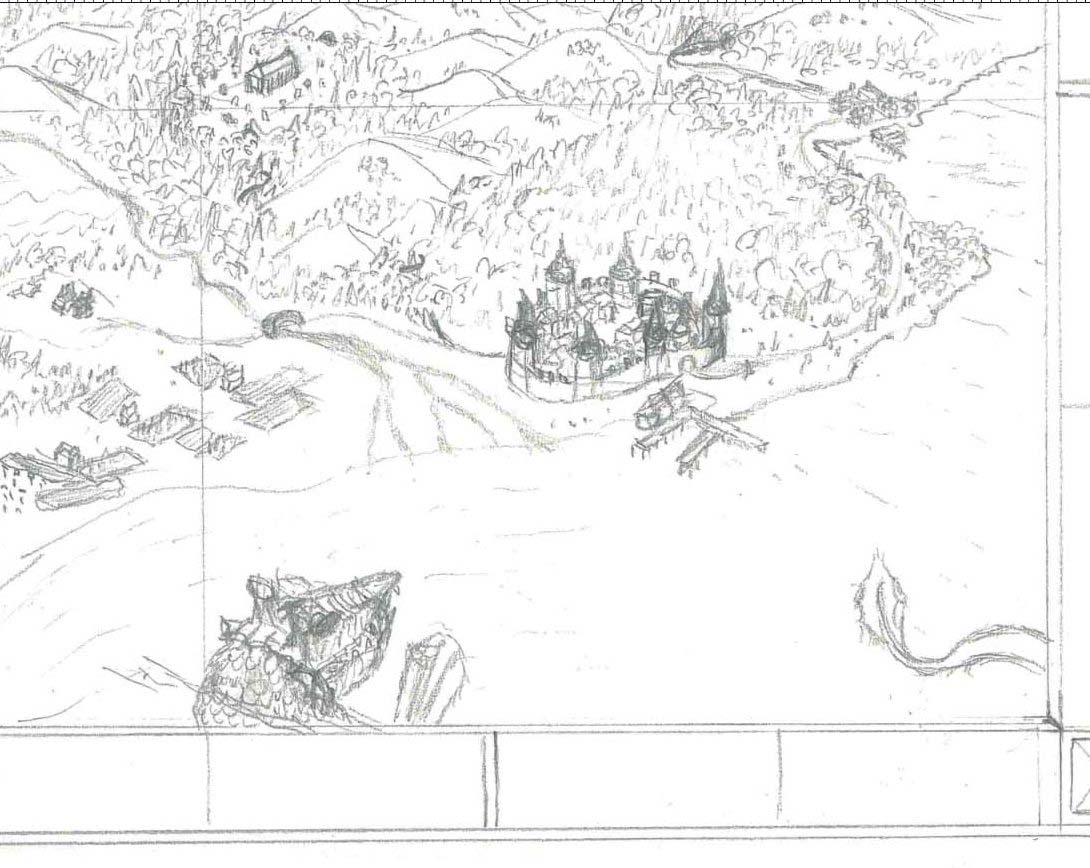
In the south-east you find the city of Greifshold, with the small fishing village Breka to the east and the remains of a temple to the north. Deep under the sea they say a serpent waits to swallow trade vessels whole.
In the west travelers report of sentient mushrooms, defending their territory fiercely. Some say a mushroom king holds court on a throne made of precious stones and pure gold. In the east sentient trees guard remains of an ancient civilisation, unwilling to share its secrets.
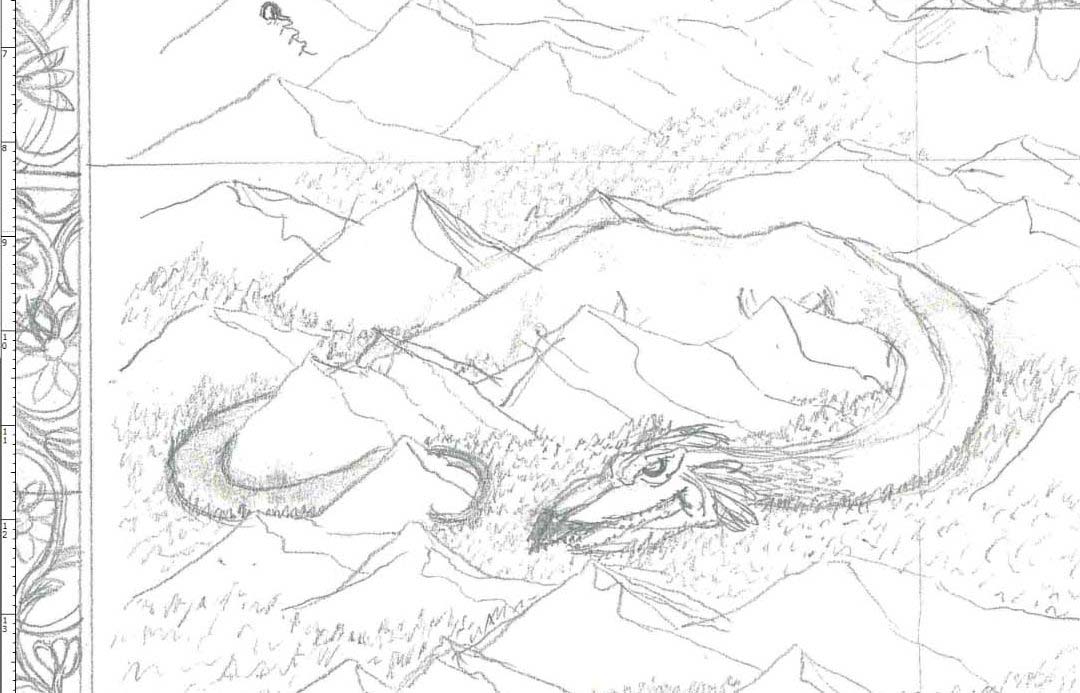
The nomadic tribes of this land consider the mountain range that forms the northern limits of Greifshold to be the fossilized remains of an ancient, powerful being. A child of the gods, the first dragon and mortal enemy of the sea serpent below the waves. It is said an old pass leads to a portal, hewn in the very rock of the mountains. Where it leads nobody knows.
Something to rest on – Sketching your map
After you decided on the background you can start sketching your map. Depending on your preference you can use pencil or a tablet for this step. If you do the entire map digitally you obviously save yourself the scanning. However, there is something to be said to sketch and ink it the old-fashioned way.
You don’t need expensive supplies to draw your own maps, nor will you need an expensive Adobe Creative Suite subscription. Drawing supplies are readily available at your local art store and you can use open source software like Gimp and Inkscape to clean up and colorize your maps. You can basically use any image manipulation program that allows you to use layers. It comes in handy to have a function that converts a bitmap into a vector graphic, but even that is not necessary when you start out. You can use Inkscape for this, which is the open source alternative to Illustrator, a vector drawing program.
I did use Photoshop and Illustrator for my map, mainly because I have these programs at my disposal, but the instructions work with any program.
So far so good, but what basic supplies do you need?
- A pencil or a set of micro pens. I use one with a 0.8 mm and one with a 1 mm tip respectively.
- White drawing paper. I use 80gsm paper for marker and pen rendering. It is smoother than your usual copy paper and the marker does not tend to run or smudge on this paper.
- Illustrator or Inkscape to clean up and vectorize your art work.
- Photoshop or Gimp to colorize your artwork.
You can see, if you don’t want to colorize or vectorize your artwork you only need pen and paper to start. Onwards to drawing techniques!
Let the ink flow!
For starters take a piece of paper and just draw something. Hills, trees, a coastline etc. or if you already feel comfortable with more intricate designs try yourself on some buildings, maybe a farmstead or a tower. You can look online for some inspiration.
After an evening of relaxed sketching move to your map proper. Start with a simple frame and think about the geographical features the map should show. Do you want to draw an entire continent or just a small area map? The larger the scale the more abstract your map: Settlements are depicted using symbols or a small icon. Mountain ranges and forests won’t show singular trees and beasts may be something to adorn the corners or the frame of your map.
If you want to draw a map of a smaller area you will need to add more details. Settlements may show singular houses, a city wall may be visible and singular trees will stand out. The beasts can be more easily depicted in perspective interacting with the landscape: A sentient fungi would easily tower over city and mountain alike on a large-scale map that shows continents or a whole world. On an area map the fungi can walk through the forest and won’t look too much out of scale. You can also add more detailing such as scales and facial expression, which may be difficult if your beasts are only a centimeter tall.
Some general advise when drawing a map:
- Try to be consistent with regard to the perspective.
- If you want to colorize your map keep the shading subtle and leave lots of white space.
- Don’t draw the details too small if you want to blow the map up later on. This will give you a cleaner look.
- Develope your own way to do things instead of copying your favourite artist.
- When you start a map, finish it. It gives you a feeling of accomplishment and seeing it through will also hone your drawing skills.
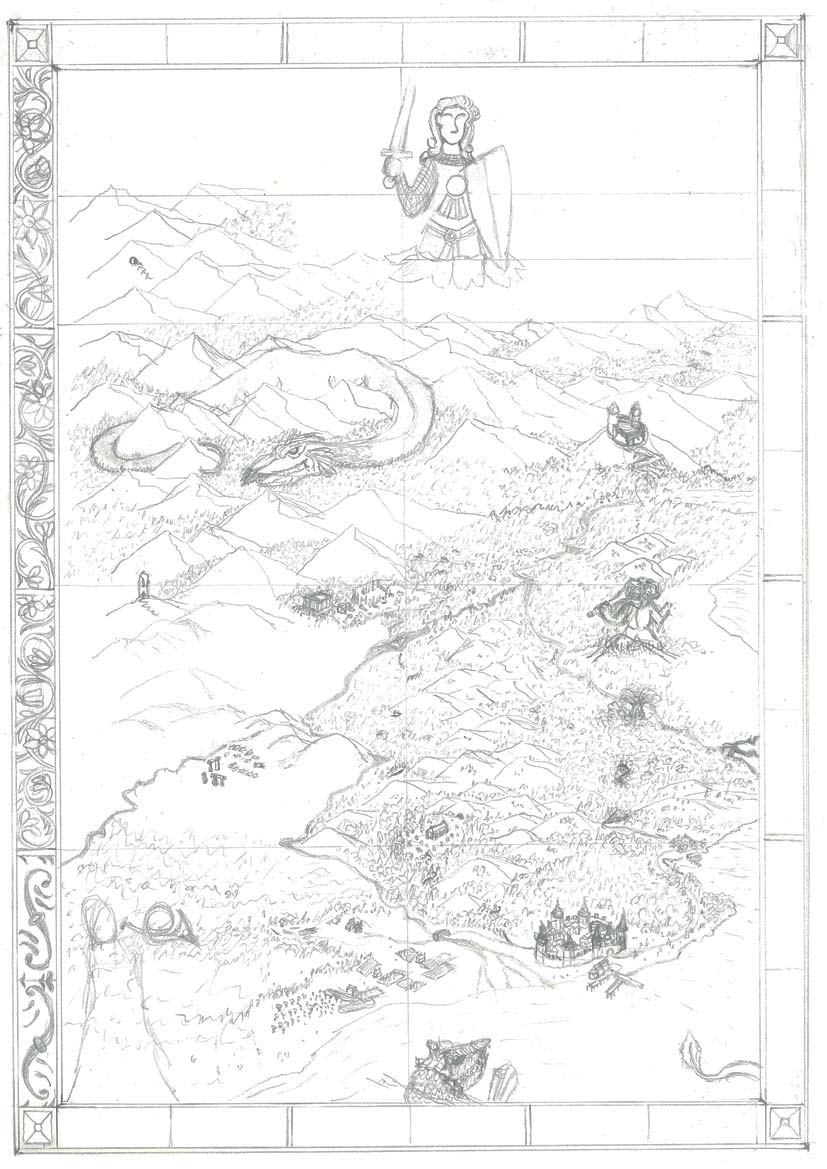
The sketch does not have to be perfect, but make sure that the overall composition is to your liking. Keeping the historical background in mind I divided my canvas into a 2 x 4 grid. I aimed on having something of interest in each of the sections: A ruined castle on a hilltop, a dragon curled around a mountain range, a small fishing village and so on. My goal was to give the beholder a reason to let the eye wander over the map and to engage him or her with evocative details.
Geometric delights – sketching the beasts
When you sketch the beasts keep a few things in mind:
- It is easy to imagine a build structure like a house as a combination of geometric shapes, accordingly drawing them in perspective is much easier than organic shapes.
- However, you can also imagine a creature as a conglomeration of geometrical shapes. For instance the dragons neck is basically a cylinder that winds around the mountain. Both the head of the dragon and the sea serpent can be seen as triangular or square based pyramids. Bodies turn into prisms or cuboids and so on. Rotate these shapes in your head and think how they would look in perspective. Sketch these simple shapes and then round them off to make them appear more organic. Add details, like teeth and scales only when the basic shapes have been established.
- Don’t be afraid to experiment. See what happens if you add a line or change its curvature. At the sketching stage your eraser or Ctrl+z is your friend.
- Try to stick to your perspective of choice. If you draw an isometric map it would seem odd to draw a dragon with a vanishing point.
You can use this method for pretty much everything: Temples, ruins, farmsteads, mountain ranges etc. First establish the basic shapes then add to it.
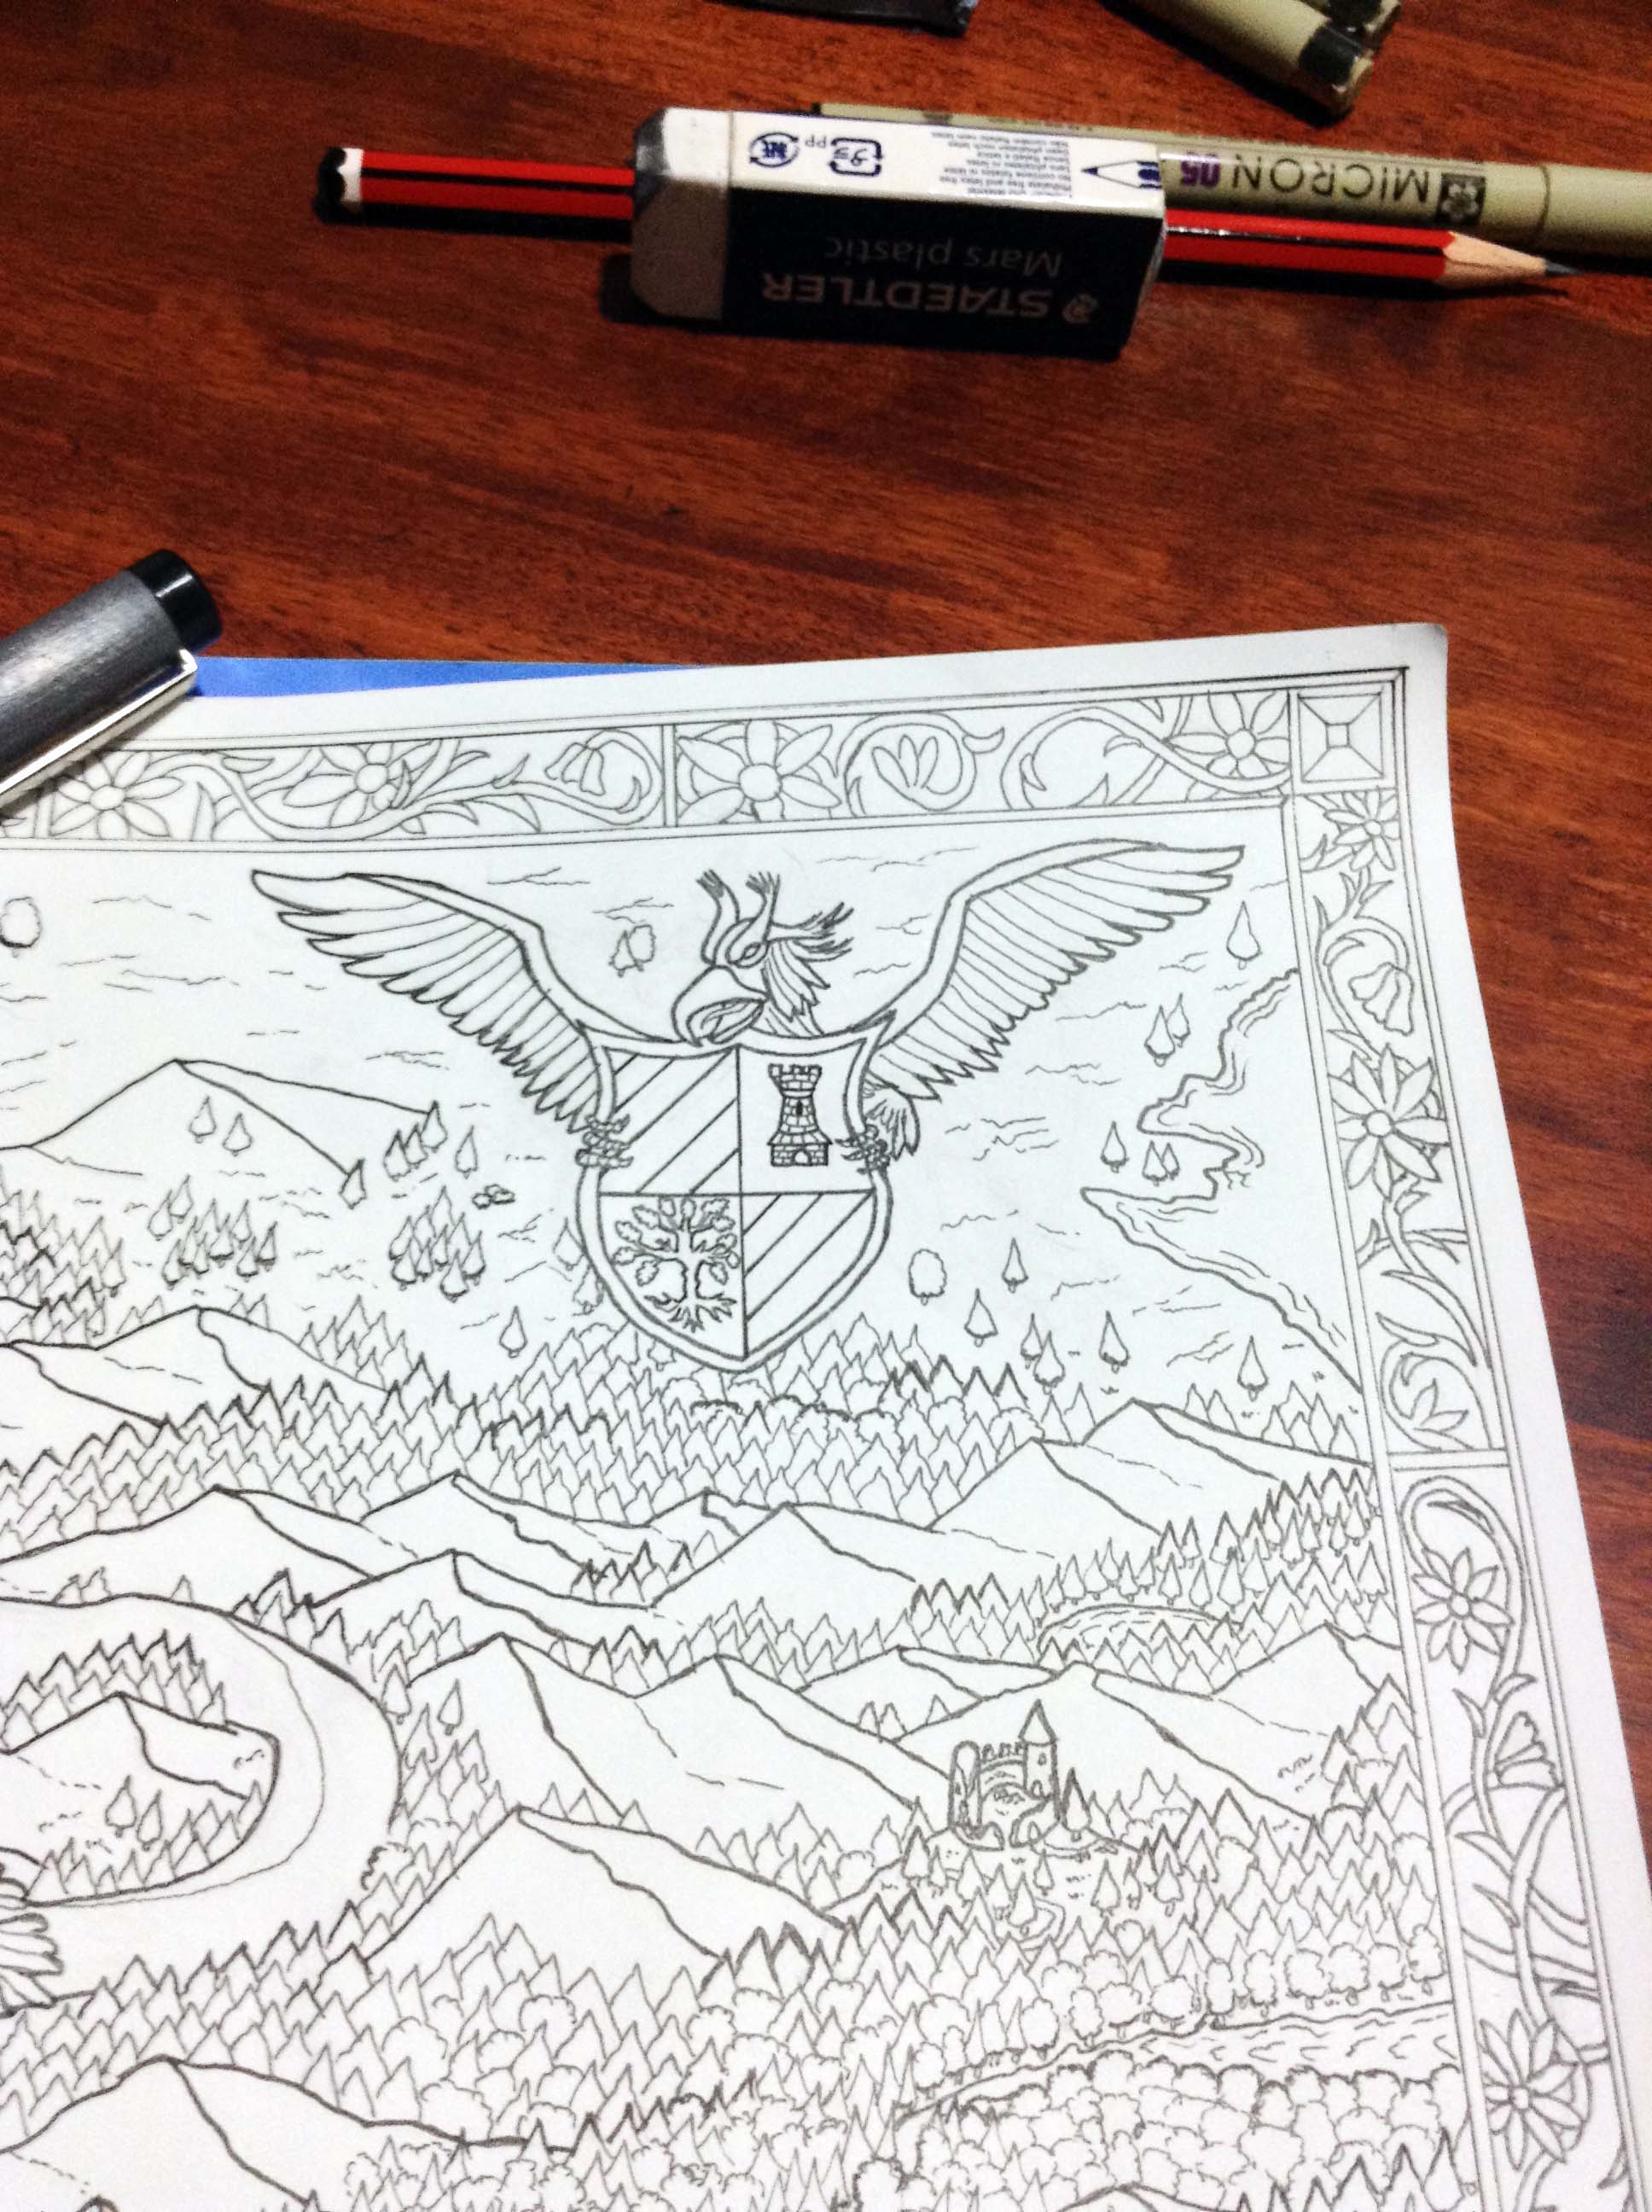
A permanent fixture – Inking the map
When you are satisfied with your sketch take out the micro pens and proceed to inking. At this stage it pays off to use different line weights to emphasise certain elements on your map. For instance the outline of the serpent is drawn with a 0.45 mm tip, while the scales, fingers, eye and teeth are drawn using a 0.05 mm tip. In addition some of the tree and hill silhouettes are pronounced using a larger tip. This way the hills stand out more easily against the surrounding forest. In case of the trees this change of line weight indicates that they are slightly elevated in comparison to the trees directly behind them.
Do not rush the inking and draw confidently. The sketch will help guide your hand. If you make a mistake you can always delete it later. This process can take several days worth of hobby time for a very detailed map, but it is very satisfying when you see the finished piece.
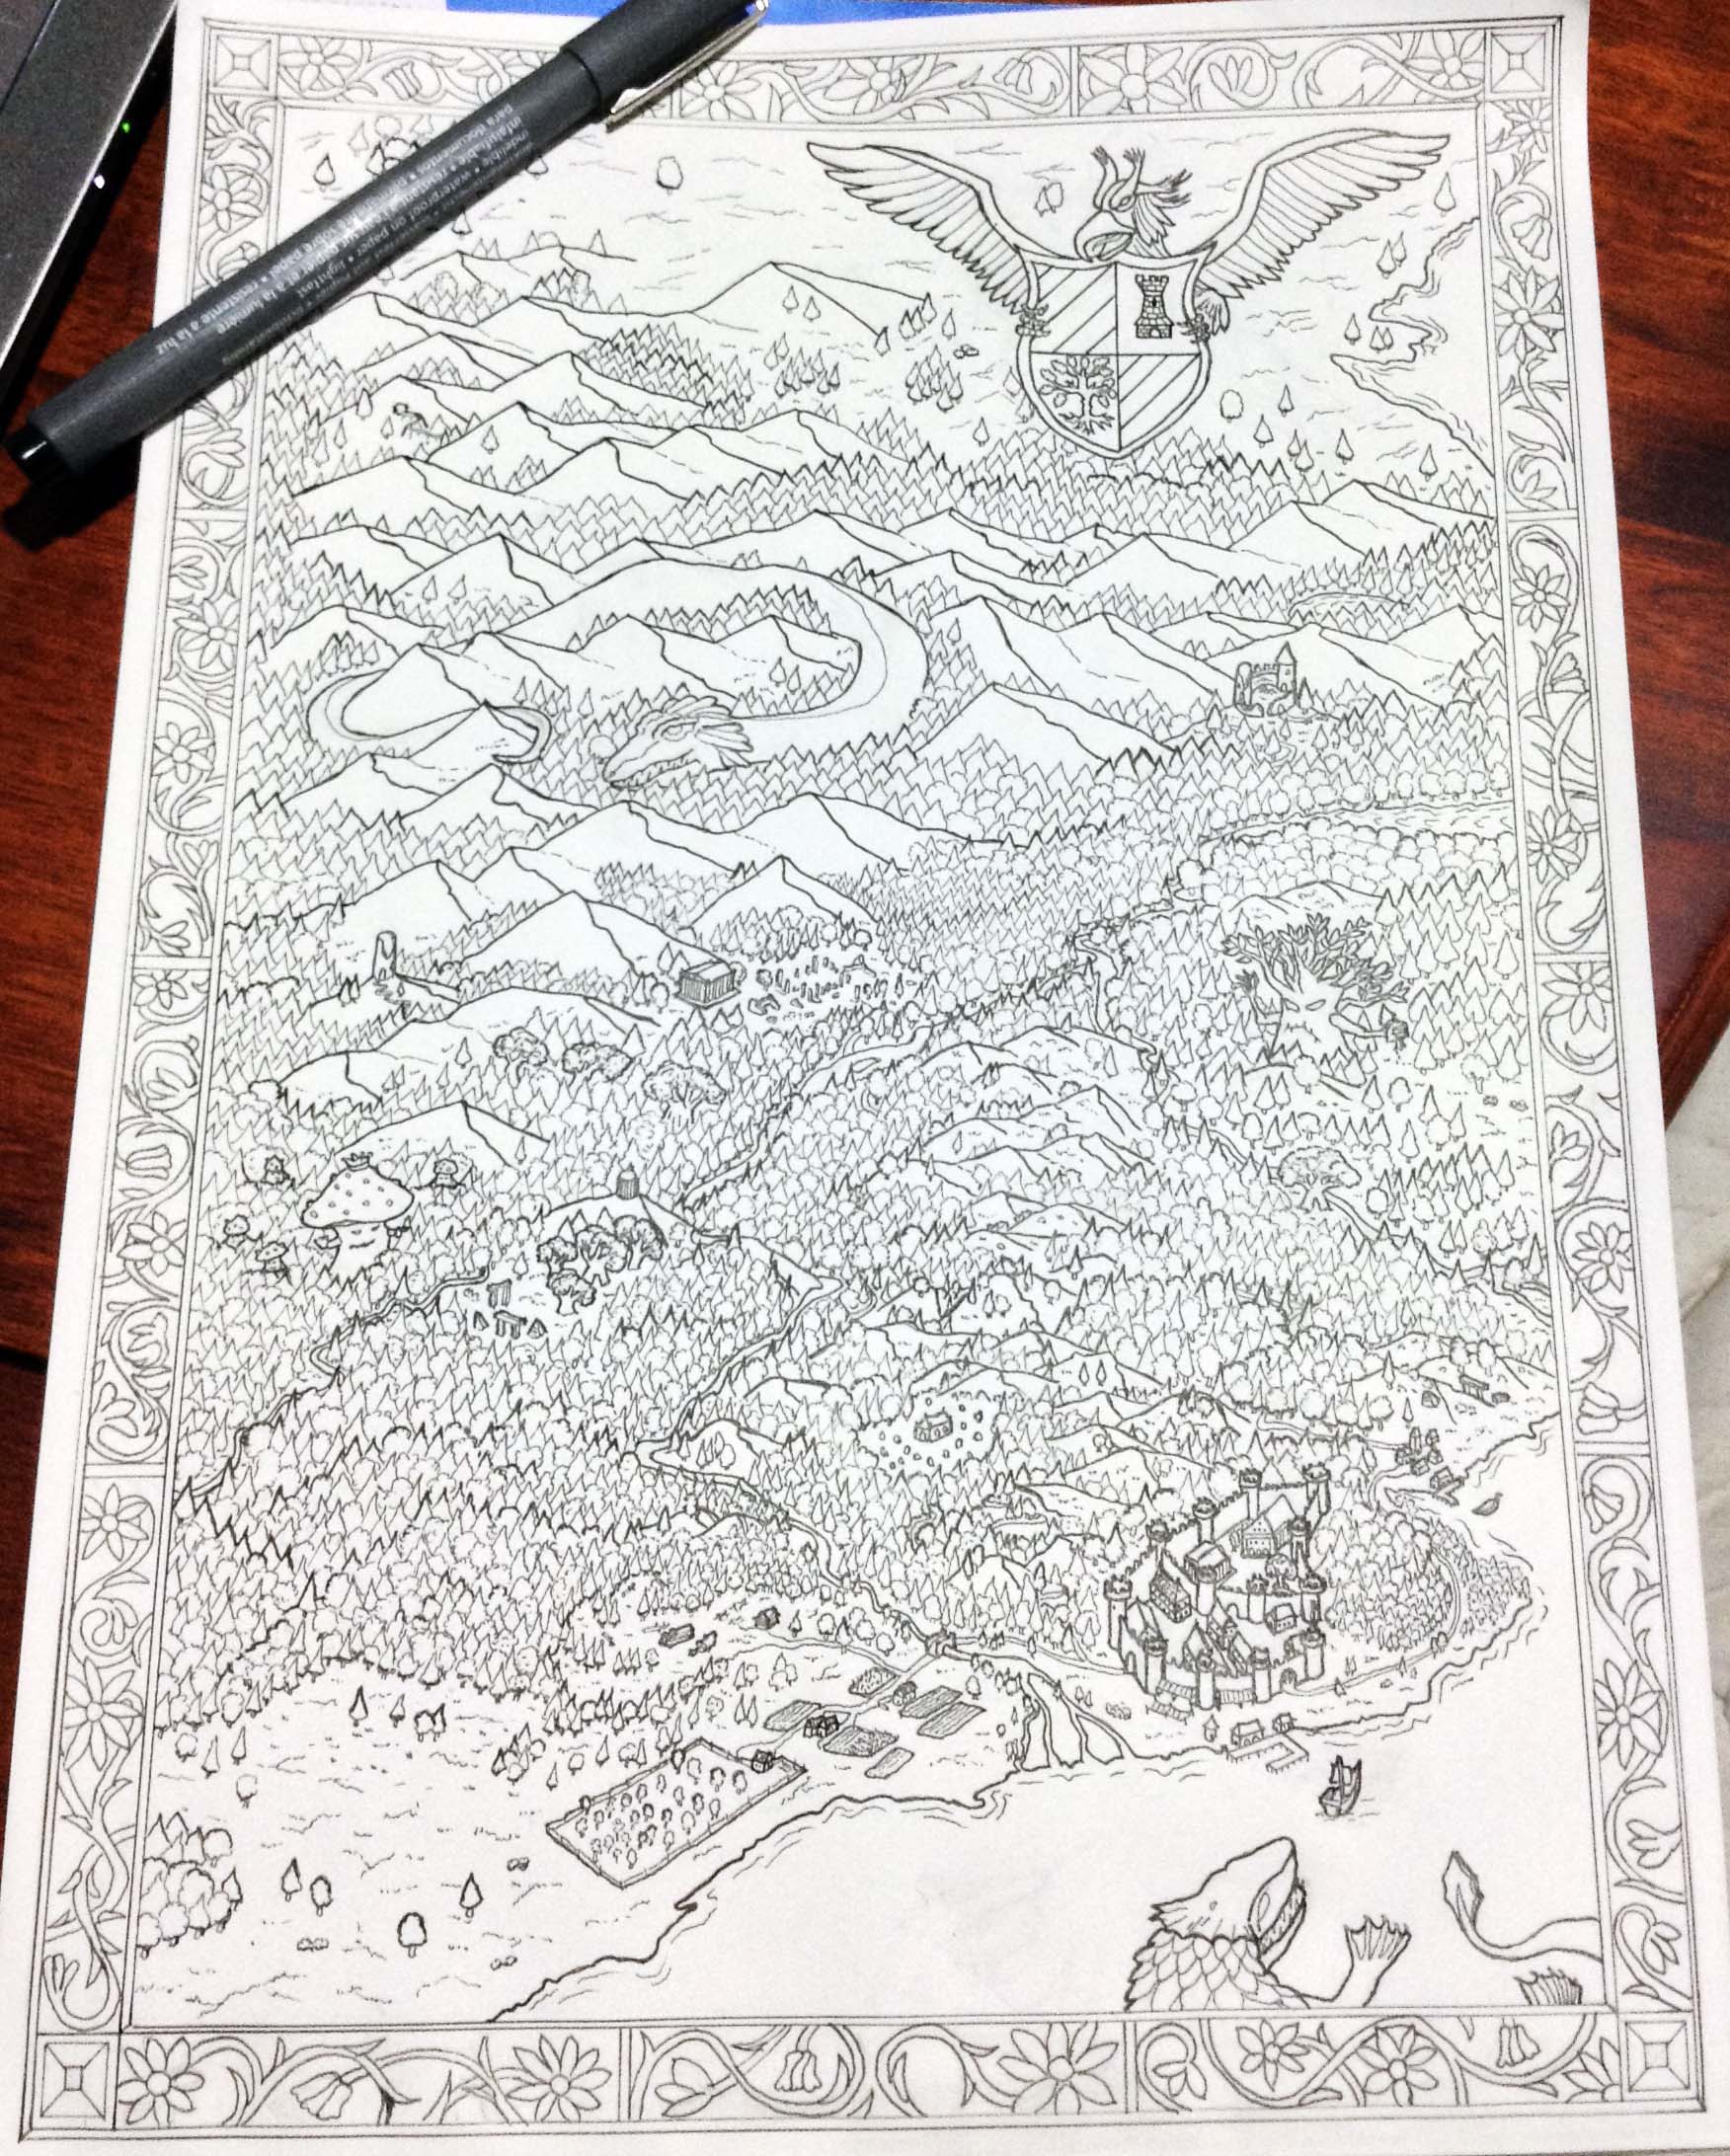
Scanner time!
When you are finished with inking remove any remaining sketch marks and scan your work at a high-resolution. Depending on the scanner it may have a line art setting that will output a PNG with transparent background, which will save you a step. If that does not work remove the white background in the photo editing program of your choice or vectorize the drawing.
To vectorize your drawing Illustrator offers a handy function: Live Trace. This basically traces your pixel-based artwork, turns it into paths and removes any white elements. This not only cleans up your art work but makes it scale-able. Have a look at this tutorial if you use Inkscape and this one for Illustrator.
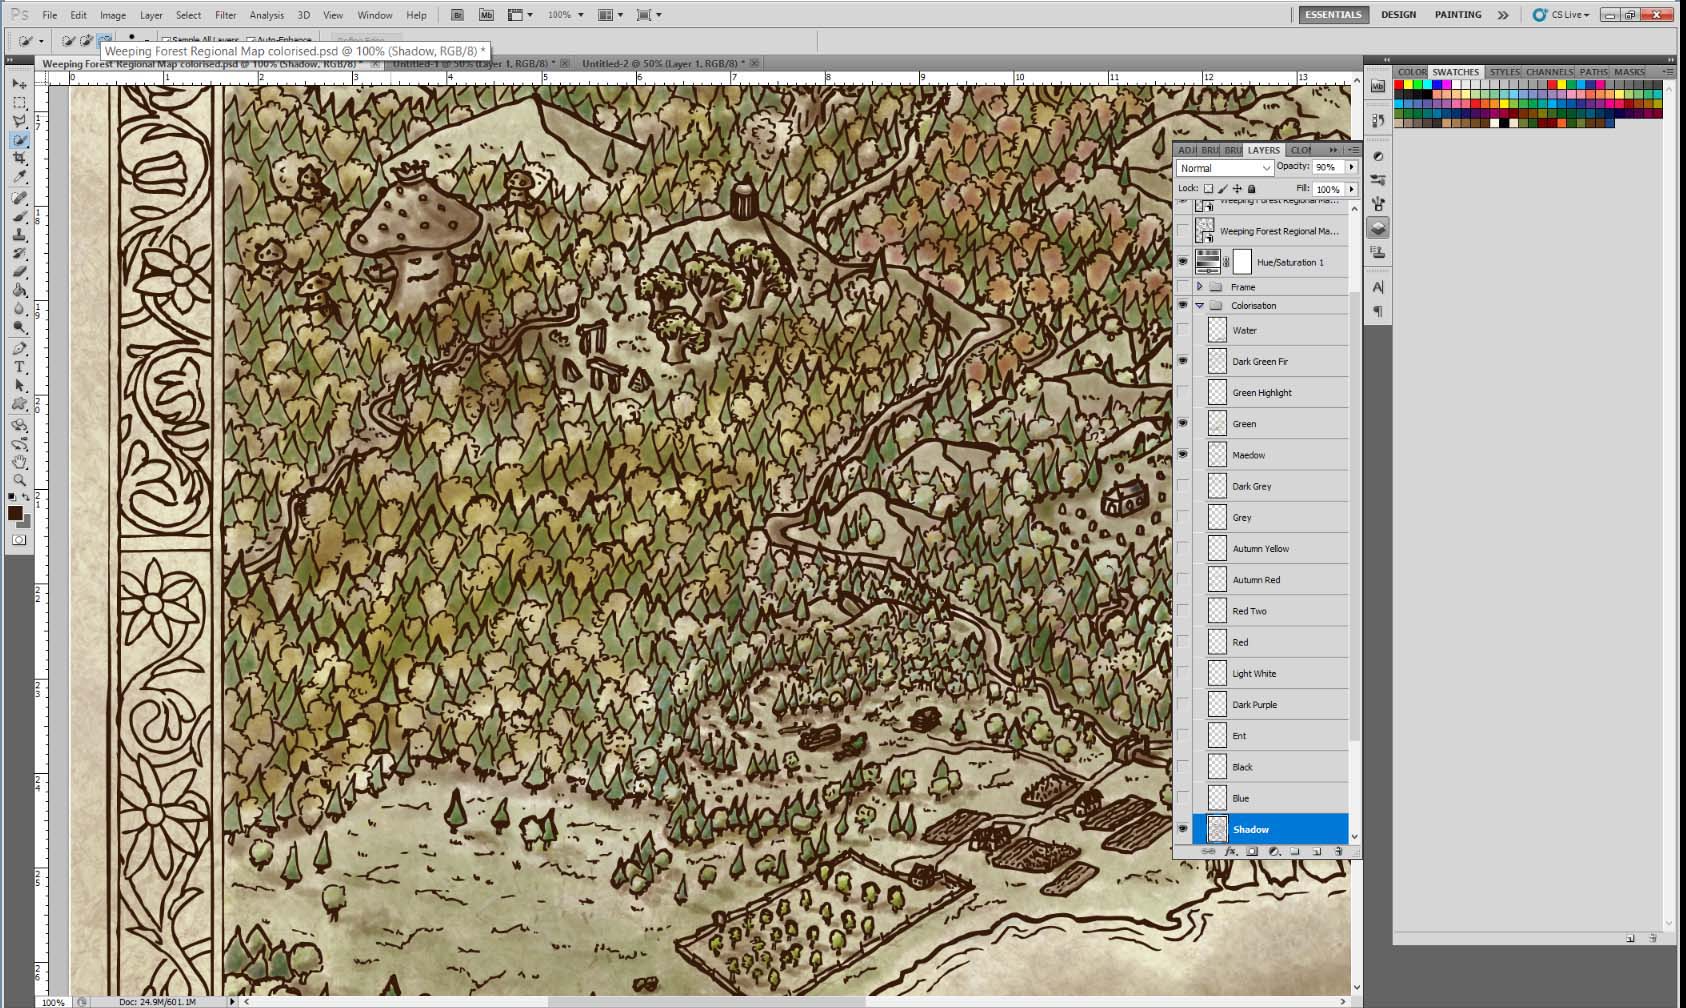
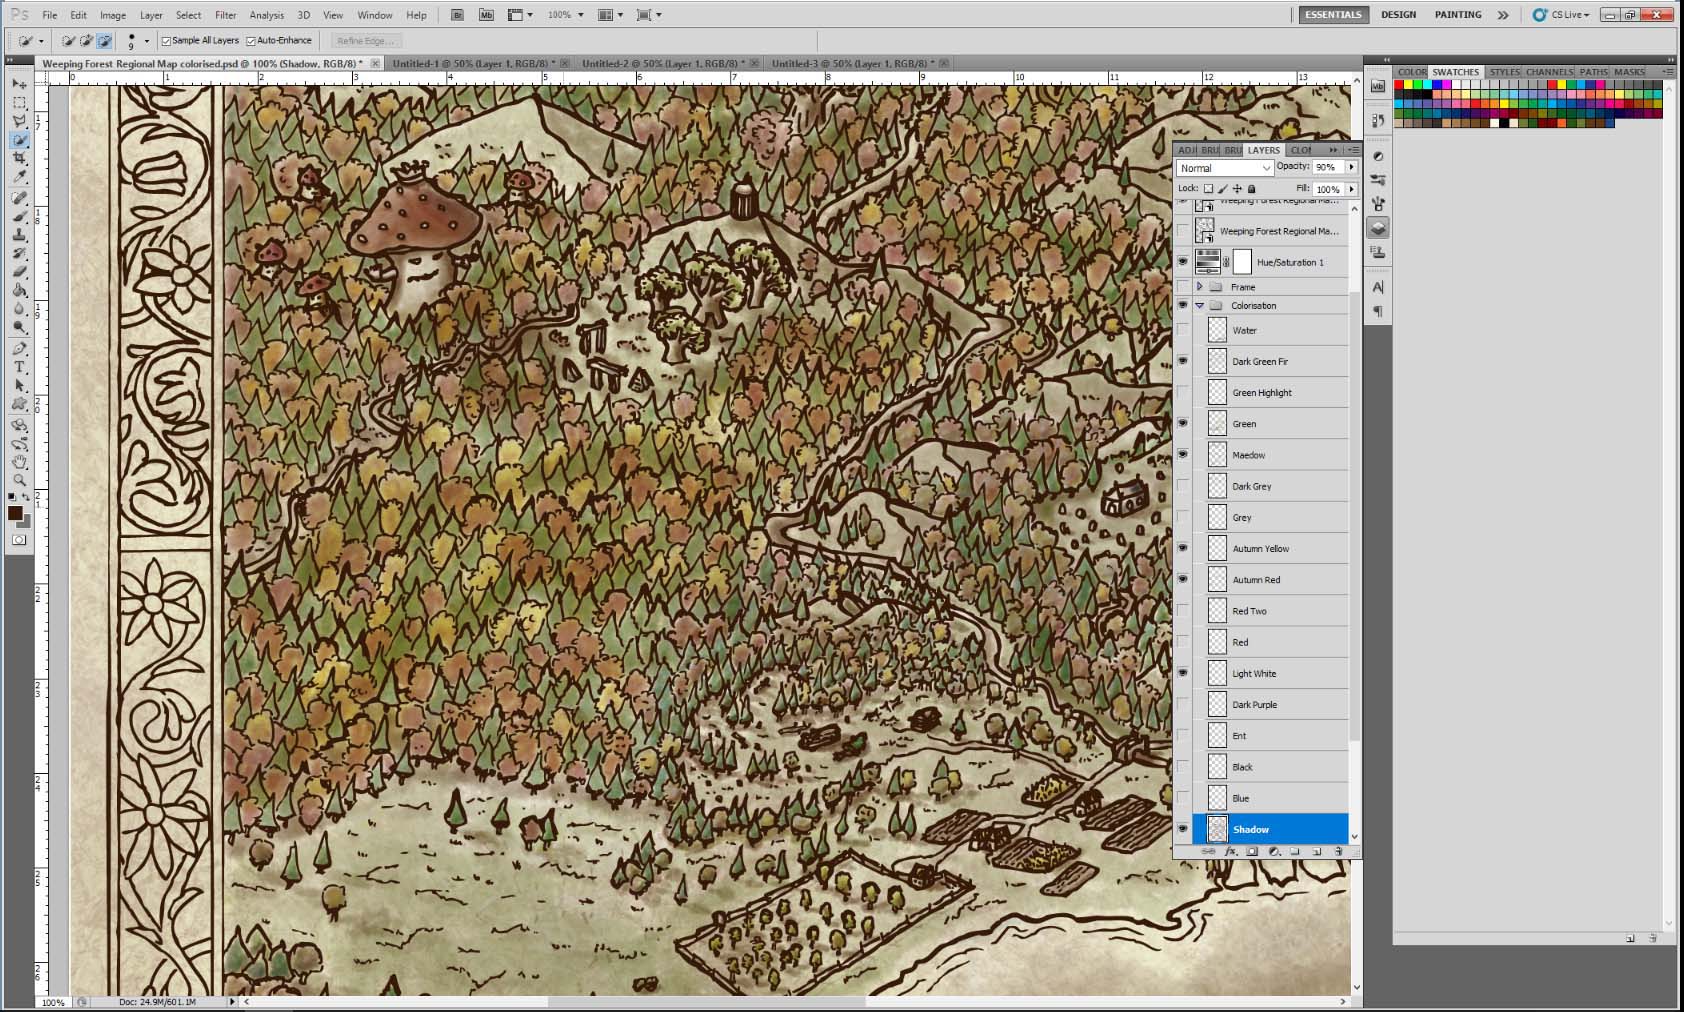
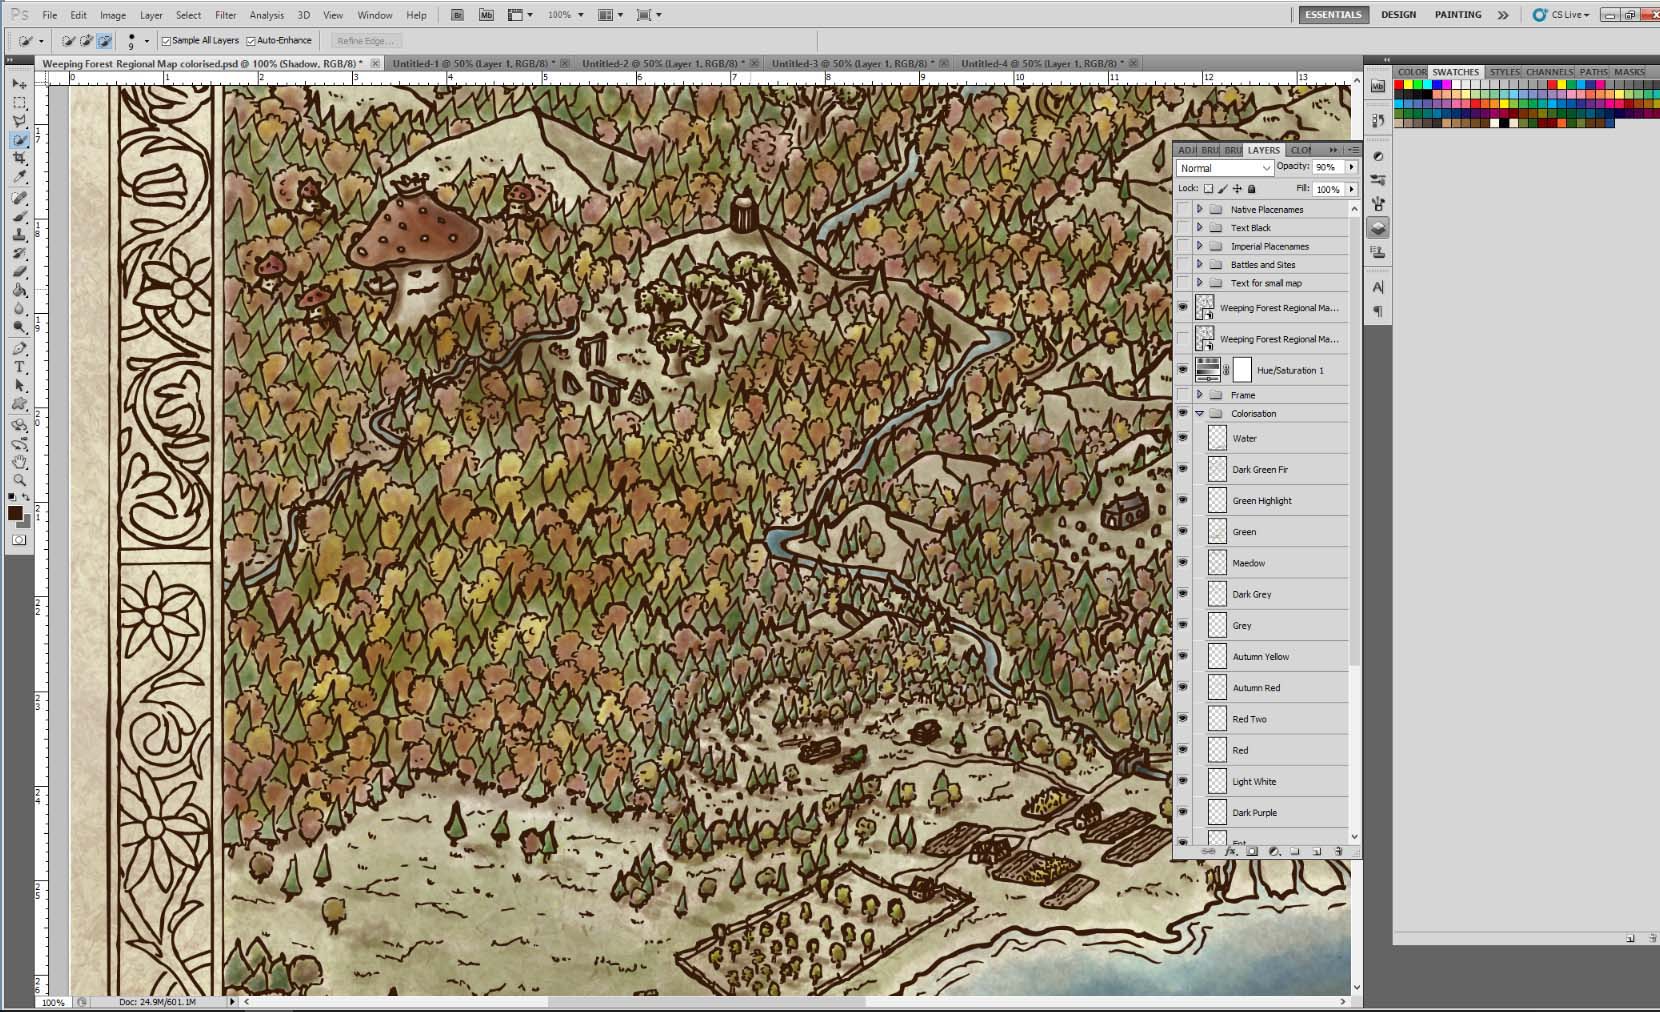
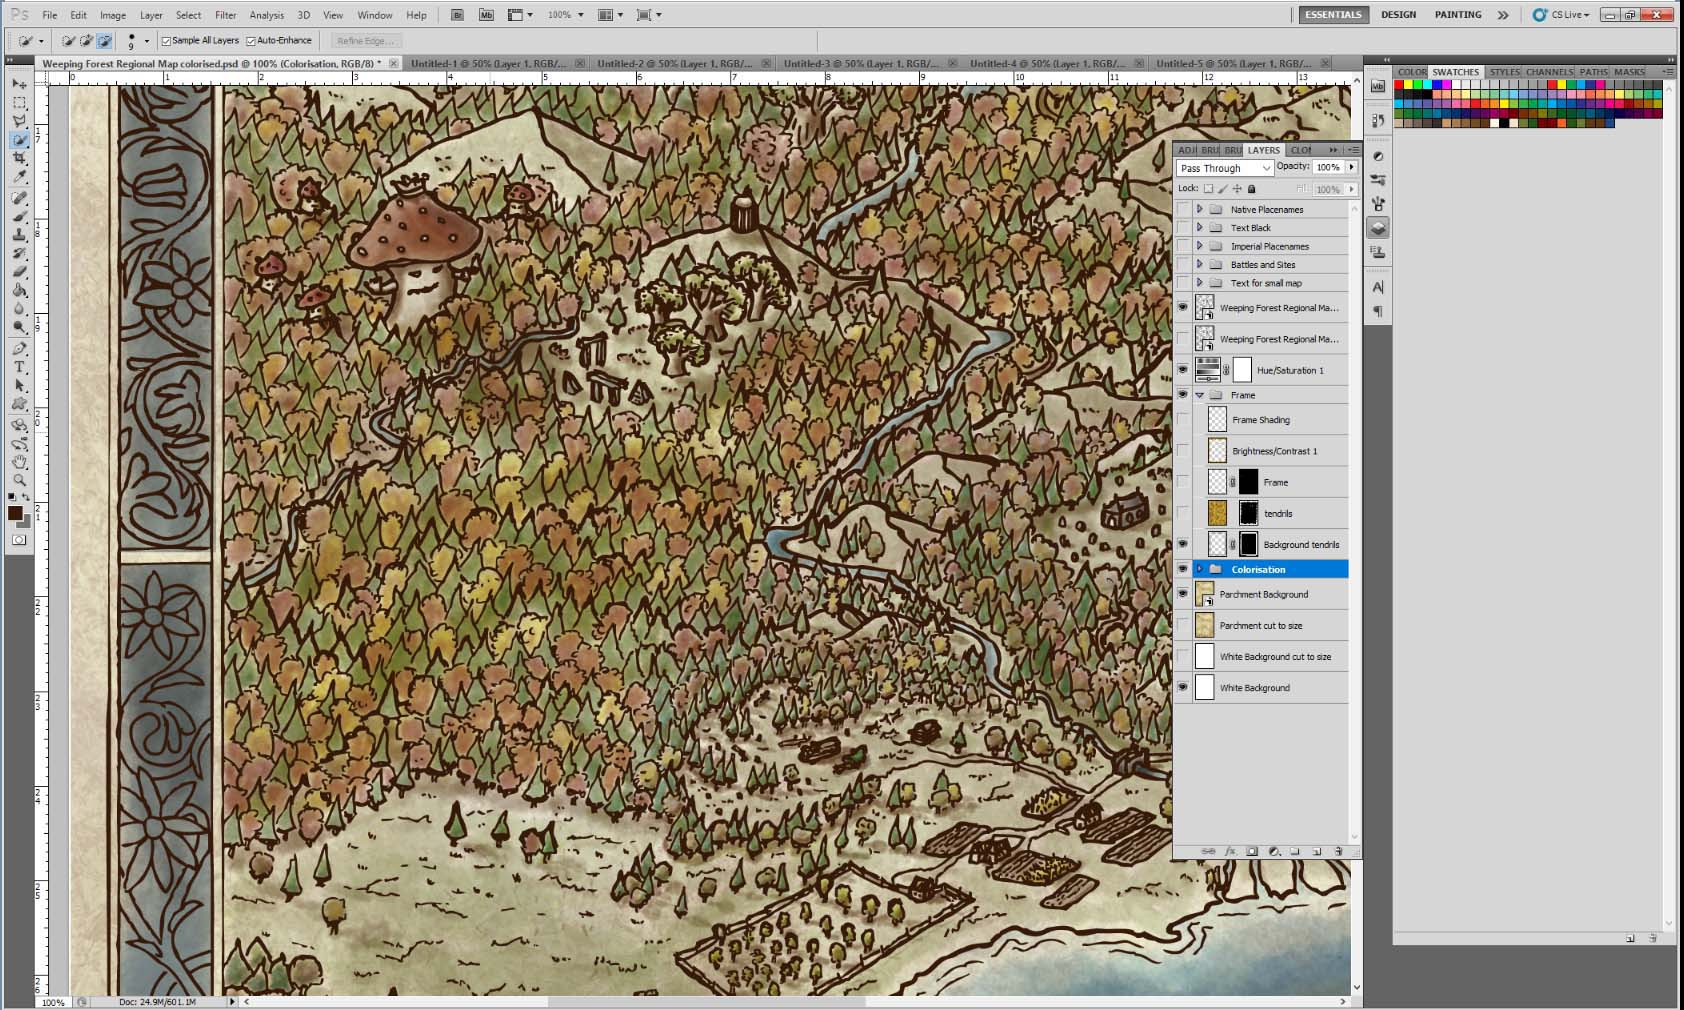
A dab of autumn – coloring the map
All that is now left to do is adding some colour to your map. Start with a white background and a parchment texture. The idea is now to first shade the map and then add different layers of transparent colors. I wanted to achieve a water-color effect. Naturally you can attempt to emulate other styles.
Create a new layer for each color in your editing program of choice. This way you can always tweak things and – not unlike miniature painting – add layers to change the hue and depth of an underlying layer.
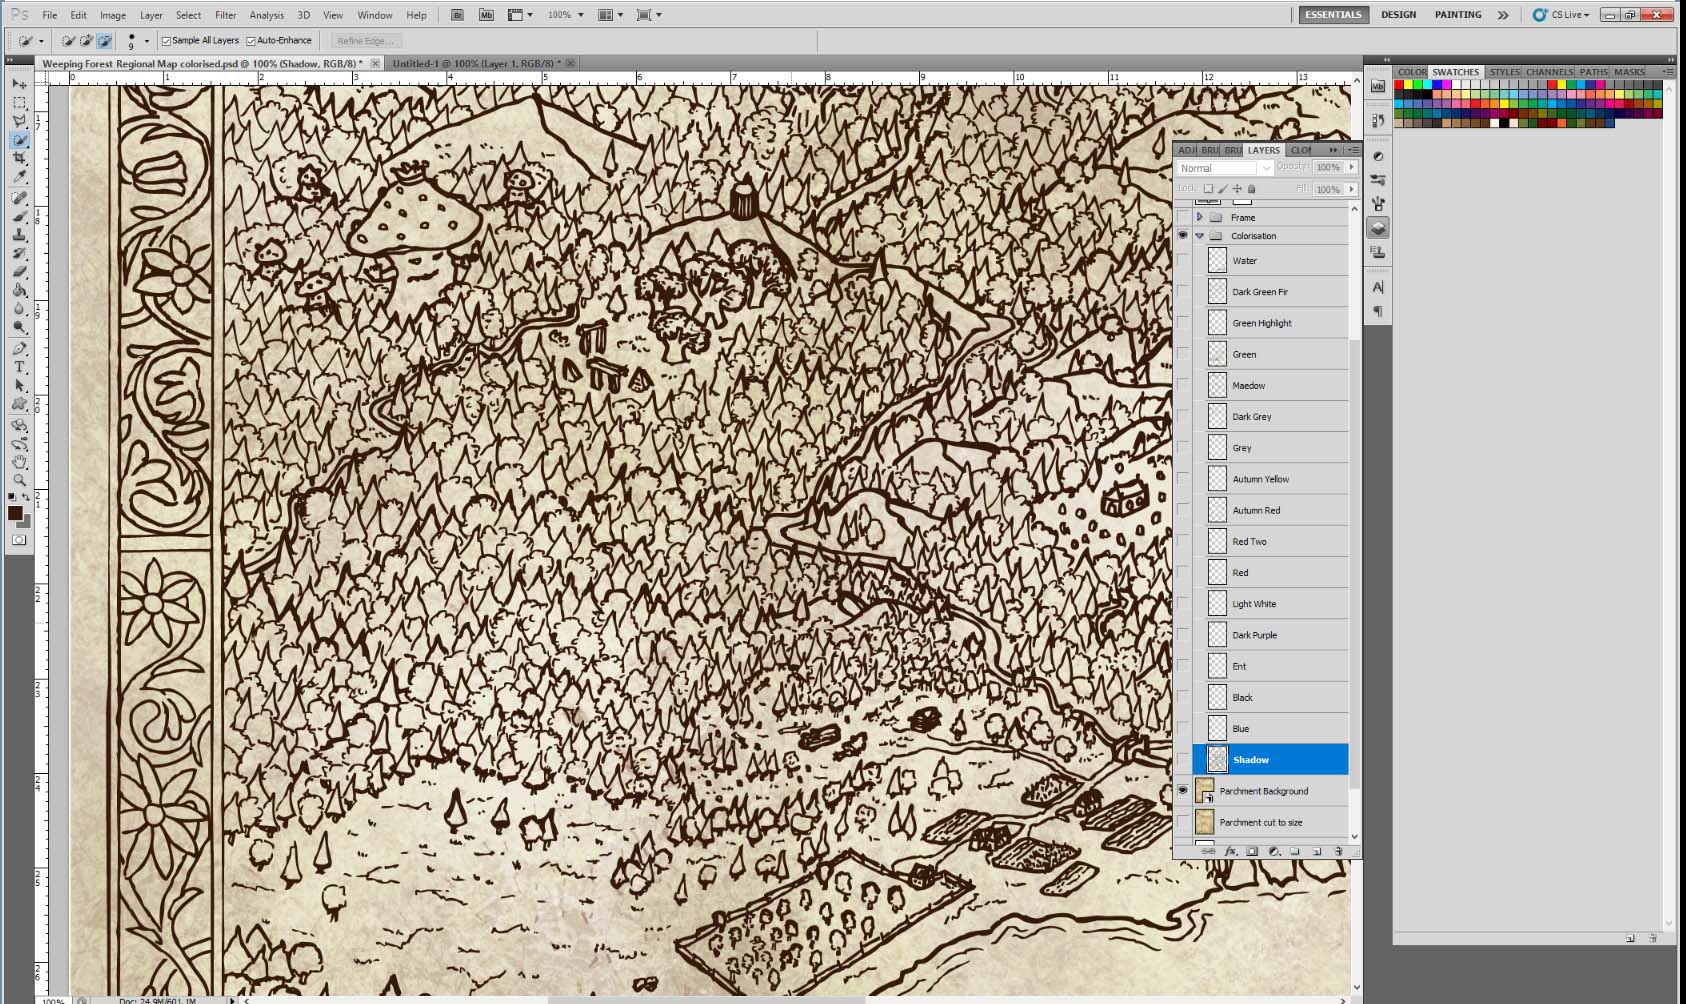
Pre-shading
We start with the shadows. I use a dark brown grunge brush with an opacity setting of about 20% and slowly make my way around the map. The layer mode can be “Normal”, “Overlay” or “Soft Light”, depending on your preference. You can increase opacity if needed. The goal is to achieve smooth transitions.
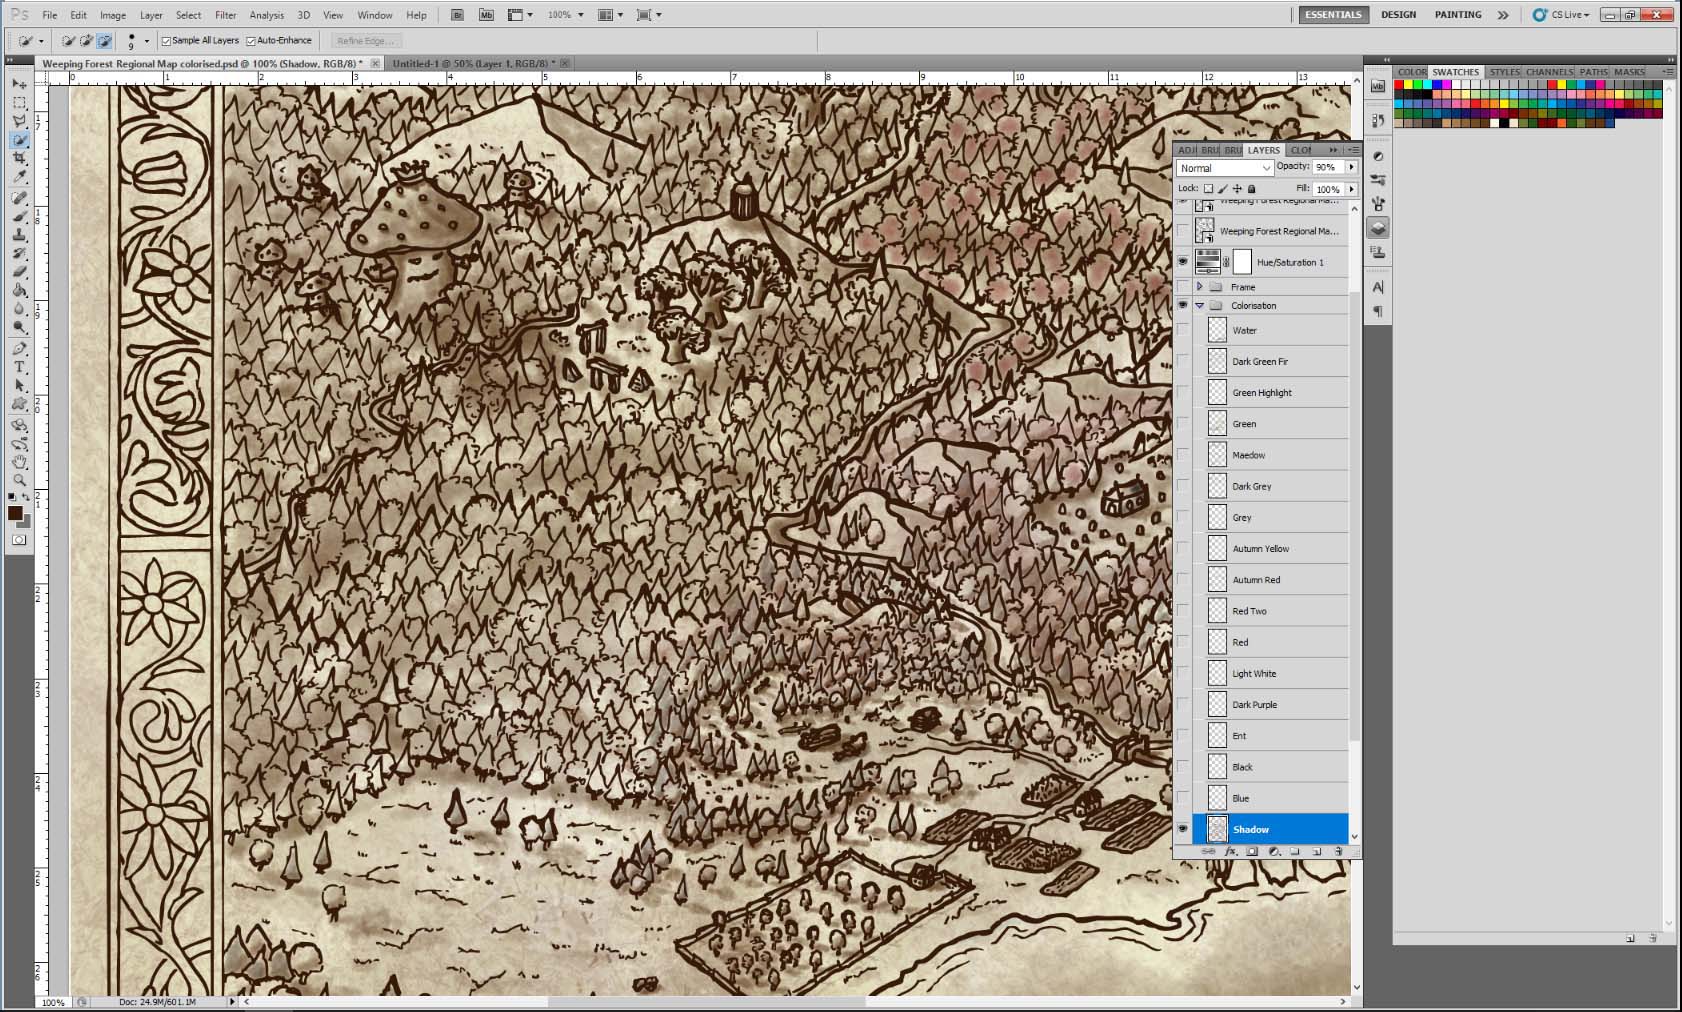
It begins with G for green
After the pre-shading is finished you add layer after layer of translucent colours. For instance the forest is first coloured green followed by autumnal colors such as yellow and red. I use 30-40% opacity, with the aim to achieve smooth transitions and to let the underlying colours come through. This way you can create a more complex texture. The same red is also used for the Mushroom king and his fellow fungi. His stem is coloured using an off-white. Using similar or the same colours on the beasts makes them part of their surroundings and thus integrates them into the map.
Let’s get wet
The same idea is used on all remaining features, such as water, buildings, fields and so on. You can use slightly modified shades for other details to keep the coloration cohesive. I also had success using the color dynamics setting to add further variations to the forest or the mountain range.
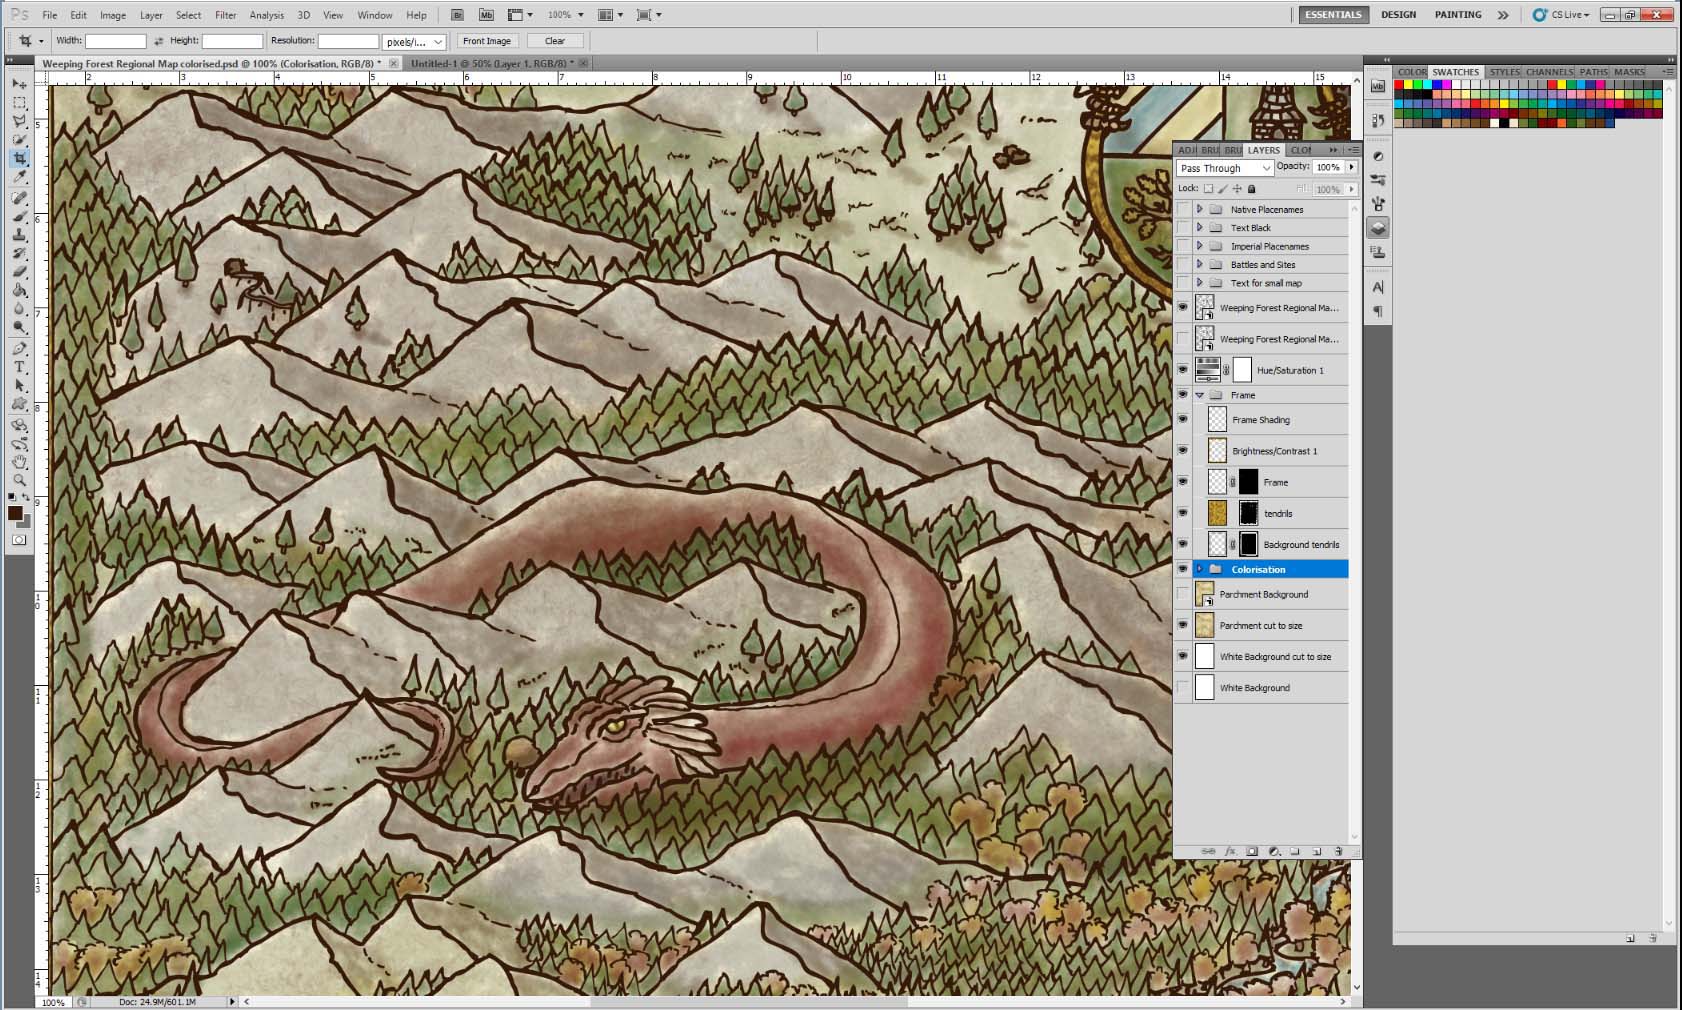
Colour for the beasties
The sea serpent and dragon are not different to the other elements. Try to imagine where the light comes from and shade the body of the serpent with a dark brown accordingly. Now add additional layers of turquoise and light blue. The dragon is actually more of a Wyrm (or a Tatzelwurm in German). It has no wings and a smooth, snake-like skin. Adding color and an iris to the eye is another nice touch that will bring the beast to life. The beast also casts a faint shadow on the trees which further integrates it into the map.

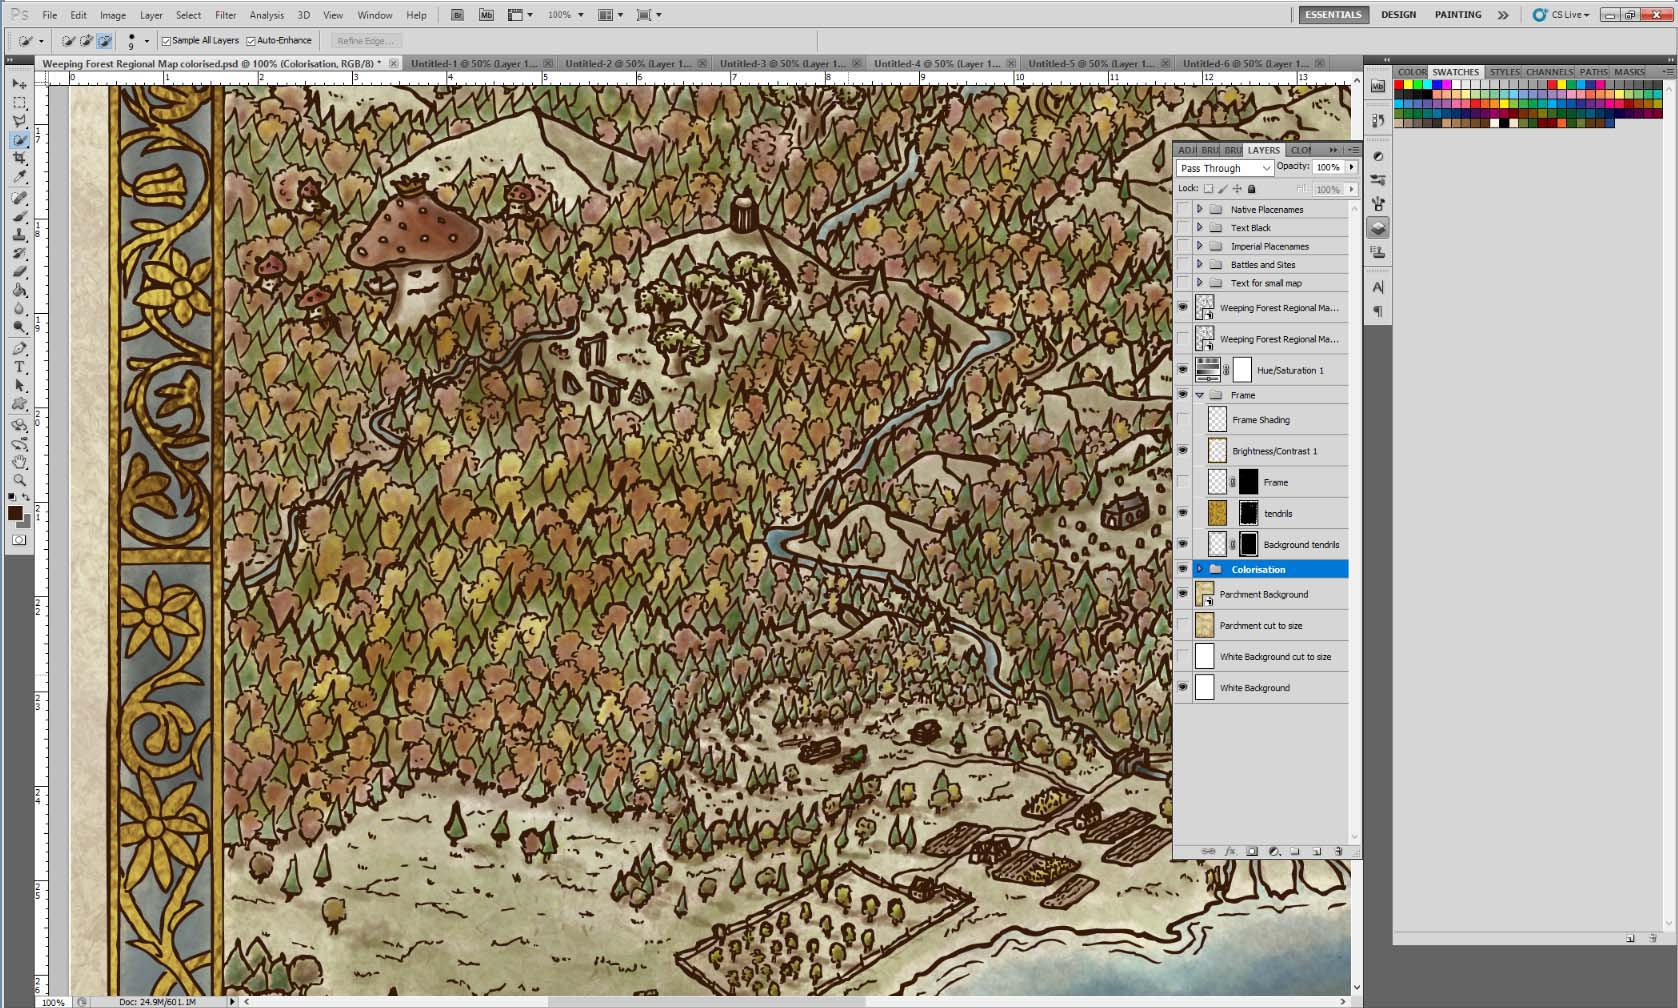
Framing your drawing
The frame can be colored using the same techniques outlined above. If you would like to add a gold leaf effect as I did, a slightly different approach is necessary. First off choose a background color for the gilded parts and block it in. I went for a dark blue. I did not aim for an opaque coat. Much rather I wanted the background to be patchy with some of the parchment texture coming through.
Now it gets a bit more complicated. To achieve the gold leaf effect you first need to create a gold texture. I found this very helpful tutorial that will show you how to create such a texture and also how to make a gilded text. We can use the same idea for the floral design of the frame.
You basically need to cut out the floral design so that it shows the gold leaf effect, but not the other parts of the map. This can be achieved using a layer mask and carefully removing the areas were you want the effect to show. This is time intensive. You can speed it up if you draw the frame border and the design inside the borders on separate layers. If you draw the map by hand this is obviously difficult to achieve and you need to use the quick selection tool. You can further refine the frame adding a shadow layer to emphasise the reflective qualities of the gold leaf.
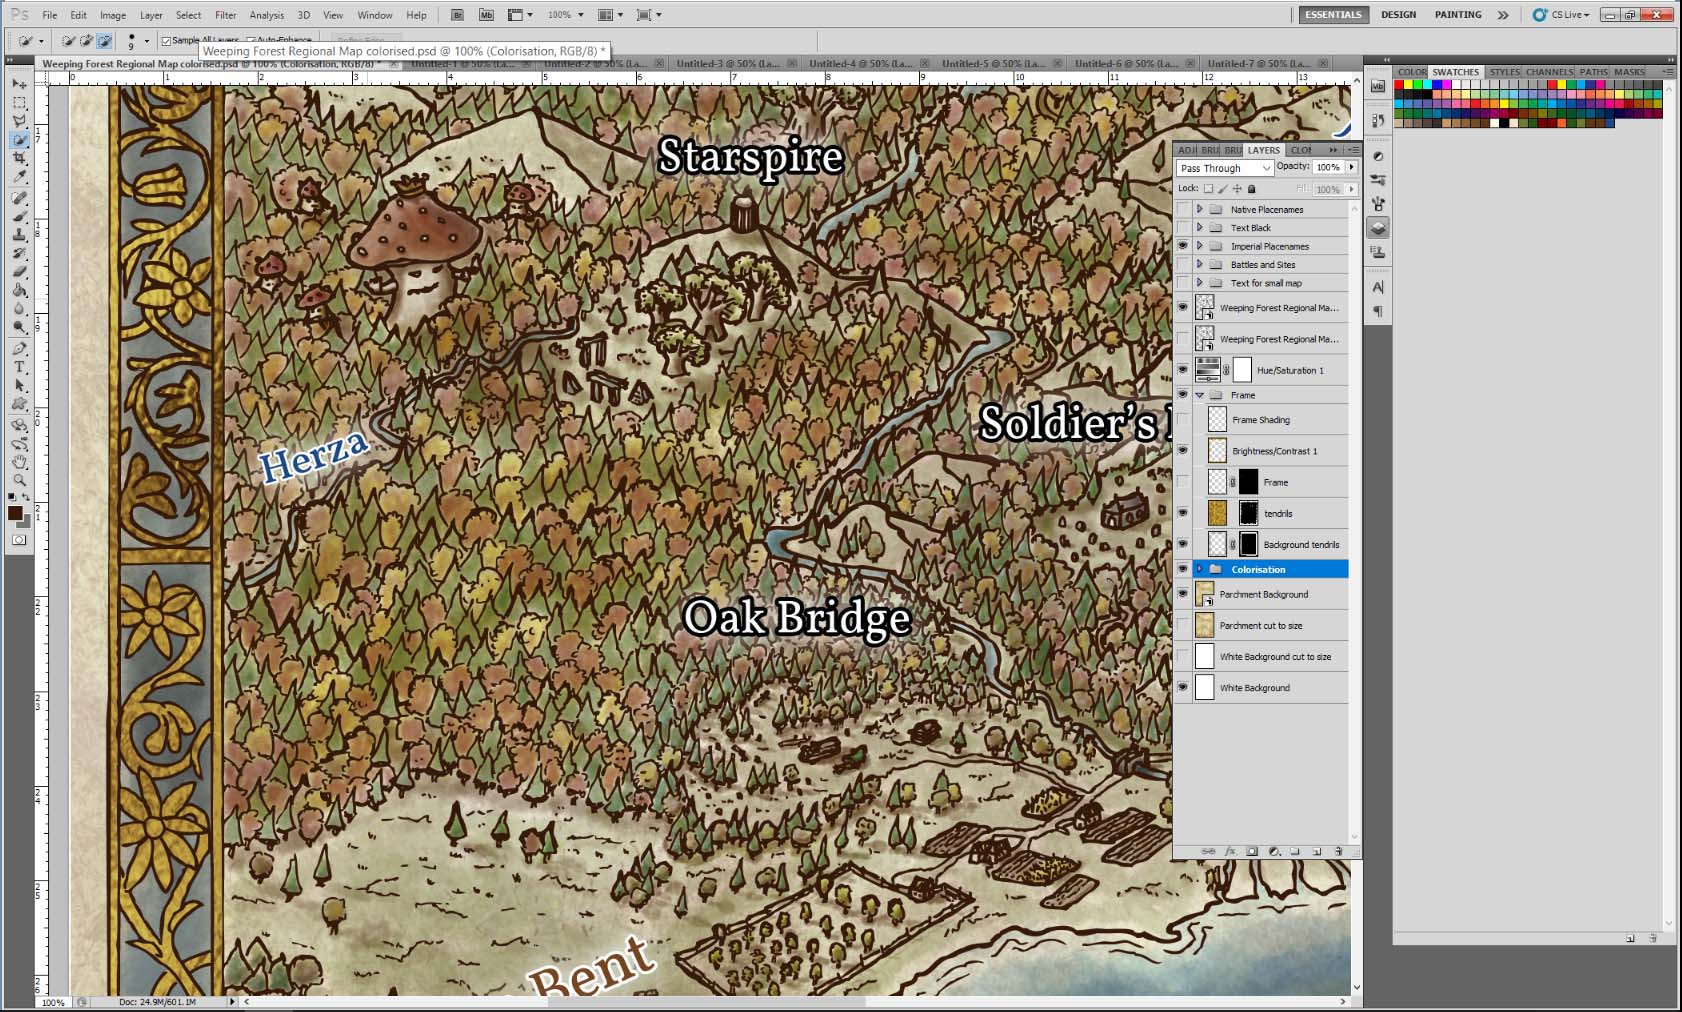
Adding labels
All that is now left are the labels. White text with a black outline and a very faint glow in the background works very well for location names, while I chose a brown with white outline for area names. About the place names: The native peoples’ language is inspired by Old High German, and thus rivers kept their native name. English is the common language among the colonists and thus other sites are renamed by them. That way the placenames reflect the history of the region.
The finished map
And there we have it: a nice map that can be used for a roleplaying or wargaming campaign or just as a stand alone piece to put on the wall of the man cave or femme den.

I hope you enjoyed this short tutorial and give it a try yourself. If you have any questions, remarks or suggestions comment below. Map-maker or not, always wield your brush with honour!
Great class and an awesome result on the map and dragon.
A belated thank you! Glad you enjoyed learning about the beasties.
Beautiful work. That’s one evocative map!
Thank you Arkie. The idea was indeed to evoke a certain atmosphere and feeling for the setting without the need for text or labels.
Wow amazing!
Thank you for your comment! Pleased to read that the map is to your liking!
As usual, your work is so impressive. Love the map and the post tutorial. Thanks!
Thank you Mark! I am glad you like the map and the tutorial is of use!
What a stunning map, it´s an really impressive job you have done here!
Thank you Utgaard, much obliged. Took a while to complete it, but it was a fun project. I hope to add more maps depicting east, north and west of the continent, so that they can be combined to a much larger map in the end.
Great tutorial! It was easy to follow and read. 👍🏻
Thank you Thomas for your comment. Glad the tutorials was an easy and clear read!